7.2.Request Broker Session Parameters
The Request Broker is responsible for setting up the profile of one of more OpenLink Data Access sessions, this includes a Transport Protocol selection, Keep Alive Packets notifications, Network Message Buffer Sizes. Initialization retry intervals, Agent initialization timeouts, and much more. Rather than have you manually set this options via the OpenLink Rule Book, it is now possible for you to configure this options via your Web Browser of choice using the Admin Assitant
The Admin assistant allows you to configure Request Broker session parameters in two ways, via a series of Wizard Interactions or via an HTML form, the sections that follow illustrate both approaches.
7.2.1.General Information
You obtain additional information using the Admin Assistant, expand the "Server Components Administration" menu item, then "General Request Broker Information", you are offered:
-
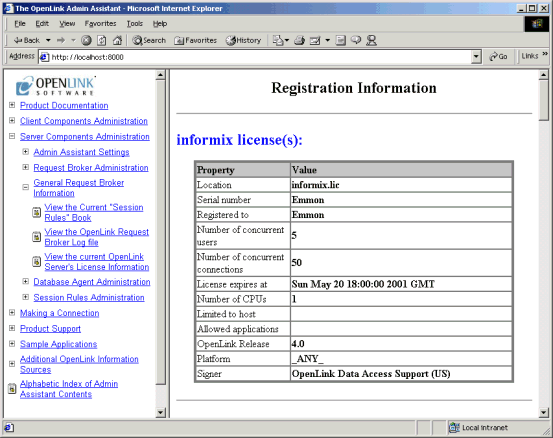
Register File Information - enables you to determine the license(s) that you have in place.
-
Session Rules Book - the current set of rules for your OpenLink Data Access sessions.
-
Request Broker Log File Information - displays the contents of your Request Broker log file.
Here is an example of the License Information page:
Figure7.1.Admin Assistant Wizard - License Information
7.2.2.Using Admin Assistant Wizards
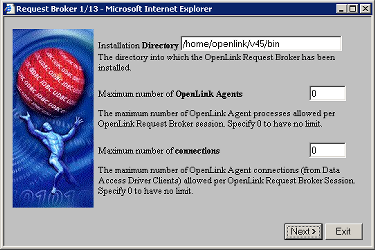
-
Specify the location of your Request Broker and its dependent components. Also set restrictions on number of Agents, and number of connections.
Click the "Next" button.
Figure7.2.Admin Assistant Wizard
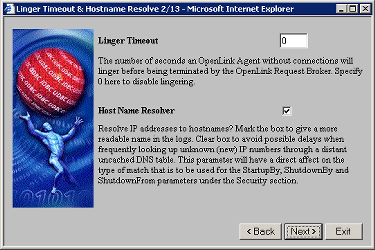
-
Linger Timeout: The number of seconds an OpenLink Agent without connections will linger before being terminated by the OpenLink Request Broker, Specify 0 here to disable lingering. Lingering is a feature for avoiding repetative load/unload overhead of agents that are frequently used for short, quick concurrent open/close connections.
This setting is global to all agents. For specific agent settings, use the LingerTimeout= value in the agent environment section.
Set Resolving of IP addresses to hostnames. The logging will show the hostname instead of the IP number if this option is selected. Switch off hostname lookup to avoid possible delays when frequently looking up unknown (new) IP numbers through a distant uncached DNS table. This parameter will have a direct affect on the type of match that is to be used for the StartupBy, ShutdownBy and ShutdownFrom parameters under the Security section.
Click the "Next" button.
Figure7.3.Admin Assistant Wizard
-
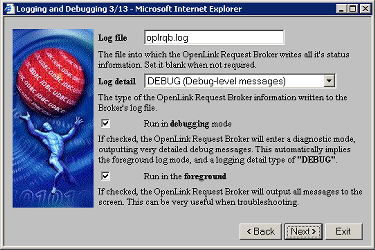
To help with troubleshooting, turn on session logging and extra information. Or run the broker in foreground mode to view the trace. Then click on the "Next" button.
Figure7.4.Admin Assistant
-
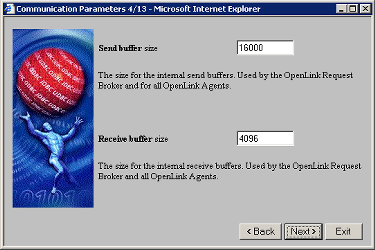
Enter buffer size values for the inbound and outbound network messages for each OpenLink Agent (it is advisable to take the default values presented). Then click the "Next" button.
Figure7.5.Admin Assistant
-
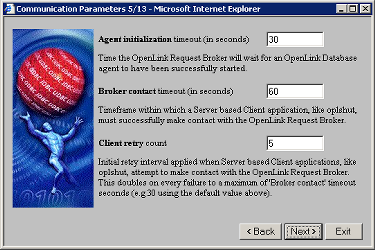
Enter values for "Database Agent" session initialization, "Broker Contact", and initialization failure retry counts by entering values into the respective fields as depicted below (it is advisable take the defaults). Then click on the next button.
Figure7.6.Admin Assistant
-
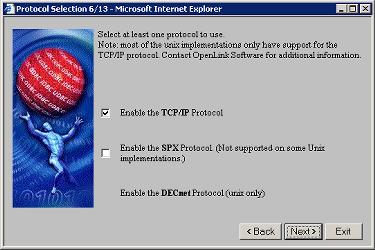
Check the related boxes presented in order to select the Network Transport Protocol to be used by your Request Broker and Database Agents when communicating with your OpenLink Data Access Clients. Then click on the next button.
Figure7.7.Admin Assistant
-
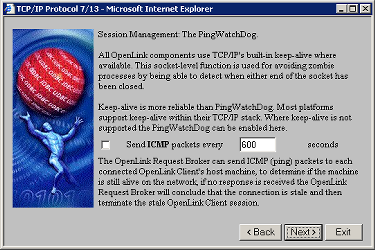
You can choose to enable the OpenLink Ping Watchdog. All OpenLink components automatically use the keep-alive feature built in to most current implementations of TCP/IP stack. If keep-alive is not available the Ping WatchDog can be enabled in attempt to compensate for this. Click the "Next" button to continue.
Figure7.8.Admin Assistant
-
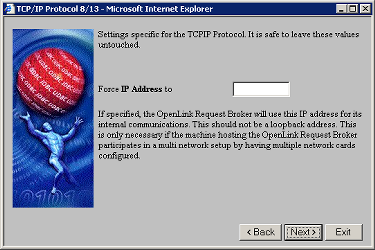
If you have more than one Network Interface Card (NIC) installed on your OpenLink Server machine, then you can enter a value in the "Force IP Address" field that represents the IP address that you want the Request Broker to listen at.
Figure7.9.Admin Assistant
-
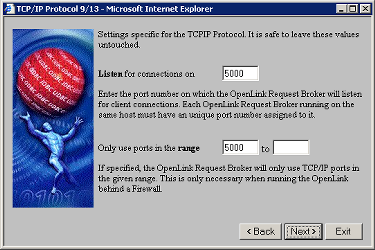
Enter the port number on which the OpenLink Request Broker will listen for client connections. Each OpenLink Request Broker running on the same host must have a unique port number assigned to it.
You can also designate port number ranges to be used by the Broker to advertise other OpenLink services (e.g JDBC Agent used by OpenLink Drivers for JDBC). Once completed, click the "Next" button to continue.
Figure7.10.Admin Assistant
-
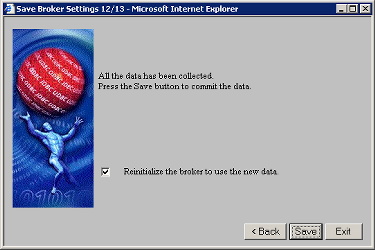
Click on the "Save" button to save your changes permanently.
Figure7.11.Admin Assistant
-
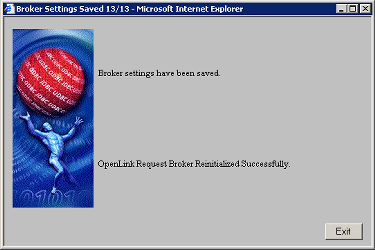
Click the "Exit" button to leave the Broker Settings Wizard.
Figure7.12.Admin Assistant
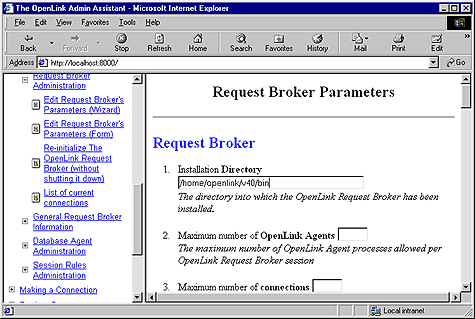
7.2.3.Using Admin Assistant Forms
You can also choose to configure your Request Broker's session settings via a Forms as opposed to Wizard based interface. You select this option from the Admin Assistant and you will be presented with a screen similar to the snapshot below.
Each Broker session settings field contains a description of the values that need to be entered into each of the forms fields. In addition a brief description of the use of each of these values is provided below each field.
Figure7.13.Admin Assistant