2.13.2. Creating the Application
Step 1 - Add A New Domain Service Class
The EmployeeService Domain Service Class was only used to display data so was created read only. In this example we need to be able to update the data so we need to remove the read only Domain Service Class and create a new on.
-
In the
Server Explorer
right click EmployeeService and select
Delete
-
Right click the server project and
Add New Item
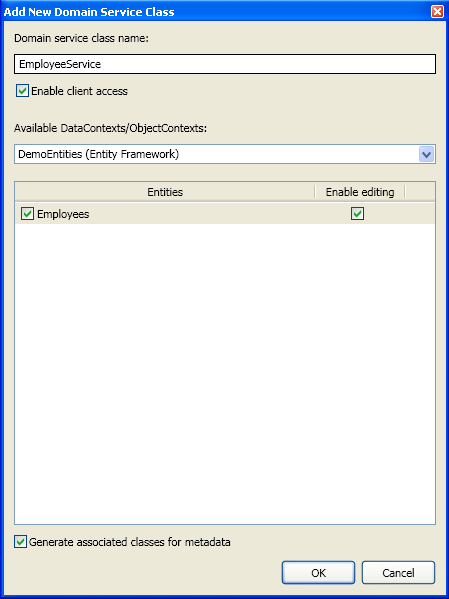
. In the dialog box choose Domain Service Class from the Templates pane and again call it EmployeeService.cs. Click Add.
-
Select the Employees entity and tick
Enable editing
. Also tick
Generated associated classes for metadata
.
Figure 2.181. .NET RIA Services Application
-
Update MainPage.xaml.cs to use EmployeeService2 the new domain service rather than EmployeeContext.
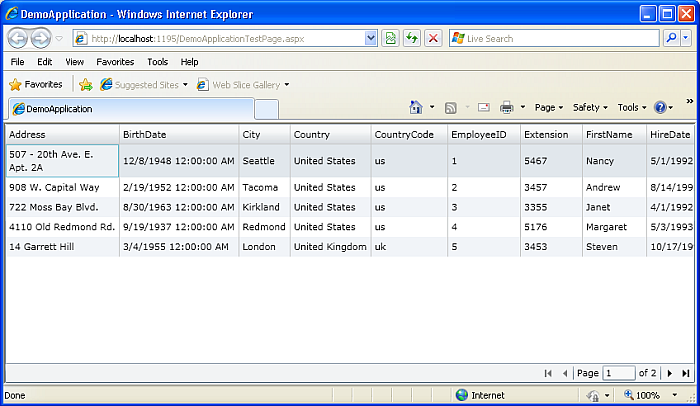
We want to create a master detail style page. To do this we will use the DomainDataSourceComponent from the Silverlight Components. But first we will add a pager so only 5 records are displayed at a time.
Step 2 - Add a DataPager
-
Add two new namespaces to MainPage.xaml
xmlns:riaControls="clr-namespace:System.Windows.Controls;assembly=System.Windows.Ria.Controls"
xmlns:ds="clr-namespace:DemoApplication.Web"
-
Use a DomainDataSource to provide the data to fill the grid. Add the following to MainPage.xaml before the DataGrid.
<riaControls:DomainDataSource x:Name="EmployeeDataSource" QueryName="GetEmployeesQuery" LoadSize="10" AutoLoad="True"> <riaControls:DomainDataSource.DomainContext> <ds:EmployeeService2/> </riaControls:DomainDataSource.DomainContext> </riaControls:DomainDataSource> -
Update the MainPage.xaml.cs code behind file. Using the DomainDataSource means you no longer need to instantiate the context and load the grid in MainPage.xaml.cs so it becomes:
public partial class MainPage : UserControl { public MainPage() { InitializeComponent(); } } -
Set the binding source of the DataGrid to the DomainDataSource
<data:DataGrid MinHeight="100" IsReadOnly="True" ItemsSource="{Binding Data, ElementName=EmployeeDataSource}" x:Name="DataGrid1"></data:DataGrid> /> -
Drag a DataPager form the tool box onto MainPage.xaml just after the DataGrid.
-
Add a page size and binding element to the DataPager.
<data:DataPager PageSize="5" Source="{Binding Data, ElementName=employeeDataSource}" Margin="0,-1,0,0"></data:DataPager> -
Build and run the application. The data should be displayed 5 rows at a time.
Figure 2.182. .NET RIA Services Application
We now need to add a DataForm to display the details.
Step 3 - Add a DataForm
-
Add the following namespace to MainPage.xaml
xmlns:dataForm="clr-namespace:System.Windows.Controls;assembly=System.Windows.Controls.Data.DataForm.Toolkit"
-
Add the form to MainPage.xaml
<dataForm:DataForm x:Name="dataForm1" Header="Employee Information" AutoGenerateFields="False" AutoEdit="False" AutoCommit="False" CurrentItem="{Binding SelectedItem, ElementName=DataGrid1}" Margin="0,12,0,0"> <dataForm:DataForm.EditTemplate> <DataTemplate> <StackPanel> <dataForm:DataField Label="Employee ID"> <TextBox Text="{Binding EmployeeID, Mode=TwoWay}" /> </dataForm:DataField> <dataForm:DataField Label="First Name"> <TextBox Text="{Binding FirstName, Mode=TwoWay}" /> </dataForm:DataField> <dataForm:DataField Label="Last Name"> <TextBox Text="{Binding LastName, Mode=TwoWay}" /> </dataForm:DataField> <dataForm:DataField Label="Courtesy Title"> <TextBox Text="{Binding TitleOfCourtesy, Mode=TwoWay}" /> </dataForm:DataField> <dataForm:DataField Label="Hire Date"> <TextBox Text="{Binding HireDate, Mode=TwoWay}" /> </dataForm:DataField> <dataForm:DataField Label="Title"> <TextBox Text="{Binding Title, Mode=TwoWay}" /> </dataForm:DataField> <dataForm:DataField Label="Reports To"> <TextBox Text="{Binding ReportsTo, Mode=TwoWay}" /> </dataForm:DataField> <dataForm:DataField Label="Region"> <TextBox Text="{Binding Region, Mode=TwoWay}" /> </dataForm:DataField> <dataForm:DataField Label="Address"> <TextBox Text="{Binding Address, Mode=TwoWay}" /> </dataForm:DataField> <dataForm:DataField Label="City"> <TextBox Text="{Binding City, Mode=TwoWay}" /> </dataForm:DataField> <dataForm:DataField Label="Country Code"> <TextBox Text="{Binding CountryCode, Mode=TwoWay}" /> </dataForm:DataField> <dataForm:DataField Label="Postal Code"> <TextBox Text="{Binding PostalCode, Mode=TwoWay}" /> </dataForm:DataField> </StackPanel> </DataTemplate> </dataForm:DataForm.EditTemplate> </dataForm:DataForm> -
Surround the DomainDataSource, DataGrid and DataForm with
<ScrollViewer BorderThickness="0" VerticalScrollBarVisibility="Auto" Padding="12,0,12,0" Margin="-2"> <StackPanel Margin="0,12,0,12" Orientation="Vertical" > . . . </StackPanel> </ScrollViewer> -
Build and run the application. As each employee is selected the data form fill with their details
Figure 2.183. .NET RIA Services Application
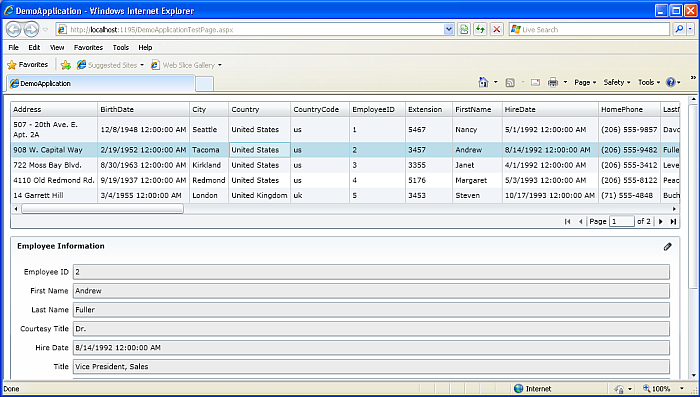
By clicking on the pencil symbol in the top right hand corner the data in the form can be edited but it is not propagated back to the database.