7.3.OpenLink Session Rules Administration & Configuration Guide
One of the most important features and benefits of your OpenLink Multi Data Access Drivers, is the ability to configure and control your entire OpenLink infrastructure from a central point using "OpenLink Session Rules". These session rules are stored and maintained in a text based repository called the "Session Rules Book" (the file "oplrqb.ini").
You administer these rules from your web browser using the OpenLink Admin Assistant. The rules that you create are enforced by the OpenLink Request Broker, giving you phenomenal control over your distributed computing infrastructure.
7.3.1.OpenLink Session Rules Concepts
Session rules are declarative in nature and template driven. You build a template that determines how one or more OpenLink Client components are going to interact with a particular instance of an OpenLink Server component (Database Agent or Service Provider Agent). Session rules also determine what OpenLink Server is instantiated and how it is to be instantiated for a particular OpenLink Client.
The basic Session Rule unit is an OpenLink Connection Attribute, each representing a key aspect of an OpenLink Client's connection to an OpenLink Agent Session. There are six OpenLink Connection Attributes: Domain, User, OpSys, Machine, Application and Mode.
7.3.2.OpenLink Connection Attributes
There are two types of OpenLink Connection Attributes, these are "User Configurable" and "Non User Configurable" Connection Attributes.
User Configurable Connection Attributes
These attributes are configurable by the OpenLink Client user. When using ODBC this is handled via the ODBC Administrator or via the Admin Assistant ODBC Data Source Name Configuration Menu (this also applies to UDBC Clients). JDBC handles this through the use of JDBC URLs and in the case of JDBC 2.0 via Data Source Names. OLE-DB handles this via a Connection String Building Wizard.
Domain Attribute
Identifies the OpenLink Agent to which all OpenLink Connection Attributes apply.
This attribute describes a logical reference for a database type, OpenLink agent type, or anything else you would like to use as a logical identifier for all the other OpenLink Connection Attributes.
This attribute is also referred to as the "Server Type" or "SVT" attribute of an OpenLink Client connect string. It is also referred to in older product documentation as the OpenLink "Provider Type".
User Attribute. Identifies the User making use of an OpenLink Client.
Database Attribute. Identifies a specific database name within a database environment, e.g ORCL within Oracle, "stores7" within Informix, "pubs" with Sybase or Microsoft SQL Server etc. The values associated with this Connection Attribute aren't overridden by Aliases, instead they are overridden by the "Database" attribute within an Agent Configuration template.
ServerOpts (Database Sever Environment Options) Attribute. Identifies a set of database environment initialization parameters, currently this attribute only applies to Progress environments. It is used to set self serving client initialization parameters such as: -TB, -TB, -q, -D mdy etc. The values associated with this Connection Attribute aren't overridden by Aliases, instead they are overridden by the "SeverOptions" attribute within an Agent Configuration template.
ConnectOpts (Database Server Connection Options) Attribute . Identifies a set of database server connection parameters used to initiate a connection with a backend database server process. This is how an OpenLink Database Agent makes a connection with a backend database server using a particular database vendors networking middleware (e.g. Net8 or SQL*Net for Oracle, I-Connect or I-Net for Informix, Progress Client Networking for Progress, Open Client for Sybase etc.) . The values associated with this Connection Attribute aren't overridden by Aliases, instead they are overridden by the "ConnectOptions" attribute within an Agent Configuration template.
Non User Configurable Connection Attributes
These attributes are environmental in nature and derived automatically by an OpenLink Client.
OpSys (Operating System) attribute. Identifies the Client operating system from which the OpenLink Client is being executed.
Machine attribute. Identifies the Network Alias or IP address of the machine or device from the OpenLink Client is being executed.
Application attribute. Identifies the ODBC, JDBC, UDBC, OLE-DB Client Application from which the OpenLink Client is being executed.
![[Note]](images/note.png) |
Note: |
|---|---|
|
The Application name can be set within the application using the ODBC API SQLSetConnectOption(hdbc, SQL_APPLICATION_NAME, "AppName"). The JDBC equivelent can also be used. |
Mode attribute. Identifies the session Mode required by an OpenLink Client, this may be Read-Only or Read-Write.
7.3.3.OpenLink Session Templates
Connection attributes are conditionally post processed during the initialization of session between an OpenLink Client and and OpenLink Agent, the rule book consists of a number of templates that play different roles during this process. The rule book is made up of the following templates: Session Aliases, Mapping Rules, and Agent Configuration
Session Aliases Templates. These are rule book templates used for post processing OpenLink Connection Attribute values prior to Mapping Rules evaluation. This is the facility used by the Request Broker for overriding Connection Attributes from OpenLink Clients with values on configured an OpenLink server.
Mapping Rules Templates. These are rule book templates used to determine which OpenLink Agents are instantiated in line with an OpenLink Client's session request.
OpenLink Agent Configuration Templates. Templates used for setting key OpenLink Agent Configuration parameters. See the OpenLink Agent Administration section for detailed information.
7.3.4.Session Rules Execution Process
When an OpenLink Client makes contact with an OpenLink Request Broker a series of events occur culminating in the identification and execution of a session rule. The step as follow guide you through this process:
-
Request Broker receives session request from one or more OpenLink Clients (Drivers for ODBC, UDBC, JDBC, OLE-DB).
-
Request Broker parses the session request data stream received from the relevant OpenLink Client isolating each OpenLink Connection Attribute type and associated attribute values.
-
Request Broker then performs a regular expression search through the rule book looking for Session Aliases that match the parsed OpenLink Connection Attributes.
-
For each OpenLink Connection Attribute that the Request Broker find a matching Session Alias it determines if the Alias has a non NULL assigned value, if this is true the OpenLink Connection Attribute values are reassigned to those of the matching Session Alias, otherwise they retain their existing values.
-
Request Broker then performs a regular expression search using a combination of all the OpenLink Connection Attributes across the session rules books "Mapping Rules" template.
-
The Request Broker scans through each "Mapping Rule" in ascending order, If it finds a "Mapping Rule" match it then applies the matching rule to the appropriate Client Session request, otherwise it reports an error condition back to the OpenLink client.
-
When a "Mapping Rules" occurs the Request Broker evaluates the "Mapping Rule". This evaluation results in the Acceptance or Rejection of an OpenLink Client request.
-
OpenLink Client request acceptance results in the OpenLink Clients session request being associated with an OpenLink Agent template, this template then applies all of its attribute Attributes to the OpenLink Agent Configuration process.
-
Session Rules rejection results in a user/administrator definable error message being relayed back to the OpenLink Client.
-
OpenLink Session is fully initialized. This means that the OpenLink Client and Server (agents) components are now linked and operating in a connected state.
-
OpenLink Agent evaluates subsequent OpenLink Client session requests to see if they are in line with the ReUse attribute of its Agent Configuration template.
7.3.5.Creating Custom Aliases For Use By OpenLink Data Access Clients
Understanding how to maintain Session Aliases is a critical part of understanding how to create session rules. You can create, modify, edit, and delete Session Aliases in two ways, you either use the Admin Assistant's GUI interface or manually edit the session rule book using a text editor (only recommended for advanced users).
The steps that follow guide you through the Session Alias management process using the Admin Assistant's GUI. Before performing any of these steps you need to start the Admin Assistant, this is done by following the steps below:
-
Start the Request Broker
-
Start a Web Browser session
-
Enter the following URL into your browser:
If you started the Request Broker on your local machine enter:
http://localhost:8000/
(assuming you accepted port 8000 as the Admin Assistant port number at installation time).
If the Request Broker in on another machine enter:
http://<hostname or IP address>:8000
(assuming you accepted port 8000 as the Admin Assistant port number at installation time).
Domain Aliases
The steps that follow show you how to manage Domain Aliases:
-
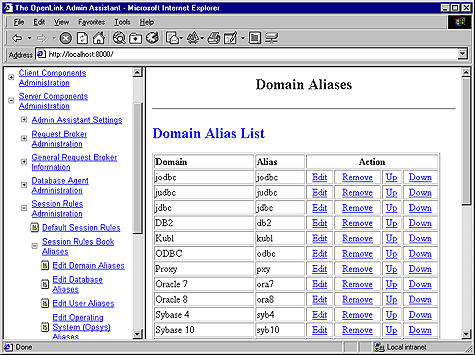
Follow the "Server Components Administration"->"Session Rules Administration"->"Session Rules Book Aliases"->"Edit Domain Aliases" menu tree which brings you to a screen identical to the one depicted below.
The Admin Assistant presents you with a list of pre-configured Domain Aliases, click on the "Edit" hyperlink to change settings, the "Remove" hyperlink to delete an Alias, and the "Add" button at the bottom of the screen to create a new Domain Alias.
Figure7.14.Admin Assistant
-
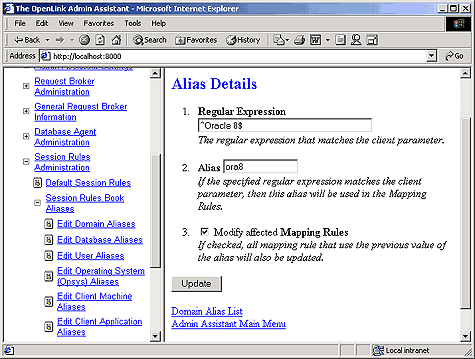
The example below assumes that you are modifying a Domain Alias named "ora8" with the attribute values "Oracle 8". This implies that you want to take note of Domain Connection Attributes from an OpenLink Client that start with the value "Oracle 8" evaluation against a mapping rules template. Once you have completed your input click the "Update" button.
Figure7.15.Admin Assistant
-
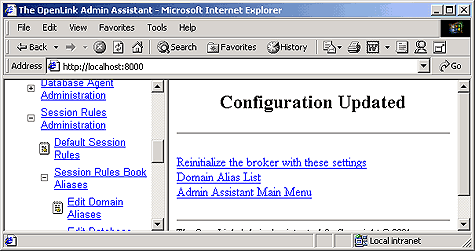
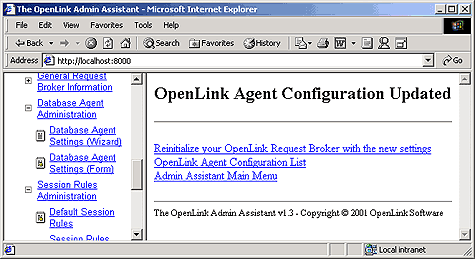
You then commit your changes to the rule book by clicking on the "Reinitialize the OpenLink Request Broker with these settings" hyperlink. See screen shot below:
Figure7.16.Admin Assistant
-
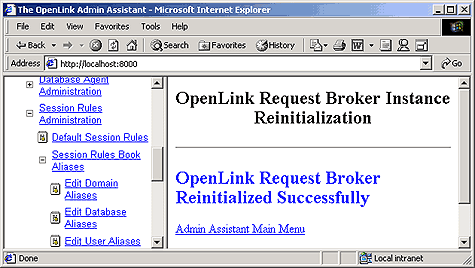
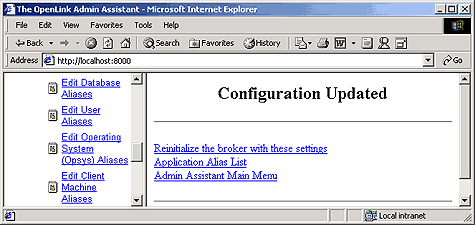
Admin Assistant confirms commitment of your changes to the rule book.
Figure7.17.Admin Assistant
User Aliases
The steps that follow show you how to manage User Aliases using the Admin Assistant:
-
Follow the "Server Components Administration"->"Session Rules Administration"->"Session Rules Book Aliases"->"Edit User Aliases" menu tree which brings you to a screen similar to the one depicted below.
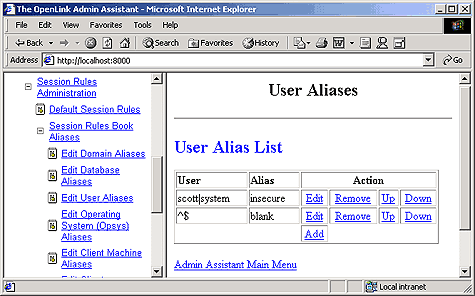
The Admin Assistant presents you with a list of pre-configured User Aliases if any exist, if this is your first time there will be not items listed. Click on the "Add" hyperlink to create a new User Alias.
Figure7.18.Admin Assistant
-
The example below assumes that you are creating an User Alias named "Sales" with attribute values of "Test" or "Mary", the use of the caret symbol (character "^") and the Dollar symbol indicate the start and end of regular expression evaluation values respectively. The Pipe symbol (character "|") indicates an OR condition. Thus the entry depicted below implies that you want to take note of User Connection Attributes from an OpenLink Client that hold the values "Test" or "Mary" for evaluation against a mapping rules template. Once you have completed your input click the "Add" button.
Figure7.19.Admin Assistant

-
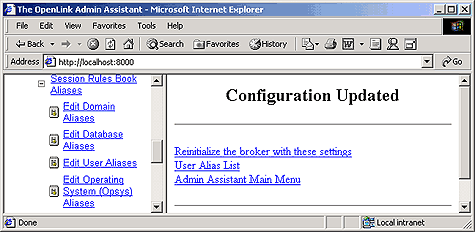
3.You then commit your changes to the rule book by clicking on the "Reinitialize the OpenLink Request Broker with these settings" hyperlink. See screen shot below:
Figure7.20.Admin Assistant
-
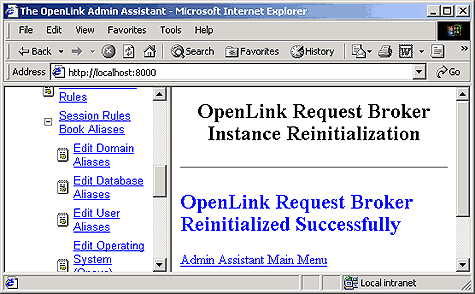
Admin Assistant confirms commitment of your changes to the rule book.
Figure7.21.Admin Assistant
OpSys Aliases (Operating System Aliases)
-
The steps that follow show you how to manage OpSys Aliases using the Admin Assistant:
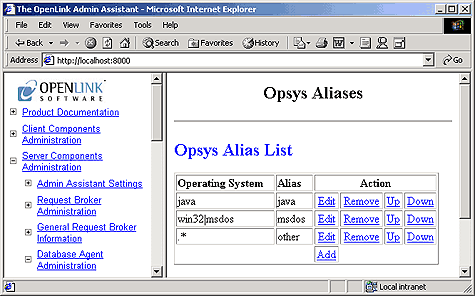
Follow the "Server Components Administration"->"Session Rules Administration"->"Session Rules Book Aliases"->"Edit Operating System Aliases" menu tree which brings you to a screen identical to the one depicted below.
The Admin Assistant presents you with a list of pre-configured OpSys Aliases if any exist, if this is your first time no items will be listed. Click on the "Add" hyperlink to create a new OpSys Alias.
Figure7.22.Admin Assistant
-
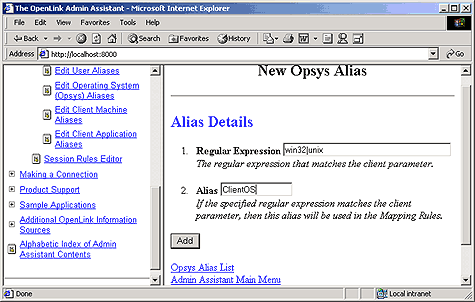
The example below assumes that you are creating an OpSys Alias named "ClientOS" with attribute values of "win32" or "unix". The Pipe symbol (character "|") indicates an OR condition. Thus the entry depicted below implies that you want to take note of OpSys Connection Attributes from an OpenLink Client that start with the values "win32" or "unix" for evaluation against a mapping rules template. Once you have completed your input click the "Add" button.
Figure7.23.Admin Assistant
-
You then commit your changes to the rule book by clicking on the "Reinitialize the OpenLink Request Broker with these settings" hyperlink. See screen shot below:
Figure7.24.Admin Assistant
-
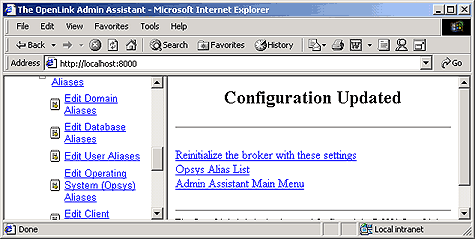
Admin Assistant confirms commitment of your changes to the rule book.
Figure7.25.Admin Assistant
Machine Aliases
The steps that follow show you how to manage User Aliases using the Admin Assistant:
-
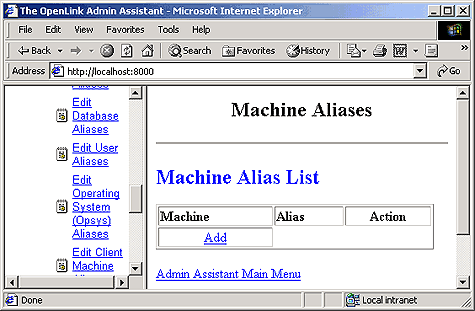
Follow the "Server Components Administration"->"Session Rules Administration"->"Session Rules Book Aliases"->"Edit Operating Machine Aliases" menu tree which brings you to a screen identical to the one depicted below.
The Admin Assistant presents you with a list of pre-configured OpSys Aliases if any exist, if this is your first time no items will be listed. Click on the "Add" hyperlink to create a new Machine Alias.
Figure7.26.Admin Assistant
-
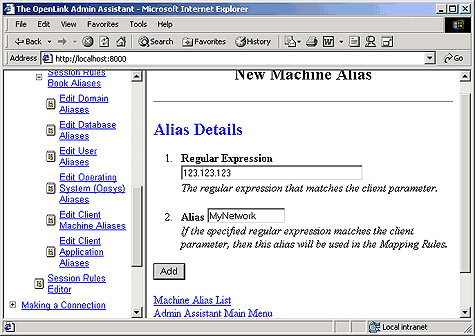
The example below assumes that you are creating an Machine Alias named "MyNetwork" with an attribute value of "123.123.123". This implies that you want to take note of Machine Connection Attributes from an OpenLink Client that start with the value "123.123.123" (you would do this to identify the Network portion of the client machines IP address). Once you have completed your input click the "Add" button.
Figure7.27.Admin Assistant
-
You then commit your changes to the rule book by clicking on the "Reinitialize the OpenLink Request Broker with these settings" hyperlink. See screen shot below:
Figure7.28.Admin Assistant
-
Admin Assistant confirms commitment of your changes to the rule book.
Figure7.29.Admin Assistant
Application Aliases
The steps that follow show you how to manage User Aliases using the Admin Assistant:
-
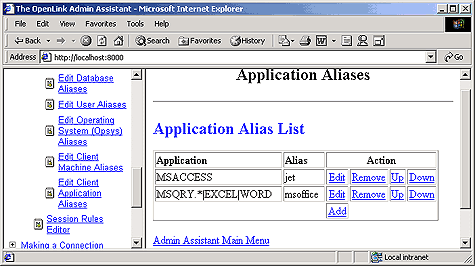
Follow the "Server Components Administration"->"Session Rules Administration"->"Session Rules Book Aliases"->"Edit Application Aliases" menu tree which brings you to a screen identical to the one depicted below.
The Admin Assistant presents you with a list of pre-configured Application Aliases, click on the "Edit" hyperlink to change settings, the "Remove" hyperlink to delete an Alias, and the "Add" button at the bottom of the screen to create a new Application Alias.
Figure7.30.Admin Assistant
-
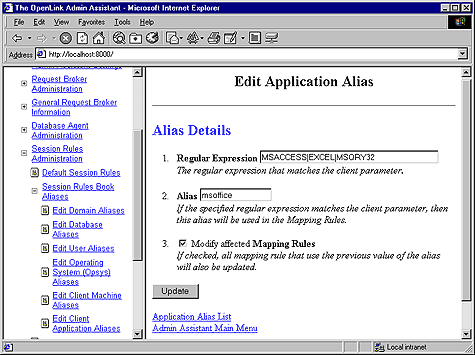
The example below assumes that you are modifying an Application Alias named "msoffice" with attribute values of "MSACCESS" or "EXCEL" or "MSQRY32". The Pipe symbol (character "|") indicates an OR condition. Thus, the entry depicted below implies that you want to take note of Application Connection Attributes from an OpenLink Client that hold the values "MSACCESS" or "EXCEL" or "MSQRY32" for evaluation against a mapping rules template. Once you have completed your input click the "Update" button.
Figure7.31.Admin Assistant
-
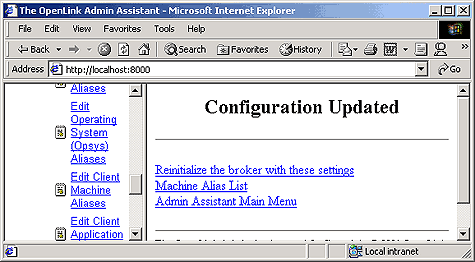
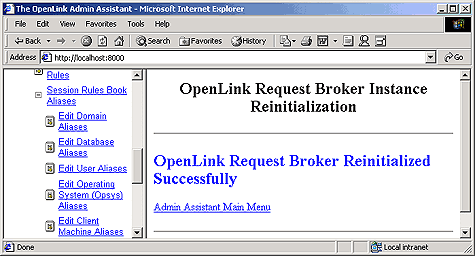
You then commit your changes to the rule book by clicking on the "Reinitialize the OpenLink Request Broker with these settings" hyperlink.
Figure7.32.Admin Assistant
-
Admin Assistant confirms commitment of your changes to the rule book.
Figure7.33.Admin Assistant

Determining The Values of OpenLink Client Generated Connection Attributes
When managing Aliases for non user configurable Connection Attributes you need to do the following in order to determine the appropriate values:
-
Start the Request Broker in Debug Mode
-
Then make a connection from your OpenLink Client
-
The debug output in your Request Brokers debug window will contain the following:
oplrqb: client-machine.YourDomain called (123.123.123.100.1510)
oplrqb: request: domain=Oracle 8 database= serveropts=
oplrqb: connectopts= user= opsys=win32 readonly=0
oplrqb: application=OPLSCAN processid=384
-
Take note of the values assigned to the following Connection Attributes: opsys, readonly, and application. Apply these values to the appropriate Aliases that your are attempting to configure.
7.3.6.Using the Admin Assistant To Create Session Rules
There are different type of session rules that you may want to create the examples that follow guide through the process of creating some very common session rules.
Security Oriented "Session Rules" Examples
A major concern with ODBC, JDBC, UDBC and OLE-DB is the fact that you could potentially lose control over the number and types of applications that have full read-write access to your organizations databases, unfortunately database engine based security is User, Group and in some case Role driven, database engines do not have the ability to decipher the type of Client application or data access mechanism being used by a client process. Thus ODBC, UDBC, JDBC, and OLE-DB can potentially introduce serious security loopholes.
The security and configuration control attributes of the session rules book is OpenLink's single most important and distinguishing feature when compared with other data access technologies (standards or non standards based).
Session rules enable you enforce rules that protect you from many form security related exposure in a time when connectivity is increasing at an alarming rate. The examples that follow use typical security scenarios to demonstrate how session rules can be devised to address security and/or resource consumption issues introduced by the use of ODBC, JDBC, UDBC, and OLE-DB compliant solutions.
Creating A Session Rule Enforcing READ-ONLY sessions unconditionally across all OpenLink Clients
The steps that follow guide you through the process of building a session rule that enforces read-only data access across all OpenLink ODBC, JDBC, UDBC, and OLE-DB sessions:
-
Start the Request Broker
-
Start a Web Browser session
-
Enter the following URL into your browser:
If you started the Request Broker on your local machine enter:
http://localhost:8000/
(assuming you accepted port 8000 as the Admin Assistant port number at installation time).
If the Request Broker in on another machine enter:
http://<hostname or IP address>:8000
(assuming you accepted port 8000 as the Admin Assistant port number at installation time).
-
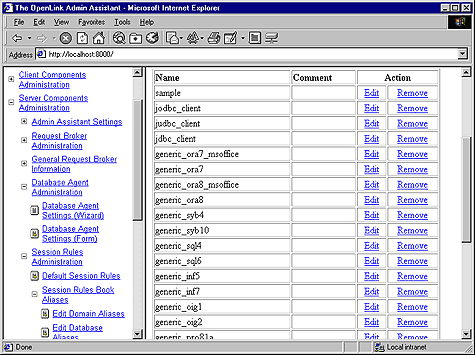
Since you are attempting to create a read-only session rule for a particular database, you need to ensure that you actually have an OpenLink Agent template that has its ReadOnly attribute set to "Y" or "Yes". To do this you navigate the Admin Assistant menu down the following path: "Server Components Administration"->"Database Agent Administration"->"Database Agent Settings (Form)" . Locate the database agent for your database engine type from the list presented and then click on the "Edit" hyperlink.
Figure7.34.Admin Assistant
-
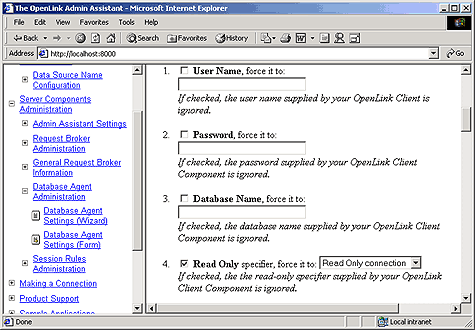
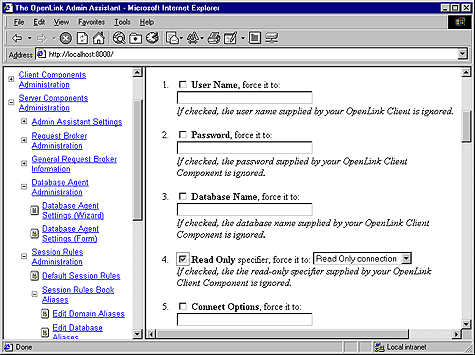
Locate the "Read Only" checkbox and then hatch the box which indicates the enforcement of Read-Only session when this agent is connected to backend database.
Figure7.35.Admin Assistant
-
Proceed to the end of this page and then click on the "Update" button.
Figure7.36.Admin Assistant
-
You then commit your changes to the rule book by clicking on the "Reinitialize the OpenLink Request Broker with these settings" hyperlink.
Figure7.37.Admin Assistant
-
Admin Assistant confirms commitment of your changes to the rule book.
Figure7.38.Admin Assistant
-
Now that you have created a OpenLink Agent Template for Read-Only sessions against your backend database you can now proceed to the creation of your session rule.
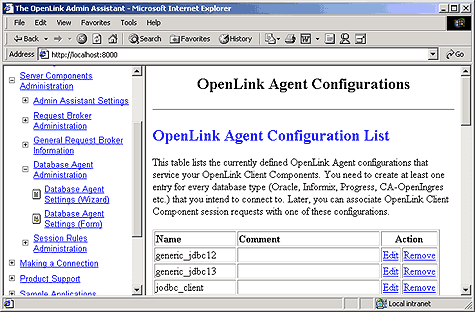
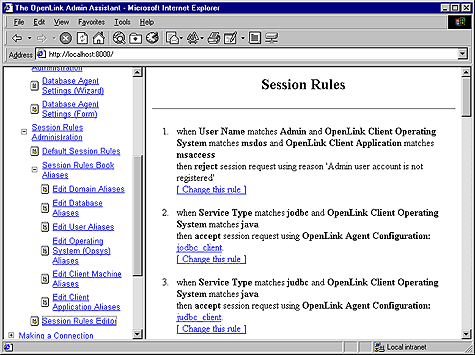
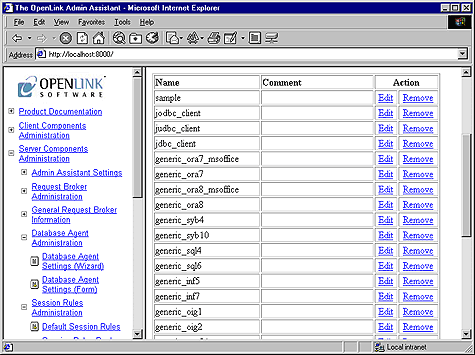
Follow the "Server Components Administration"->"Session Rules Administration"->"Session Rules Editor" menu path which brings you to a screen identical to the one depicted below, this presents you with a list of existing session rules (all OpenLink installations come with a set of pre-configured session rules).
Figure7.39.Admin Assistant
-
Scroll to the bottom of the session rules editor page and then click on the "Add a new rule" hyperlink, this opens up a new session rules page.
Figure7.40.Admin Assistant
-
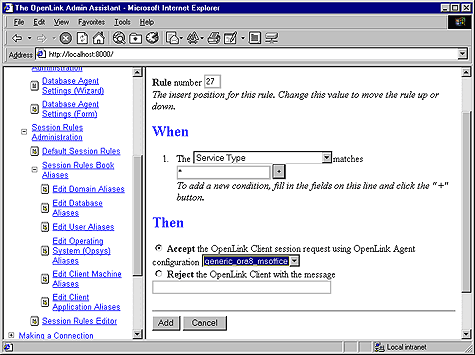
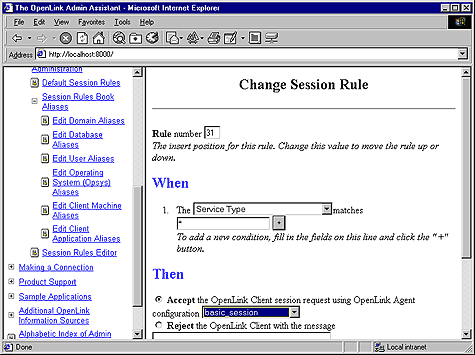
Create your new session rule.
A session rule is broken down into three parts a "Rule Number", a "When" predicate and a "Then" processing instruction.
Rule Number: This sets the order in which the session rules are evaluated. The Request Broker reads scans session rules in ascending "Rule Number".
"When" Predicate: Enter a regular expression value into the field beside the "+" button, this identifies to the Request Broker an OpenLink Service Type (a Domain attribute) value that forms one of the Connection Attributes that make up the session rule that you are constructing. Simply click on the "+" button to Add other Connection Attributes that will make up the session rule that you are constructing. In this example we want our session rule to apply to all OpenLink clients thus entering an "*" (which implies any Domain attribute and sub attributes) serves our needs adequately.
"Then" Processing Instruction: Check the "Accept" radio button and then select an OpenLink Agent template to associate with your rule by clicking on the "configuration" Listbox. The template that you choose needs to match the one that you placed in Read-Only mode at the start of this exercise. Then click on the "Add" button.
-
You then commit your changes to the rule book by clicking on the "Reinitialize the OpenLink Request Broker with these settings" hyperlink.
Figure7.41.Admin Assistant
-
Attempt a new OpenLink Client connection to you backend database and then attempt a record update, you will observe that your update attempt will be rejected and an error condition communicated to you via your ODBC, JDBC, UDBC,or OLE-DB based application.
Creating A Session Rule That Enforces READ-ONLY sessions for a specific OpenLink Client User
The steps that follow guide you through the process of building a session rule that enforces read-only data access for a specific User account across all OpenLink ODBC, JDBC, UDBC, and OLE-DB sessions.
-
Follow Steps 1 - 10 of the "Read-Only" session rules exercise above.
-
Create your new session rule.
A session rule is broken down into three parts a 'Rule Number', a "When" predicate and a "Then" processing instruction.
Rule Number: This sets the order in which the session rules are evaluated. The Request Broker reads scans session rules in ascending "Rule Number".
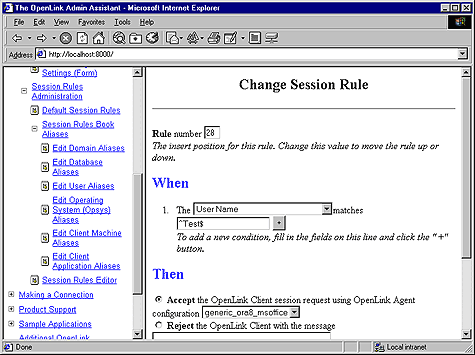
"When" Predicate: Enter a regular expression value into the field beside the "+" button, this identifies to the Request Broker an OpenLink Client User (the User attribute) value that forms one of the Connection Attributes that make up the session rule that you are constructing. Simply click on the "+" button to Add other Connection Attributes that will make up the session rule that you are constructing. In this example we want our session rule to apply to a specific OpenLink Client User irrespective of anything else. Thus, entering the value "^Test$" implies that anyone that makes an ODBC, JDBC, UDBC, or OLE-DB connection using the user name "Test" operates against your backend database in Read-Only mode.
"Then" Processing Instruction: Check the "Accept" radio button and then select an OpenLink Agent template to associate with your rule by clicking on the "configuration" Listbox. The template that you choose needs to match the one that you placed in Read-Only mode at the start of the "Read-Only" session rules exercise. Then click on the "Add" button.
Figure7.42.Admin Assistant
-
Click on the "Update" button to complete the rule creation exercise and then reinitialize the Request Broker when prompted.
-
Attempt a connection under the user name "Test" and attempt a database record update. Note that "Test" must be a valid user account in your database environment.
Creating A Session Rule That Enforces READ-ONLY sessions for a Group of Users
The steps that follow guide you through the process of building a session rule that enforces read-only data access for a specific group of users across all OpenLink ODBC, JDBC, UDBC, and OLE-DB sessions.
-
Follow Steps 1 - 10 of the "Read-Only" session rules exercise above.
-
A session rule is broken down into three parts a "Rule Number", a "When" predicate and a "Then" processing instruction.
Rule Number: This sets the order in which the session rules are evaluated. The Request Broker reads scans session rules in ascending "Rule Number".
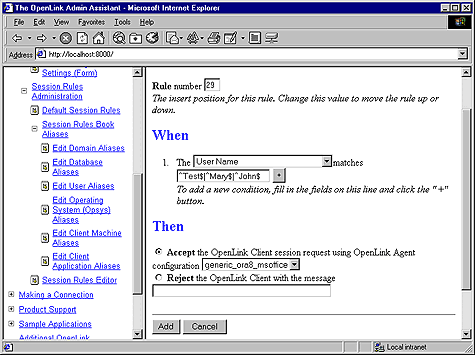
"When" Predicate: Enter a regular expression value into the field beside the "+" button, this identifies to the Request Broker an OpenLink Client User (the User attribute) value that forms one of the Connection Attributes that make up the session rule that you are constructing. Simply click on the "+" button to Add other Connection Attributes that will make up the session rule that you are constructing. In this example we want our session rule to apply to a group of OpenLink Client Users irrespective of anything else. Thus, entering the value: "^Test$|^Mary$|^John$" implies that anyone that makes an ODBC, JDBC, UDBC, or OLE-DB connection using either the user name "Test" or "Mary" or "John" operates against your backend database in Read-Only mode.
"Then" Processing Instruction: Check the "Accept" radio button and then select an OpenLink Agent template to associate with your rule by clicking on the "configuration" Listbox. The template that you choose needs to match the one that you placed in Read-Only mode at the start of the "Read-Only" session rules exercise. Then click on the "Add" button.
Figure7.43.Admin Assistant
-
Click on the "Update" button to complete the rule creation exercise and then reinitialize the Request Broker when prompted.
-
Attempt a connection under the user name "Test" and attempt a database record update. Note that "Test" must be a valid user account in your database environment.
Creating A Session Rule That Enforces READ-ONLY sessions for a specific OpenLink Client Application
The steps that follow guide you through the process of building a session rule that enforces read-only data access for a specific Application.
-
Follow Steps 1 - 10 of the "Read-Only" session rules exercise previously.
-
Create your new session rule.
A session rule is broken down into three parts a "Rule Number", a "When" predicate and a "Then" processing instruction.
Rule Number: This sets the order in which the session rules are evaluated. The Request Broker reads scans session rules in ascending "Rule Number".
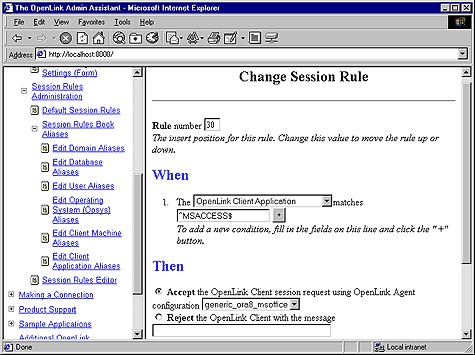
"When" Predicate: Enter a regular expression value into the field beside the "+" button, this identifies to the Request Broker an OpenLink Client Application (the Application attribute) value that forms one of the Connection Attributes that make up the session rule that you are constructing. Simply click on the "+" button to Add other Connection Attributes that will make up the session rule that you are constructing. In this example we want our session rule to apply to a specific OpenLink Client Application irrespective of anything else. Thus, entering the value "^MSACCESS$" implies that anyone that makes an ODBC, JDBC, UDBC, or OLE-DB connection using the Application presented by an OpenLink Client as "MSACCESS" operates against your backend database in Read-Only mode.
"Then" Processing Instruction: Check the "Accept" radio button and then select an OpenLink Agent template to associate with your rule by clicking on the "configuration" Listbox. The template that you choose needs to match the one that you placed in Read-Only mode at the start of the "Read-Only" session rules exercise. Then click on the "Add" button.
Figure7.44.Admin Assistant
-
Click on the "Update" button to complete the rule creation exercise and then reinitialize the Request Broker when prompted.
-
Attempt a connection under the user name "Test" and attempt a database record update. Note that "Test" must be a valid user account in your database environment.
Creating A Session Rule That Enforces READ-ONLY sessions for OpenLink Client connections outside of your Local Area Network (LAN)
Imagine a scenario in which you staff have access to your corporate databases over the internet due to the fact that you permit employees to work remotely. It may so happen that the work that your require them to do of site requires only a read-only session. The steps that follow guide you through the process of creating a session rule that only gives read-write database access to employees within your network domain, once they connect outside of this domain the sessions are automatically read-only.
This exercise assumes that your LAN is a class C type TCP/IP network with 123.123.123 identifying your LAN.
-
Follow Steps 1 - 3 of the "Read-Only" session rules exercise previously.
-
Since you are attempting to create a read-only session rule for a particular type of connection, you need to ensure that you actually have an OpenLink Agent template for your Read-Only database sessions and another Agent template for your Read-Write database sessions. The ReadOnly attribute of the Read-Only Agent template should be set to "Y" or "Yes", while that of the Read-Write session left unchanged.
To set things up navigate the Admin Assistant menu down the following path: "Server Components Administration"->"Database Agent Administration"->"Database Agent Settings (Form)" . Locate the database agent for your database engine type from the list presented and then click on the "Edit" hyperlink.
Figure7.45.Admin Assistant
-
Locate the "Read Only" checkbox and then hatch the box which indicates the enforcement of Read-Only session when this agent is connected to backend database.
Figure7.46.Admin Assistant
-
Proceed to the end of this page and then click on the "Update" button.
Figure7.47.Admin Assistant
-
Create a new OpenLink Agent template for the same database, but this time around we will not alter it Read-Only setting since this is disabled by default.
To set things up by navigate the Admin Assistant menu down the following path: "Server Components Administration"->"Database Agent Administration"->"Database Agent Settings (Form)" . Scroll to the bottom of the page and then click on the "Add" hyperlink.
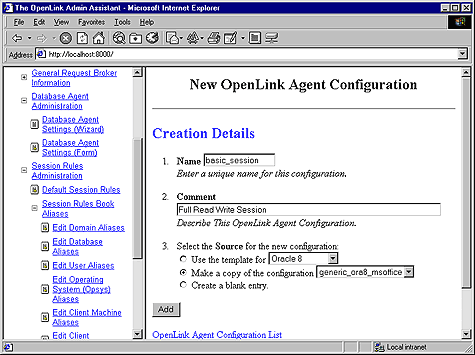
Enter a name for your Agent template in the "Name" field, a descriptive comment in the "Comment" field, then click on the "Make a copy of the configuration" and select the template name that matches your Read-Only template.
Figure7.48.Admin Assistant
-
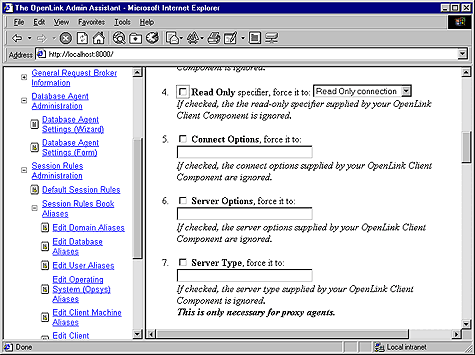
You now have a new Agent template named "basic_session", but since this is based on your Read-Only template (which was created earlier) you need to change its Read-Only attributes to that Read-Only session aren't enforced when OpenLink client connections are associated with this template after the "Mapping Rules" evaluation process. To do this navigate the Admin Assistant menu down the following path: "Server Components Administration"->"Database Agent Administration"->"Database Agent Settings (Form)" . Locate the Agent template named "basic_session" and then click on the "Edit" button. Uncheck the "Read Only" checkbox.
Figure7.49.Admin Assistant
-
Proceed to the end of this page and then click on the "Update" button.
Figure7.50.Admin Assistant
-
Proceed to the creation of your session rule.
Follow the "Server Components Administration"->"Session Rules Administration"->"Session Rules Editor" menu path which brings you to the session rules editor, click on the "Add new rule" hyperlink so that the new session rule page is presented to you.
Figure7.51.Admin Assistant
-
Create your new session rule.
A session rule is broken down into three parts a "Rule Number", a "When" predicate and a "Then" processing instruction.
Rule Number: This sets the order in which the session rules are evaluated. The Request Broker reads scans session rules in ascending "Rule Number". Since you are going to be creating two rules (one for read-write sessions and another for read-only sessions), you need to order your rules appropriately, remember Request Broker reads these rules for evaluation in ascending order. In this case the rule for read-write sessions is the exception to the norm so we change the number of this rule to 1.
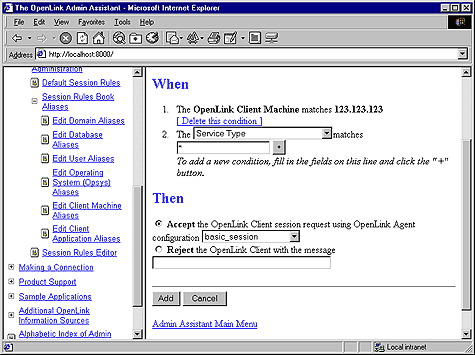
"When" Predicate: Enter a regular expression value into the field beside the "+" button, this identifies to the Request Broker an OpenLink Client Machine (the Machine attribute) value that forms one of the Connection Attributes that make up the session rule that you are constructing. Simply click on the "+" button to Add other Connection Attributes that will make up the session rule that you are constructing. In this example we want our session rule to apply to a specific OpenLink Client Machines irrespective of anything else. Thus, entering the value "123.123.123" implies that any machine that makes an ODBC, JDBC, UDBC, or OLE-DB connection with an from an IP Address that starts with "123.123.123" operates against your backend database in Read-Write mode.
"Then" Processing Instruction:
Check the "Accept" radio button and then select an OpenLink Agent template to associate with your rule by clicking on the "configuration" Listbox. The template that you choose needs to match the one that you placed in Read-Only mode at the start of the Read-Only" session rules exercise. Then click on the "Add" button.
Logically all other connections will end up being in Read-Only mode since they will not be resolved to having an IP Address that starts with "123.123.123". This also means that they will not be associated with the "basic_agent" Agent Template which is the only means of establishing a Read-Write session with your backend database.
Figure7.52.Admin Assistant
-
Click on the "Update" button to complete the rule creation exercise and then reinitialize the Request Broker when prompted.
-
Attempt a connection from outside your LAN and attempt a database record update.
Resource Management Oriented "Session Rules" Examples
The examples addressed in this section focus on the the management of OpenLink Agent processes with the view to providing systems administrators with the ability to tune OpenLink Agents in line with operating system resource constraints.
Unconditionally Sharing One Database Agent Instance Across Numerous OpenLink Clients
You might want to reduce the number of OpenLink Agents in use at any given time, a good reason for doing this stems from the fact that OpenLink Agent instances are processes which like other processes on your machine will consume a chunk of resources per instance. The more Agents you have running the more operating system kernel resources are consumed. Thus, by setting a ReUse attribute value of "always" you could ensure that under no condition is more than one Agent instance running.
Note: An exception to this rule only occurs if the Request Broker attempts to associate a new OpenLink Client session with an existing agent that hasn't completed its processing cycle, under these circumstance the Request Broker will spawn a new Agent instance.
The steps that follow guide you through the process of creating the appropriate session rule using the Admin Assistant:
-
Start the Request Broker
-
Start a Web Browser session
-
Enter the following URL into your browser:
If you started the Request Broker on your local machine enter:
http://localhost:8000/
(assuming you accepted port 8000 as the Admin Assistant port number at installation time).
If the Request Broker in on another machine enter:
http://<hostname or IP address>:8000/
(assuming you accepted port 8000 as the Admin Assistant port number at installation time).
-
Since you are attempting to modify the ReUse attribute of an existing Agent Template simply navigate the Admin Assistant menu down the following path: "Server Components Administration"->"Database Agent Administration"->"Database Agent Settings (Form)". Locate the database agent for your database engine type from the list presented and then click on the "Edit" hyperlink.
Figure7.53.Admin Assistant
-
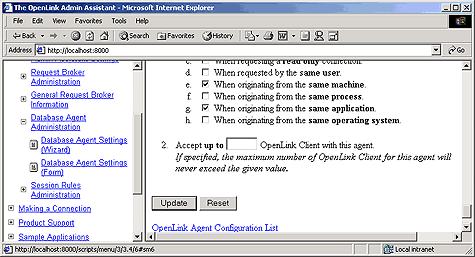
Scroll down to the "Client-Server Process Mapping & Control section, and then check the "Always" radio button as depicted in the screen shot below.
Figure7.54.Admin Assistant
-
Click on the "Update" button to complete the rule creation exercise and then reinitialize the Request Broker when prompted.
-
Restart your Broker in debug mode.
-
Attempt multiple OpenLink ODBC, JDBC, UDBC, OLE-DB connections from the same and different machines.
-
Then navigate the Admin Assistant menu down the following path: "Server Components Administration"->"Request Broker Administration"->"List of Current connections" . This will show you how many OpenLink Client connections that you have open and how many OpenLink Agents are serving these sessions.
Conditionally Sharing One Database Agent Instance Across Numerous Data Access Clients
There may be times where you only want to conditionally pool connections from your OpenLink Clients against a particular OpenLink Agent instance. The steps that follow show you how to pool all OpenLink Client connections from a specific machine to a single Agent instance. Thereby creating a scenario in which an one OpenLink Agent instance is spawned per OpenLink Client machine.
The steps that follow guide you through the process of creating the appropriate session rule using the Admin Assistant:
-
Follow steps 1 -4 in the prior section.
-
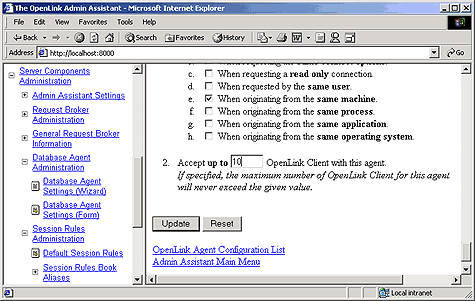
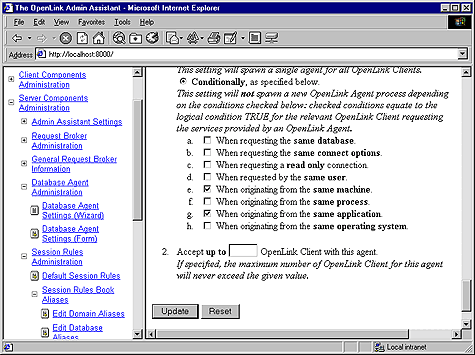
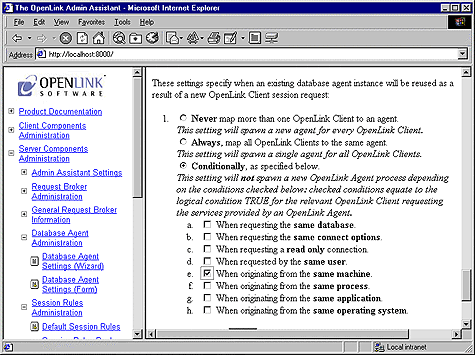
Scroll down to the "Client-Server Process Mapping & Control section, then check the "Conditionally" radio button, then check the checkbox field labeled "When originating from the same machine" as depicted in the screen shot below.
Figure7.55.Admin Assistant

-
Click on the "Update" button to complete the rule creation exercise and then reinitialize the Request Broker when prompted.
-
Attempt multiple OpenLink ODBC, JDBC, UDBC, OLE-DB connections from the same and different machines.
Then navigate the Admin Assistant menu down the following path: "Server Components Administration"->"Request Broker Administration"->"List of current connections". This will show you how many OpenLink Client connections that you have open and how many OpenLink Agents are serving these sessions.