2.12.2. Creating the Application
Step 1 - Create the Visual Studio Projects.
-
Open
Visual Studio
and create a new
Silverlight Application
project. Call the project DemoApplication.
-
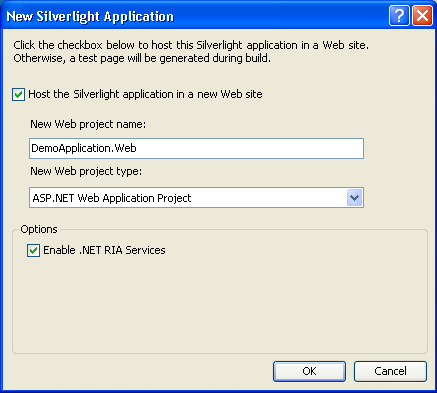
In the New Silverlight Application dialog ensure that
Enable .NET RIA Services
is checked. Click the
OK
button.
Figure 2.171. .NET RIA Services Application

At this point a skeleton solution is created that consists of a client project called DemoApplication and a server project called DemoApplication.Web. This application will use data from the Virtuoso database. We add the data and its schema to the application by adding an ADO.NET entity data model to the server project.
Step 2 - Add the Data Model
-
Right click the server project in the
Solution Explorer
and
Add New Item
. In the dialog box select
ADO.NET Entity Data Model
and call it demo.edmx. Click the
Add
button. This will open the
Entity Data Model Wizard
.
-
Choose
Generate From Database
and click
Next
.
-
Set up a connection to the Demo database on your local Virtuoso Server, select
Yes, include the sensitive data in the connection string
and set the name of the entities to DemoEntities. Click
Next
.
-
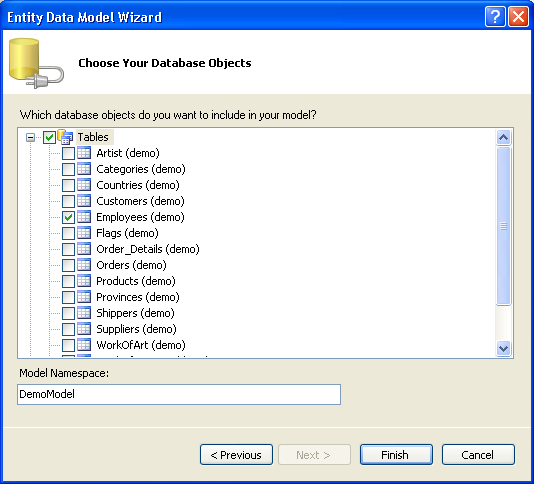
On the
Choose Your Database Objects
page expand
Tables
and select Employees. Check that the Model Namespace is DemoModel and click
Finish
.
Figure 2.172. .NET RIA Services Application

We want to make the entities in the model available to both the client and server parts of the solution. To do this we need to add a DomainService to the solution. However, to make the entities from the data model available to the domain service we must first build the solution.
Step 3 - Add a Domain Service.
-
First build the solution.
-
Right click the server project in the
Solution Explorer
and
Add New Item
. In the dialog box choose
Domain Service Class
from the Templates pane and call it EmployeeService.cs. Click
Add
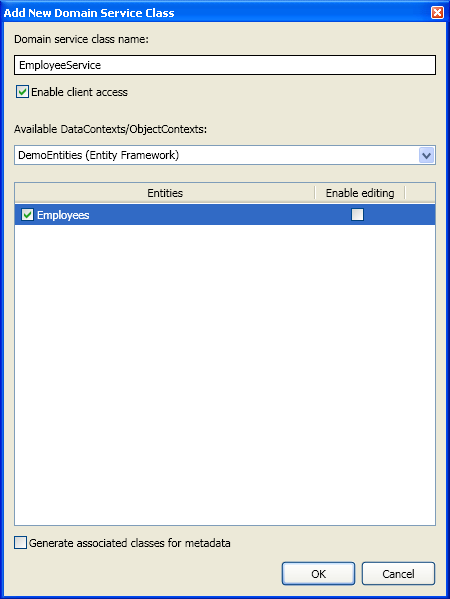
. This will open the
Add New Domain Service Class
dialog.
-
The entities from the model we have just added to the project are listed under
Entities
. Tick the box next to Employees. and click OK.
Figure 2.173. .NET RIA Services Application

This will create the DomainService class and generated code in both the client and server parts of the application. The Silverlight client can now interact with the data through the DomainContext class in the client project. At this point you need to build the solution again.
Step 4 - Display The Data
-
From the
Silverlight XAML Controls
in the
Toolbox
drag a
DataGrid
between the <Grid> </Grid> tags on MainPage.xaml in the client. Call the grid EmployeeGrid.
<data:DataGrid Name="EmployeeGrid"></data:DataGrid>
-
Instantiate the DomainContext to get the list of employees and add them to the grid by adding code to MainPage.xaml.cs so it looks like this:
using System; using System.Collections.Generic; using System.Linq; using System.Net; using System.Windows; using System.Windows.Controls; using System.Windows.Documents; using System.Windows.Input; using System.Windows.Media; using System.Windows.Media.Animation; using System.Windows.Shapes; using DemoApplication.Web; using System.Windows.Ria.Data; namespace DemoApplication { public partial class MainPage : UserControl { private EmployeeContext _employeeContext = new EmployeeContext(); public MainPage() { InitializeComponent(); LoadOperation<Employees> LoadOp = this._employeeContext.Load(this._employeeContext.GetEmployeesQuery()); this.EmployeeGrid.ItemsSource = LoadOp.Entities; } } } -
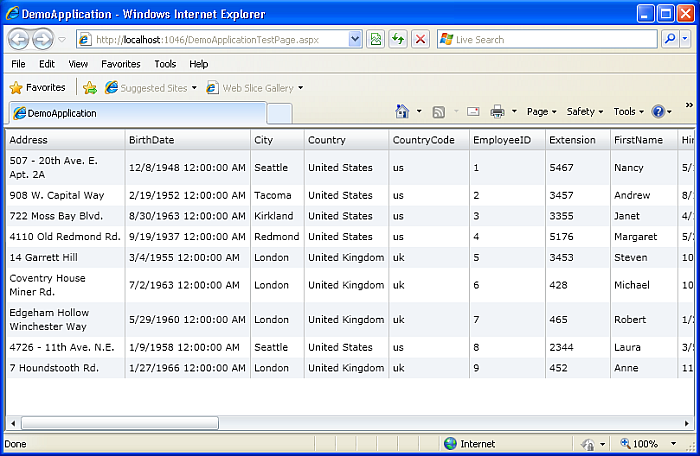
Build and run the application. Internet Explorer will be launched and you will see the data displayed on the page as a grid.
Figure 2.174. .NET RIA Services Application

