8.1.Administration Assistant
Every database engine has a one or more key values that need to be set in order for database clients to be able to communicate with database servers. These values take the form of host operating system environment variables, database connection string formats/parameters, or a combination of both.
Configuring your OpenLink database agent is all about creating session initialization templates in the Sessions Rules Book which map key database client values with OpenLink Agent Template Attributes.
OpenLink provides a user friendly utility for configuring your database agents, namely the OpenLink Admin Assistant. Another option is to edit the rule book manually, but the availability of the utility makes this a less recommended option, certainly one for experienced OpenLink users only.
The preferred and much more flexible way of configuring your database agents is through the OpenLink Admin Assistant. This is a powerful HTML based GUI that is usable from any Web Browser, it provides you with two approaches to configuring database agents using Wizards or forms.
8.1.1.Wizard Based Administration
This approach to database agent administration is going to be exemplified using OpenLink Virtuoso as the database agent that is being administered. Please note that nothing in this example is database specific beyond the actual values entered. A database specific section follows which addresses these issues on database engine specific basis.
-
Start the Admin Assistant by entering the following URL into your browser: http://<IP Address or Network Alias of machine hosting the OpenLink Database Agents to be Administered>:<Admin Assistant Port number>
For a network machine aliased as "mainserver" using the default OpenLink Admin Assistant port "8000" the URL required would be entered as follows: http://mainserver:8000
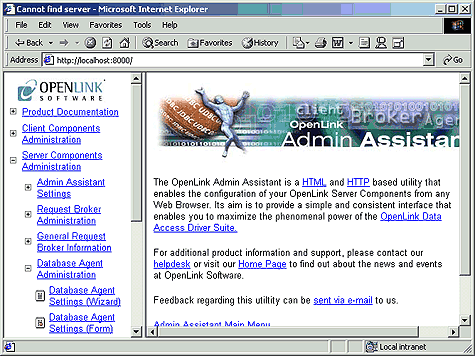
You will be presented with a screen similar to the one below:
Figure8.1.Admin Assistant
-
Expand the "Server Components Administration", and "Database Agent Administration" menus. Once this is done you need to then click on the "OpenLink Database Agent Settings (Wizard)" hyperlink. This will bring you to the first Database Agent Wizard dialog as depicted below:
Figure8.2.Admin Assistant
-
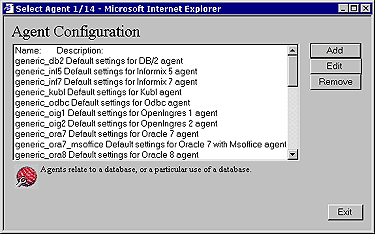
From the list of pre-configured database agents select one that matches the database engine that your database agent will be communicating with, note that every database supported by OpenLink will have a pre-configured default agent initialization template listed.
Figure8.3.Admin Assistant
-
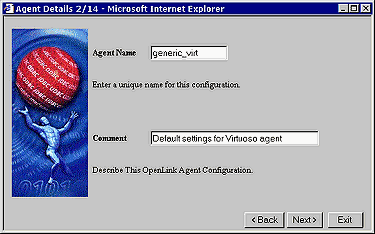
Click the "Edit" button to commence re configuring this database agent for your specific needs. Enter a name in the "Agent Name" field that is to be used to identify the database agent that your are configuring (it is recommended that you keep the default, if you do opt for a new name please don't enter names that contain spaces), also enter text into the "Comment" field describing your database agent. Once completed click on the "Next" button.
Figure8.4.Admin Assistant
-
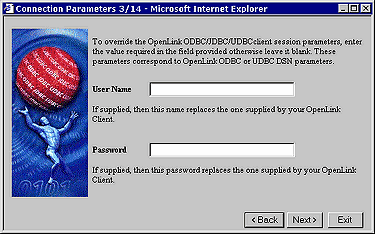
You can force your OpenLink clients to connect a backend database using a pre-assigned username and password combination, this is done by entering the values that you want to enforce into the "User Name" and "Password" fields in the Wizard dialog depicted below. This activity implies that irrespective of what username password combination is entered at OpenLink client configuration or connect time, the values that you provide will take precedence. If you do not want to enforce username and password combinations for your OpenLink clients simply leave the "User Name" and "Password" fields blank. Click on the "Next" button to continue.
Figure8.5.Admin Assistant
-
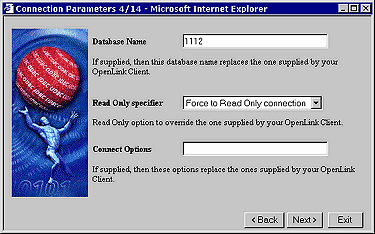
Enter a value in the "Database Name" field that identifies the actual database within your database engine's environment that you want to connect your OpenLink clients with, the format of these values vary by database engine type. You can control what type of session(s) your OpenLink clients conduct with your backend database by choosing the appropriate value from the "Read Only Specifier" listbox. If you are connecting to a database that does not reside on the same machine as your database agent, or circumstances require you to use the networking middleware provided by your database vendor (which is already installed on the same machine as the database agent), then you can enter the remote database connection values required by your remote database into the "ConnectOptions" field. Once completed click the "Next" button to continue.
Figure8.6.Admin Assistant
-
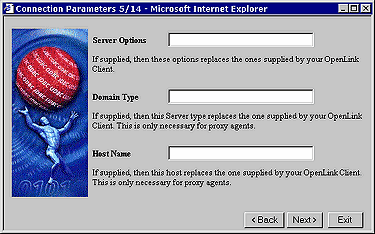
Some database engines allow their clients to configure session resources, in situations where this holds true you can use the "Server Options" field to set these values for your database agent sessions.
You can also configure your database agents such that the database agent that services OpenLink clients acts as a PROXY to other database agents residing on a remote OpenLink server(s) within your network infrastructure. This is basically a 3-Tier or N-Tier Distributed Database Agent configuration and the key configuration values go into the "Domain Type" and "Host Name" fields.
Domain Type - this is your OpenLink agent Server type (Virtuoso, Oracle. Informix, ODBC, PROXY, etc..), in the case of a typical 3-tier configuration you would enter the value PROXY, this implies that you are going to a PROXY agent rather than an database agent.
Host Name - this is how you identify the machine hosting the Request Broker that binds your OpenLink clients with the OpenLink agent designated by the value entered into the "Domain Type" field.
In most case all of these fields can simply be left blank. Click on the "Next button to continue.
Figure8.7.Admin Assistant
-
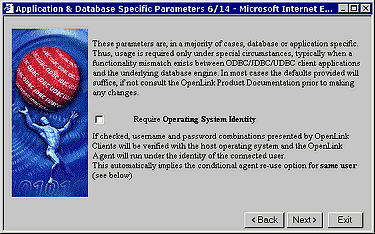
For security purposes there are times when you want to validate your OpenLink clients at the operating system level before they actually initiate sessions with your backend database. In some cases backend databases presume that your ability to attempt database connection implies your being a valid operating system users, this can be a major security hole for those database engines that do not conduct their own username and password verification. By hatching the "Require Operating System Identity" checkbox your database agent will validate OpenLink clients at the operating system level before attempting a connection to your backend database. Click the "Next" button to continue.
Figure8.8.Admin Assistant
-
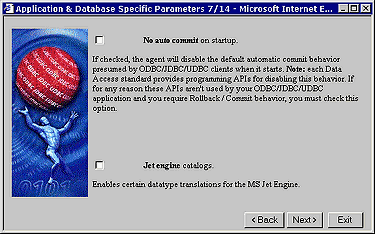
You can enforce consistent transaction behavior across your OpenLink clients through the "No Auto Commit On Startup" field, this ensures that database commands originating from OpenLink clients do not contain trailing "Commit" instructions. Without this restriction database integrity could easily be compromised by incomplete transactions creating broken records. You enable this protection by hatching the "No Auto Commit On Startup" checkbox.
You can also enforce application specific data type translation handling specifically for Microsoft Jet Engine based OpenLink ODBC clients by hatching the "Jet Engine Catalogs" checkbox. This is a very application specific feature that is only required when Microsoft's Jet engine is the OpenLink ODBC client.
Click the "Next" button to continue.
Figure8.9.Admin Assistant
-
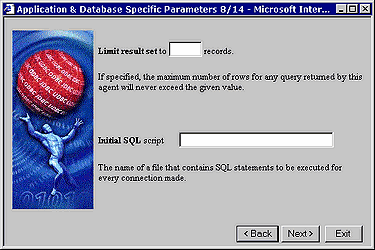
There are times when you may want to restrict the number of records that your database agent transmits to your OpenLink clients. In such scenarios you can enter a numeric value into the "Limit result set" field that represents the maximum number of records from a database query resultset that your database agent should transmit back to your OpenLink clients. This features protects your network from "Innocent Queries From Hell", these are queries that end-user unknowingly generate when using visual query tools, especially as they familiarize themselves with the concepts of SQL querying.
There are also times when critical database functionality may not be implemented as part of the ODBC. JDBC., UDBC,or OLE-DB specifications, but you need to make use of such functionality in order to run your database infrastructure smoothly. When this situation arises you are able to use the "Initial SQL script" field to enter a value that points to a script file containing a set of SQL instructions that implemented the desired functionality. This field corresponds to specifying "CommandLine = +initsql filename" in the rulebook (oplrqb.ini).
In some cases you may find yourself having to deal with the fact that although the functionality may be implemented at the ODBC, UDBC, JDBC, OLE-DB specification level, the client application connecting to your database via OpenLink simply is not making use of this functionality. In this scenario the "Initial SQL Script" field comes in handy. A typical example is default Transaction Isolation Levels handling.
Click "Next" to continue.
Figure8.10.Admin Assistant
-
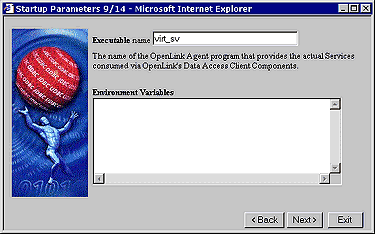
You identify the binary executable file that represents the specific database agent for your backend database by entering the binary files name in the "Executable Name" field. This set for you by default and unless you rename this file yourself it does not need to be changed.
Many database environments are driven by operating system level environment variables, the "Environment Variables" field allows you to set or re-configure these values (see database specific settings section). Click the "Next" button to continue.
Figure8.11.Admin Assistant
-
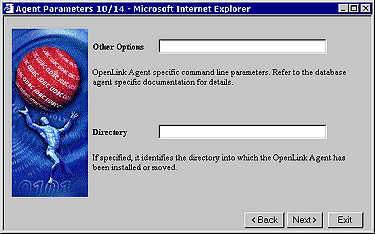
There may be some database agent specific options that you need to apply specifically to sessions with your backend database (see usage part of "obtaining database agent information" section for list of values), you enter these values into the "Other Options" field.
You also need to indicate the directory in which your database agent executable binary file resides, this is only required if you have moved these files from their default location after installation. Click the "Next Button" to continue.
Figure8.12.Admin Assistant
-
Your database agents act as servers to your OpenLink clients, this implies that as server processes they do consume server operating system resources. You can control resource consumption by predefining how many database agent instances are to be started as a result of OpenLink clients connections, and the basis upon which these instance are reused by subsequent OpenLink client connections. The "Never", "Always", and "Conditionally" radio button allows you to choose the option that best suits your infrastructure's needs.
The "Accept Up To" field allows you to enter a numeric value that indicates the maximum number of new database agent processes that can be instantiated on a given OpenLink server operating environment.
If you choose the "Conditionally" radio button and then click the "Next" button you will be presented with an additional dialog with a list of checkboxes. These checkboxes allow you to customize the sets of circumstances under which you want an OpenLink client connection to result in the instantiation of a new database agent instances. Click the next "Button" to continue.
Figure8.13.Admin Assistant

-
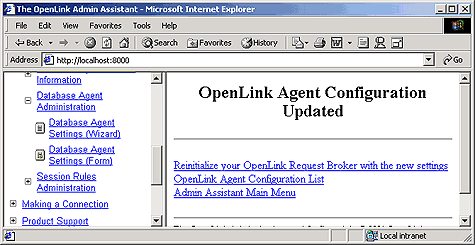
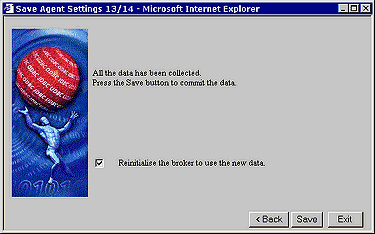
At the end of this Wizard interaction you can opt to make you database agent settings available to the next OpenLink client without shutting down and restarting the Request Broker, you do this by hatching the "Reinitialize" checkbox and then clicking the "Save" button to save your settings.
Figure8.14.Admin Assistant
8.1.2.Forms Based Administration
You can also administer database agents through the Admin Assistant using a "Forms" as opposed to "Wizards" based approach, the steps that follow guide you through this process using the same example (configuring the a database agent for the OpenLink Virtuoso database).
-
Start the Admin Assistant by entering the following URL into your browser: http://<IP Address or Network Alias of machine hosting the OpenLink Database Agents to be Administered>:<Admin Assistant Port number>
For a network machine aliased as "mainserver" using the default OpenLink Admin Assistant port "8000" the URL required would be entered as follows: http://mainserver:8000
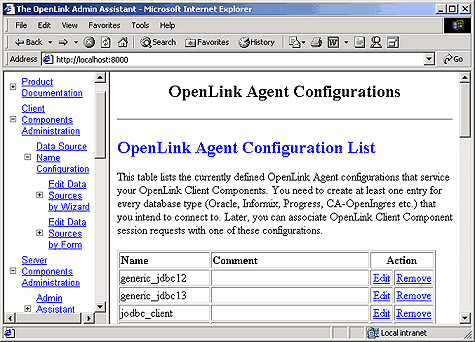
Expand the menus for "Server Components Administration", and "Database Agent Administration". Once this is done you need to then click on the "Database Agent Settings (Form)" hyperlink. This will bring you to a database agent listing as depicted below:
Figure8.15.Admin Assistant
-
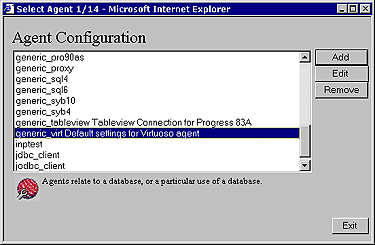
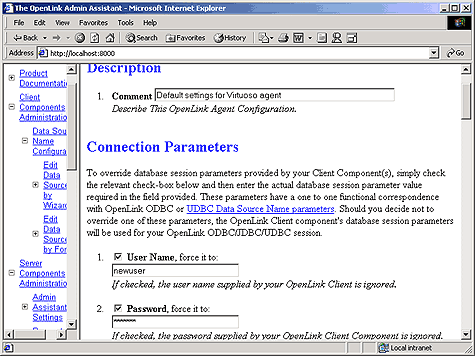
As our example for this exercise is based on the OpenLink Virtuoso database agent, click on the "Edit" hyperlink for the "generic_virt" default database agent (note you can substitute this with the default database agent that matches your backend database). Once these actions are completed you will be presented with the main database agent initialization template form. Complete the values for the fields that apply to needs and then click on the "Update" button at the bottom of the form to save your changes.
Figure8.16.Admin Assistant
-
Click on the "Reinitialize Your OpenLink Request Broker With New Settings" hyperlink, this enables your new setting to be applied to subsequent connections from OpenLink clients without disrupting existing OpenLink client sessions.
Figure8.17.Admin Assistant