8.2.Agent-Specific Settings
OpenLink database agents are database clients built using the SQL Call Level or Embedded SQL interfaces of the respective supported backend database engines. Thus, the process of configuring or administering a database agent is similar in essence to what you would have to do if you were administering a native database client.
Database engines use environment variables to creating a database specific operating space within which database clients and servers interact, these environment typically address the following important database session related issues:
-
Database server identification - your database client needs to be able to connect to the appropriate database server, many database implementations support multiple database servers instances listening for client connections at different network ports on the same machine (e.g. OpenLink Virtuoso, Microsoft SQL Server, Sybase, Progress, Informix etc.).
-
Database engine base installation directory - many database engine environments comprise shared or dynamically linked libraries and other runtime components that are required by database clients. Thus, there is a need for database clients to have a sense of what the actual base or root point of the database engine installation is, this enables the construct of a component search path (similar to the "PATH" operating system environment variable) at runtime.
-
Database session resource allocation - most database engines allow database session resources to be configured for clients via environment variables (sometimes these variables simply identify resource configuration files).
-
Database session optimization - some database environments allow query optimizers, network packet sizes, and records transmission values for database clients to be configured via environment variables.
The sections that follow address specific environment settings that affect the configuration of your OpenLink database agents, the values provided can supplanted values used in the Admin Assistant configuration examples provided in the prior section.
8.2.1.Common Agent Configuration Options
The following parameters exist in all Agent Environment sections of the oplrqb.ini
Table8.1.Default Rule Book settings
|
Rule Book Section & parameters |
Default Rule Book Settings |
Notes |
|---|---|---|
|
[Environment xyz] |
Any agent section | |
|
CURSOR_SENSITIVITY= |
LOW |
Set to HIGH after loading oplrvc.sql |
High Cursor Sensitivity
Enables or disables the row version cache used with dynamic cursors.
When dynamic cursor sensitivity is set high, the Cursor Library calculates checksums for each row in the current rowset and compares these with the checksums (if any) already stored in the row version cache for the same rows when fetched previously. If the checksums differ for a row, the row has been updated since it was last fetched and the row status flag is set to SQL_ROW_UPDATED. The row version cache is then updated with the latest checksums for the rowset.
From the user's point of view, the only visible difference between the two sensitivity settings is that a row status flag can never be set to SQL_ROW_UPDATED when the cursor sensitivity is low. (The row status is instead displayed as SQL_ROW_SUCCESS.) In all other respects, performance aside, the two settings are the same - deleted rows don't appear in the rowset, updates to the row since the row was last fetched are reflected in the row data, and inserted rows appear in the rowset if their keys fall within the span of the rowset.
If your application does not need to detect the row status SQL_ROW_UPDATED, you should leave the 'High Cursor Sensitivity' checkbox unchecked, as performance is improved. The calculation and comparison of checksums for each row fetched carries an overhead.
If this option is enabled, the table oplrvc must have been created beforehand using the appropriate oplrvc.sql script for the target database.
8.2.2.Virtuoso
When configuring a Virtuoso database agent the critical configuration items are:
-
Database Identification - this is the Virtuoso Database Server's port number, which identifies the actual Virtuoso server process that links you to an actual Virtuoso database file. This is the value that you enter into the "Database Name" field of either your Admin Assistant form or wizard dialog.
Application Server & 3-Tier Architecture Configuration
There may be situations in which you are unable to install your OpenLink Request Broker and Database Agents on the same machine as the one hosting your Virtuoso database server. Irrespective of the reasons that lead you to this scenario, it is possible to configure your OpenLink database agents hosted on your Application Server machine such that they connect to a remote Virtuoso database on your Database Server machine using Virtuoso's database specific networking as opposed to OpenLink's Database Independent Networking. The end result being a 3-tier distributed OpenLink architecture in which the communication between OpenLink clients and database agents use OpenLink's Database independent Networking, while the communication between the Virtuoso database agent and the Virtuoso database server uses Virtuoso database specific networking.
Configuration Steps:
Assuming you have a Virtuoso Database Server called "mainserver2" that has a Virtuoso server process listening for clients at port 1112
-
Ensure that you have a usable connection to Virtuoso using its native networking.
-
Add the following value to the "Database Name" field within the Admin Assistant Forms or Wizards used to configure your database agent. If you choose to set this value on the client simply enter the same values into the "Database Name" Attribute associated with the configuration of your OpenLink client (see OpenLink ODBC or JDBC or UDBC client configuration for more details):
mainserver2:1112
8.2.3.Informix
When configuring an Informix database agent the critical configuration items are:
-
Database Identification - this is an actual database name e.g "stores7", which identifies the actual Informix database file that you want to be connected with. This is the value that you enter into the "Database Name" field of either your Admin Assistant's database agent configuration form or wizard dialog. If you choose to have database identification take place at the client rather than server, you enter this value into the "Database Name" field or connection attribute when configuring your OpenLink client.
Informix provides a number of environment variables for configuring database clients, the basic set required for successfully connecting your database agent to an Informix database server are tabulated below:
Table8.2.Default Rule Book settings
|
Rule Book Section & parameters |
Default Rule Book Settings |
Notes |
|---|---|---|
|
[Environment INFORMIX5] |
Informix 5 Agent environment settings |
|
|
INFORMIXDIR= |
/dbs/informix5 |
Full path to the base directory for the Informix 5 installation. |
|
TBCONFIG= |
tbconfig |
Database server configuration file |
|
FORCE_ONLINE_DATABASE= |
1 |
Force mode to (0) SE or (1) ONLINE |
|
[Environment INFORMIX6] |
||
|
INFORMIXDIR= |
/dbs/informix6 |
Full path to the base directory for the Informix 6 installation. |
|
[Environment INFORMIX7] |
||
|
INFORMIXDIR= |
/dbs/informix7 |
Full path to the base directory for the Informix 7 installation. |
|
INFORMIXSERVER= |
online7 |
The name of Informix 7 server that you want the agent to attach to. As long as you have I-Connect or I-Net installed, configured and up and running this value can connect your database agent with remote Informix database servers. |
|
ONCONFIG= |
ONCONFIG |
Database server configuration file |
|
FORCE_ONLINE_DATABASE= |
1 |
Force mode: 0 for Standard Engine (SE) 1 for ONLINE |
|
DELIMIDENT= |
Y |
This will allow quoted identifiers to be handled. |
|
OPL_INF_MULTISESS= |
Y |
Enables Informix mutlisession mode. Y=Each ODBC connection gets its own database session. N=Each ODBC connection shares one database connection. |
|
OPL_SPACEPADCHAR= |
Y |
Character data from a CHAR column is fetched with trailing spaces retained. The column data is padded upto the column width. N=Trailing spaces are stripped off. |
Security Enhancement
Due to the fact that Informix leaves username and password verification to the host operating system, it is possible to close what could be an ODBC, UDBC, JDBC, or OLE-DB security loophole by utilizing the OpenLink database agent "OpsysLogin" facility which can be enabled through the Admin Assistant. By enabling this feature your Informix database agent will verify user accounts at the operating system level before attempting to connect to your Informix database. It is important to note that "super-user" or Administrator (depending on operating system) privileges are required to successfully use this feature. This implies that the account that starts the request broker must possess one of the aforementioned system level privileges, on the other hand these privileges aren't required for your actual OpenLink client sessions.
Rebuilding Informix Database agents
OpenLink provides a relinkable library and script files that enable you to rebuild your database agents as shared, as opposed to statically linked binaries, or for the purposes of getting a closer database implementation fit, should your Informix database environment be a more recent release than the actual version used by OpenLink to build the database agent installed on your system. Please read the Relinking OpenLink Database Agents section that follows, for details on how to perform this task.
Note that to run the Informix agents you may require the latest Informix Connect (a free download from the IBM/Informix site); in order to relink them, you require the Client SDK as well.
Application Server & 3-Tier Architecture Configuration
There may be situations in which you are unable to install your OpenLink Request Broker and Database Agents on the same machine as the one hosting your Informix database server. Irrespective of the reasons that lead you to this scenario, it is possible to configure your OpenLink database agents hosted on your Application Server machine such that they connect to a remote Informix database on your Database Server machine using Informix database specific networking (I-Connect or I-Net) as opposed to OpenLink's Database Independent Networking. The end result being a 3-tier distributed OpenLink architecture in which the communication between OpenLink clients and database agents use OpenLink Database independent Networking, while the communication between the Informix database agent and the Informix database server uses I-Connect or I-Net (depending on Informix version).
Configuration Steps:
Assuming you have an Informix Database Server machine called "mainserver2" that has an Informix I-Connect or I-Net server process running (this is setup and configured via the SQLHOSTS file on the database server machine).
-
On your Application Server (the machine hosting your database agent) create an I-connect or I-Net Connection Alias called "mainserver2" (for purpose of this example only) if a working Connection Alias doesn't already exist on this machine.
-
Ensure that you have a usable connection to your remote Informix database using Connection Alias "mainserver2".
-
Add the following values to the "Database Server Options" field within the Admin Assistant Forms or Wizards used to configure your database agent. If you choose to set this value on the client simply enter the same value into to the "Database Name" Attribute associated with the configuration of your OpenLink client (see OpenLink ODBC or JDBC or UDBC client configuration for more details):
mainserver2
You can also set the INFORMIXSERVER environment variable to "mainserver2".
![[Tip]](images/tip.png) |
See Also: |
|---|---|
|
Application Server Architecture for various illustrations of distributed client-server architectures supported by OpenLink database agent |
Agent handling of SQLGetInfo
The Informix agent is hard coded with responses to SQLGetInfo(). These are affected by the build version:
Table8.3.SQLGetInfo() differences
| Parameter | Build Version <= 7.x | Build Version > 7.x (eg. 9.x) |
|---|---|---|
| SQL_MAX_CATEGORY_NAME_LEN | 8 | 32 |
| SQL_MAX_OWNER_NAME_LEN | 8 | 32 |
| SQL_MAX_SCHEMA_NAME_LEN | 18 | 128 |
| SQL_MAX_QUALIFIER_NAME_LEN | 18 | 128 |
| SQL_EXPRESSIONS_IN_ORDERBY | N | N |
8.2.4.Ingres
When configuring an Ingres database agent the critical configuration items are:
-
Database Identification - this is an actual database name e.g "demo", which identifies the actual Ingres database that you want to be connected with. This is the value that you enter into the "Database Name" field of either your Admin Assistant's database agent configuration form or wizard dialog. If you choose to have database identification take at the client rather than server, you enter this value into the "Database Name" field or connection attribute when configuring your OpenLink client.
-
User Authentication - To log into OpenIngres | Ingres II databases you need to create an internal user entry in the database which matches the userid that starts the OpenLink Ingres Database agent (oig[1|2]_sv). Thus if your userid is openlink you need to create a user openlink that is capable of switching to another internal user. A default OpenIngres | Ingres II database will have entries for ingres and root. You can also enable the OpenLink 'opsyslogin' feature in the OpenLink Rule Book (oplrqb.ini) that will force the userid of the agent to be changed to that of the username that has been authenticated by the Operating system, and assuming this is a valid Ingres user will be allowed to connect by the database.
Ingres provides a number of environment variables for configuring database clients, the basic set required for successfully connecting your database agent to an Ingres database server are tabulated below:
Table8.4.Default Rule Book settings
|
Rule Book Section & parameters |
Default Rule Book Settings |
Notes |
|---|---|---|
|
[Environment OPENINGRES1] [Environment INGRES_II] |
Parameters are common in Open Ingres 1 and Ingres II | |
|
II_DATE_FORMAT= |
US |
Defines the output format for dates as dd-mmm-yyyy. This should not be changed inside the Rule Book since it enables the best compatibility with OpenLink. This will not affect any other Progress applications. |
|
II_SYSTEM= |
/dbs |
Full path to the directory immediately below the Progress/ directory e.g. if your Progress installation directory is /dbs/Progress then set this to /dbs |
|
ING_SET= |
set lockmode session where readlock=nolock |
This makes sure when the Ingres agent is started, the first thing it does is runs this command. The command itself makes sure that a simple select statement does not lock all the rows it selects. |
|
USE_OWNER= |
Y or N |
Only applicable for Ingres 6.4 databases. If set to Y forces the driver to return the ingres internal table owner as the schema name for the table, as this was required for early version of MSQuery. |
Security Enhancement:
Due to the fact that Ingres 6.4 leaves username and password verification to the host operating system (Ingres II does not have this problem), it is possible to close what could be an ODBC, UDBC, JDBC, or OLE-DB security loophole by utilizing the OpenLink database agent "OpsysLogin" facility which can be enabled through the Admin Assistant. By enabling this feature your Ingres database agent will verify user accounts at the operating system level before attempting to connect to your Ingres database. It is important to note that "super-user" or Administrator (depending on operating system) privileges are required to successfully use this feature. This implies that the account that starts the request broker must possess one of the aforementioned system level privileges, on the other hand these privileges aren't required for your actual OpenLink client sessions.
Rebuilding Ingres Database Agents
OpenLink provides a relinkable library and script files that enable you to rebuild your database agents as shared, as opposed to statically linked binaries, or for the purposes of getting a closer database implementation fit, should your Ingres database environment be a more recent release than the actual version used by OpenLink to build the database agent installed on your system. Please read the Relinking OpenLink Database Agents section that follows, for details on how to perform this task.
Application Server & 3-Tier Architecture Configuration
There may be situations in which you are unable to install your OpenLink Request Broker and Database Agents on the same machine as the one hosting your Ingres database server. Irrespective of the reasons that lead you to this scenario, it is possible to configure your OpenLink database agents hosted on your Application Server machine such that they connect to a remote Ingres database on your Database Server machine using Ingres database specific networking (Ingres Net) as opposed to OpenLink's Database Independent Networking. The end result being a 3-tier distributed OpenLink architecture in which the communication between OpenLink clients and database agents use OpenLink Database independent Networking, while the communication between the Ingres database agent and the Ingres database server uses Ingres Net.
Configuration Steps:
Assuming that you have an Ingres Database server machine called "mainserver2" that has an Ingres Net server process running.
-
On your Application Server (the machine hosting your database agent) create an Ingres Net vnode called "mainserver2" (for purpose of this example only) if you do not have a working vnode on this machine.
-
Ensure that you have a usable connection to your remote Ingres database using the vnode "mainserver2".
-
Add the following values to the "Server Options" field within the Admin Assistant Forms or Wizards used to configure your database agent. If you choose to set this value on the client simply enter the same value into to the "Database Name" Attribute associated with the configuration of your OpenLink client (see OpenLink ODBC or JDBC or UDBC client configuration for more details):
mainserver2
|
See Also: |
|---|---|
|
Application Server Architecture for various illustrations of distributed client-server architectures supported by OpenLink database agent |
![[Note]](images/note.png) |
Note: |
|---|---|
|
OpenLink Drivers for Ingres II, both Single- and Multi-Tier, are based on the OpenAPI Interface, and are intended only for use only with Ingres II. In some environments, these Drivers may also permit connection to OpenIngres 1.x and 2.x, which are also based on the OpenAPI Interface; however, these Drivers have not been certified for such connections, and they are made at the User's discretion and risk. These Drivers will not support connections to Ingres 6.4 or previous under any conditions. Drivers for versions of Ingres prior to Ingres II may be available for some platforms; please inquire at , if you require such a Driver. |
8.2.5.Progress
When configuring a Progress database agent the critical configuration items are:
-
Database Identification - this is an actual database name e.g "demo" or "isports", which identifies the actual Progress database file that you want to be connected with. This is the value that you enter into the "Database Name" field of either your Admin Assistant form or wizard dialog. If you choose to have database identification take at the client rather than server, you enter this value into the "Database Name" field or connection attribute when configuring your OpenLink client.
Progress provides a number of environment variables for configuring database clients, the basic set required for successfully connecting your database agent to an Progress database server are tabulated below:
Table8.5.Default Rule Book settings
|
Rule Book Section & parameters |
Default Rule Book Settings |
Notes |
|---|---|---|
|
[Environment PROGRESS8] |
||
|
DLC= |
/dbs/dlc8 |
Must be full path to the Progress dlc directory. |
|
PROCFG= |
/dbs/dlc8/progress.cfg |
Must be the full path and filename to the progress.cfg file. This parameter is optional. Use it if the license file can not be found. |
|
TABLEVIEW= |
Must be the full path and filename to the table view file (tableview.dat). See detailed TABLEVIEW document for more information |
|
|
TABLEVIEW_QUALIFIER= |
Y |
Add owner information to select statement |
|
DEADLOCK_TIMEOUT= |
60 |
Seconds to wait for lock to release. |
|
INSERT_LOGICAL= |
Y |
Rewrite character TRUE/FALSE to logical |
|
UPDATE_LOGICAL= |
Y |
Rewrite character TRUE/FALSE to logical |
|
SPACE_QUOTE_IDENTIFIER= |
Y |
If the SPACE_QUOTE_IDENTIFIER keyword is unset, it defaults to true, i.e., a space is returned as the quote character. To make the driver return an empty string for the quote character, this keyword must be set to N. Most applications work properly with the default behavior (SPACE_QUOTE_IDENTIFIER = Y). Known exceptions include some versions of Microsoft Visio, the Microsoft SQL Server DTS Wizard and Business Objects. |
|
MIN_FIELD_LEN= |
Minimum length for char field or expression. |
|
|
MAX_FIELD_LEN= |
Minimum length for char field or expression. |
To connect to multiple databases through a single OpenLink client connection and/or to make use array type columns you must run the OpenLink provided "setup.p" utility. Please refer to the setup.p document for detailed information on the use of this script.
Configuring Progress Session Resources
You can control default behavior and progress server session resource allocation by entering standard progress session parameters in the "Server Options" field within the Admin Assistant's database agent configuration wizard dialogs or forms.
The following values are set for you by default at installation time and displayed as depicted below within the "Server Options" fields of the Admin Assistant Forms and Wizard dialogs.
-T /tmp -d mdy -TB 31 -TM 31
Database Agent Specific Issues
Progress database servers support sockets and shared memory based methods of Inter Process Communication (IPC), unfortunately the shared memory approach which is much faster than sockets and the preferred approach by many users bears a cost of version incompatibility. This implies that your OpenLink database agents need to be an exact version match with your backend Progress database server in order to successfully initiate shared memory based database sessions (note: these agents are built using the Progress Embedded SQL package).
Rebuilding Progress Database agents
To get around the issue explained above OpenLink provides a relinkable library and script file that enables you to build an OpenLink database agent that has an exact match to the version of Progress that you have installed. See the section below on Relinking Progress Agents for details.
If shared memory based IPC isn't an issue for you then start your Progress server with the -S, -N, and -H options indicating the use of a sockets based Progress database server. This mode of operation is Progress version independent.
Application Server & 3-Tier Architecture Configuration
There may be situations in which you are unable to install your OpenLink Request Broker and Database Agents on the same machine as the one hosting your Progress database server. Irrespective of the reasons that lead you to this scenario, it is possible to configure your OpenLink database agents hosted on your Application Server machine such that they connect to a remote Progress database on your Database Server machine using Progress database specific networking (Progress Client Networking) as opposed to OpenLink's Database Independent Networking. The end result being a 3-tier distributed OpenLink architecture in which the communication between OpenLink clients and database agents use OpenLink Database independent Networking, while the communication between the Progress database agent and the Progress database server uses Progress Client Networking.
Configuration Steps:
Assuming you have a Progress Database Server machine called "mainserver2" that has a sockets based Progress Server process running, you would enter the following (assuming a TCP/IP based network):
-
Ensure that you have a usable connection to Progress using its native networking (Progress Client Networking) using the following remote database connection parameters:
-S mainserver2 -H mainserver -N tcp .
-
Add the following values to the "Connect Options" field within the Admin Assistant Forms or Wizards used to configure your database agent in the Rulebook. If you choose to set this value on the client simply enter the same value into to the "Options" attribute associated with the configuration of your OpenLink client (see OpenLink ODBC or JDBC or UDBC client configuration for more details):
-S mainserver2 -H mainserver -N tcp
|
See Also: |
|---|---|
|
See Also: |
|---|---|
|
Application Server Architecture for various illustrations of distributed client-server architectures supported by OpenLink database agent |
8.2.6.Oracle
When configuring an Oracle database agent the critical configuration items are:
-
Database Identification - this is an actual Oracle System Identifier (SID) e.g "ORCL", which identifies the actual Oracle environment that you want to be connected with. This is the value that you enter into the "Database Name" field of either your Admin Assistant's database agent configuration form or wizard dialog. If you choose to have database identification take at the client rather than server, you enter this value into the "Database Name" field or connection attribute when configuring your OpenLink client.
Oracle provides a number of environment variables for configuring database clients, the basic set required for successfully connecting your database agent to an Oracle database server are tabulated below:
Table8.6.Default Rule Book settings
|
Rule Book Section & parameters |
Default Rule Book Settings |
Notes |
|---|---|---|
|
[Environment ORACLE7] |
||
|
ORACLE_HOME= |
/dbs/oracle7 |
The home directory for the Oracle installation. |
|
ODBC_CATALOGS= |
Y |
Uncomment after loading the "odbccat7.sql" script. |
|
MULTIPLEX_LDA= |
5 |
Allow 5 OpenLink clients via a single database session |
|
OPL_USER_TBLS_FIRST= |
N |
set to Y to show OpenLink User Tables first |
|
SHOW_REMARKS= |
N |
Set to Y to retrieve SQLColumns REMARKS field |
|
[Environment ORACLE8] [Environment ORACLE9] |
Parameters are common in Oracle 8 and 9i | |
|
ORACLE_HOME= |
/dbs/oracle8 or /dbs/oracle9 |
The home directory for the Oracle installation. |
|
ODBC_CATALOGS= |
Y |
Uncomment after loading the "odbccat8.sql" script. |
|
MULTIPLEX_LDA= |
5 |
Allow 5 OpenLink clients via a single database session |
|
OPL_USER_TBLS_FIRST= |
N |
set to Y to show OpenLink User Tables first |
|
SHOW_REMARKS= |
N |
Set to Y to retrieve SQLColumns REMARKS field |
|
OCI_PREFETCH_ROWS= |
120 |
Sets the number of rows to be prefetched |
|
OCI_PREFETCH_MEMORY= |
64 |
Kb of memory allocated for rows to be prefetched |
Database Agent Specific Settings
The "odbccat.sql" scripts explained:
These scripts exist for each version of Oracle supported, the files "odbccat6.sql", "odbccat7.sql", and "odbccat8.sql" representing Oracle versions 6 up to version 8 respectively. Oracle 9i can use the "odbccat8.sql" script. These scripts are to be applied to your Oracle instance to enable efficient and extended functionality between OpenLink and Oracle when handling ODBC, JDBC, UDBC, and OLE-DB catalog calls such as SQLForeignKeys() and SQLPrimaryKeys() functions. These functions have significant impact on the performance of your OpenLink clients.
To run these scripts you need to start the Oracle server manager (svrmgr or sqldba if you do this from the command line). Connect as internal and run the script by locating the relevant script file as you would any other Oracle SQL script file.
Rebuilding Oracle Database Agents
OpenLink provides a relinkable library and script files that enable you to rebuild your database agents as shared, as opposed to statically linked binaries, or for the purposes of getting a closer database implementation fit if your Oracle database environment is a more recent release than the actual version used by OpenLink to build the database agent installed on your system. Please read the Relinking OpenLink Database Agents section that follows, for details on how to perform this task.
Application Server & 3-Tier Architecture Configuration
There may be situations in which you are unable to install your OpenLink Request Broker and Database Agents on the same machine as the one hosting your Oracle database server. Irrespective of the reasons that lead you to this scenario, it is possible to configure your OpenLink database agents hosted on your Application Server machine such that they connect to a remote Oracle database on your Database Server machine using Oracle database specific networking (SQL*Net or Net8) as opposed to OpenLink's Database Independent Networking. The end result being a 3-tier distributed OpenLink architecture in which the communication between OpenLink clients and database agents use OpenLink Database independent Networking, while the communication between the Oracle database agent and the Oracle database server uses Oracle SQL*Net or Net8.
Configuration Steps:
Assuming you have an Oracle Database Server machine called "mainserver2" that has an Oracle Listener process running, you would enter the following (presuming that your SQL*Net or Net8 alias for this Listener is also named "mainserver2"):
-
On your Application Server (the machine hosting your database agents) create a SQL*Net or Net8 Alias named "mainserver2" (for purposes of this example only).
-
Ensure that you have a usable connection to the remote Oracle database server using the SQL*Net or Net8 alias "mainserver2"
-
Add the following values to the "Server Options" field within the Admin Assistant Forms or Wizards used to configure your database agent. If you choose to set this value on the client simply enter the same value into to the "Database Name" Attribute associated with the configuration of your OpenLink client (see OpenLink ODBC or JDBC or UDBC client configuration for more details):
mainserver2
|
See Also: |
|---|---|
|
Application Server Architecture for various illustrations of distributed client-server architectures supported by OpenLink database agent |
8.2.7.Sybase
|
Note: |
|---|---|
|
The Sybase Agent is no longer required, all Sybase connectivity is handled by the TDS Agent. See: TDS Agent This section remains purely for reference on previous OpenLink versions |
When configuring a Sybase database agent the critical configuration items are:
-
Database Identification - this is the name of the Sybase database to be connected to ie pubs2 in the case of the Sybase provided sample database. This is the value that you enter into the "Database Name" field of either your Admin Assistant's database agent configuration form or wizard dialog. If you choose to have database identification take at the client rather than server, you enter this value into the "Database Name" field or connection attribute when configuring your OpenLink client.
Sybase provides a number of environment variables for configuring database clients, the basic set required for successfully connecting your database agent to a Sybase database server are tabulated below:
Table8.7.Default Rule Book settings
|
Rule Book Section & parameters |
Default Rule Book Settings |
Notes |
|---|---|---|
|
[Environment SYBASE4] |
||
|
SYBASE= |
/dbs/sybase4 |
Full path to the base directory for the Sybase installation. |
|
DSQUERY= |
SYBASE |
Name of the Sybase Query Server that you are connecting to. |
|
[Environment SYBASE10] |
||
|
SYBASE= |
/dbs/sybase10 |
Full path to the base directory for the Sybase installation. |
|
DSQUERY= |
SYBASE |
Name of the Sybase Query Server that you are connecting to. |
|
[Environment SYBASE11] |
||
|
SYBASE= |
/dbs/sybase11 |
Full path to the base directory for the Sybase installation. |
|
DSQUERY= |
SYBASE |
Name of the Sybase Query Server that you are connecting to. |
|
Note: |
|---|---|
|
On some systems, like RedHat Linux, if the environment variable LANG=en_US is set it may need to be unset, or the environment variable LC_ALL=default set in the RuleBook to avoid RPC:Time Out errors on connect. |
Rebuilding Sybase Database Agents
OpenLink provides a relinkable library and script files that enable you to rebuild your database agents as shared, as opposed to statically linked binaries, or for the purposes of getting a closer database implementation fit, should your Sybase database environment be a more recent release than the actual version used by OpenLink to build the database agent installed on your system. Please read the Relinking OpenLink Database Agents section that follows, for details on how to perform this task.
Application Server & 3-Tier Architecture Configuration
There may be situations in which you are unable to install your OpenLink Request Broker and Database Agents on the same machine as the one hosting your Sybase database server. Irrespective of the reasons that lead you to this scenario, it is possible to configure your OpenLink database agents hosted on your Application Server machine such that they connect to a remote Sybase database on your Database Server machine using Sybase database specific networking (Open Client) as opposed to OpenLink's Database Independent Networking. The end result being a 3-tier distributed OpenLink architecture in which the communication between OpenLink clients and database agents use OpenLink Database independent Networking, while the communication between the Sybase database agent and the Sybase database server uses Sybase Open Client.
Configuration Steps:
Assuming you have an Sybase Database Server machine called "mainserver2" that has an Sybase Server named "mainserver2" up and running:
-
On your Application Server (the machine hosting your database agents) create an Open Client Database Connection Alias named "mainserver2" (for purposes of this example only).
-
Ensure that you have a usable connection to the remote Sybase database server using the Open Client Database alias "mainserver2"
-
Add the following values to the "Server Options" field within the Admin Assistant Forms or Wizards used to configure your database agent. If you choose to set this value on the client simply enter the same value into to the "Database Name" Attribute associated with the configuration of your OpenLink client (see OpenLink ODBC or JDBC or UDBC client configuration for more details):
mainserver2
You may also enter the following values into the "Database Server Options" field: -s mainserver2
|
See Also: |
|---|---|
|
Application Server Architecture for various illustrations of distributed client-server architectures supported by OpenLink database agent |
8.2.8.Microsoft SQL Server
You can specify the following environment variables for this agent:
-
FREETDSCONF : a path to the freetds.conf file to use.
-
DSQUERY : the section to use within freetds.conf
-
TDSSERVER : the IP address or alias name for the server running SQL Server.
-
TDSPORT : the TCP port number the SQLServer instance is running on
-
TDSVER : the TDS Protocol version for the type of SQLServer instance being used.
-
TDSDBASE : the name of the SQLServer Database
The following Connection Options can be passed to the driver:
-
-H - Hostname of the machine SQL Server is running
-
-P - SQL Server TCP Port
-
-V - SQL Server version . Values supported are; 9.0 equal SQL Server 2005; 8.0 equal SQL Server 2000; 7.0 equal SQL Server 7
-
-S - SQL Server name on the specified host. A SQL Server instance can also be specified by appending "\InstanceName" to the ServerName?? ie "ServerName\InstanceName"
-
-F - Specify Fail over server name for Database Mirroring
-
-N - Network Packet size, which is a value that determines the number of bytes per network packet transferred from the database server to the client. The correct setting of this attribute can improve performance. When set to 0, the initial default, the driver uses the default packet size as specified in the Sybase server configuration. When set to -1, the driver computes the maximum allowable packet size on the first connect to the data source and saves the value in the system information.
-
-O Prepared Method, which is a value that determines whether stored procedures are created on the server for every call to SQLPrepare. When set to Full (2), stored procedures are created for every call to SQLPrepare, which can decrease performance when processing static statements. When set to Partial(1), the initial default, the driver creates stored procedures only if the statement contains parameters. Otherwise, the statement is cached and executed directly at SQLExecute time. When set to None (0), the driver never creates stored procedures.
-
-L - The name of a Microsoft SQL Server supported national language. The default language is English.
-
-C - The name of an installed character set on the server. By default it is the setting on the Microsoft SQL Server.
-
-A - Turn Off ANSI NULL handling
-
-E - Turn On SSL Strong Data Encryption
-
-R - Turn On SSL Server Certificate Verification
-
-D - Specify Name of Certificate Authority file to be used for SSL Certificate Verification
-
-Z - Turn On Snapshot Serializable Isolation
-
-M - Turn On Multiple Active Result Sets (MARS)
|
Note |
|---|---|
|
Note on Precedence: The web-based Administrative Assistant modifies/sets environment variables, above. These environment variables are used in preference to any -H, -V or -P connect-options that might be specified. |
Application Server & 3-Tier Architecture Configuration
There may be situations in which you are unable to install your OpenLink Request Broker and Database Agents on the same machine as the one hosting your Microsoft SQL Server database server. Irrespective of the reasons that lead you to this scenario, it is possible to configure your OpenLink database agents hosted on your Application Server machine such that they connect to a remote Microsoft SQL Server database on your Database Server machine using Microsoft SQL Server database specific networking (NETLIB) as opposed to OpenLink's Database Independent Networking. The end result being a 3-tier distributed OpenLink architecture in which the communication between OpenLink clients and database agents use OpenLink Database independent Networking, while the communication between the Microsoft SQL Server database agent and the Microsoft SQL Server database server uses Microsoft SQL Server's NETLIB.
Configuration Steps:
Assuming you have an Microsoft SQL Server Database Server machine called "oplwinnt" that has a Microsoft SQL Server Server named "oplwinnt" up and running:
-
On your Application Server (the machine hosting your database agents) create a NETLIB Database Connection Alias named "oplwinnt" (for purposes of this example only).
-
Ensure that you have a usable connection to the remote Microsoft SQL Server database server using the Open Client Database alias "oplwinnt" (this the value you provide whenever you are prompted for a Server Name by native SQL Server utilities)
-
Add the following values to the "Server Options"field within the Admin Assistant Forms or Wizards used to configure your database agent. If you choose to set this value on the client simply enter the same value into to the "Database Name" Attribute associated with the configuration of your OpenLink client ODBC or JDBC or UDBC client configuration for more details):
oplwinnt
You may also enter the following values into the "Database Server Options" field: -s oplwinnt
8.2.9.TDS
The TDS Agent supercedes the Sybase and SQLServer database agents. Although they share a common connection mechanism there are some subtle value differences that must be observed.
TDS provides a number of environment variables for configuring database clients, a typical set used for successfully connecting your database agent to a SQL Server are tabulated below:
Table8.8.Default Rule Book settings
|
Rule Book Section & parameters |
Default Rule Book Settings |
Notes |
|---|---|---|
|
[Environment SQLServer 2000] |
The section name will vary with the agent version and database version. |
|
|
FREETDSCONF= |
/home/openlink/bin/freetds.conf |
|
|
DSQUERY= |
SQLSERVER |
Load this section from the freetds.conf file. |
|
TDSHOST= |
sqlsrv |
Point this to your SQL Server /Sybase machine |
|
TDSPORT= |
1433 |
The port on which you SQL Server/Sybase listens for incoming connections. SQL Server uses port 1433 by default, however Sybase uses 4100. |
|
TDSVER= |
7.0 |
The required TDS connectivity version. Refer to the table below. |
|
SQLSERVER_CATALOG= |
Y |
|
|
CURSOR_SENSITIVITY= |
LOW |
You can set this to HIGH after loading oplrvc.sql |
The TDSVER option above must be set correctly for connection to the desired database. Use the following table to find which.
Table8.9.TDSVER settings
|
Version Number |
Database Supported |
|||||
|---|---|---|---|---|---|---|
|
4.2 |
|
|||||
|
4.6 |
|
|||||
|
5.0 |
|
|||||
|
7.0 |
|
|||||
|
8.0 |
|
|||||
|
9.0 |
|
8.2.10.DB2
Table8.10.Default Rule Book settings
|
Rule Book Section & parameters |
Default Rule Book Settings |
Notes |
|---|---|---|
|
[Environment DB2] |
||
|
DB2DIR= |
/DB2 |
Full path to the base directory for the DB2 installation. Note,DB2 version 5 and below use the environment variable DB2PATH instead. |
|
DB2INSTANCE= |
DB2 |
Name of the instance you want to connect to. DB2 is the default DB2 instance name. |
Agent Section
OpsysLogin=No; Validation of users is left to DB2
Database Agent default name: db2_sv
8.2.11.PostgresSQL
Table8.11.Default Rule Book settings
|
Rule Book Section & parameters |
Default Rule Book Settings |
Notes |
|---|---|---|
|
[Environment POSTGRES] |
||
|
;ODBC_CATALOGS= |
Y |
Uncomment after loading odbccat defs |
Agent Section
OpSysLogin= Yes; Users are validated against the operating system.
The following options can be used in the ConnectOptions field of the rule book (oplrqb.ini) to override client Options settings:
-
-H <hostname>. Connect to postmaster on <hostname>. This defaults to localhost if unspecified
-
-P <port>. Contact postmaster on port <port>, which defaults to PGPORT (5432) is unspecified.
-
-T. Disable ODBC transaction management. All transactions will be automatically committed. This prevents palloc() failures with out-of-memory errors when doing really big transactions such as Exporting 10000 records from MS/Access.
Database Agent default name: pgr7_mv (or pgr7_sv which is single threaded)
This ODBC database agent has been built using PostgreSQL release 7.2. Using this agent with a previous version of Postgres will probably fail. If you experience any problems with older releases, please try against release 7.2 first before contacting OpenLink.
Data type Mapping from ODBC Data types to Postgres Data types
This information can be queried by the SQLTypeInfo catalog call.
Table8.12.Default Rule Book settings
| SQL type | Postgres type |
|---|---|
| SQL_CHAR | char |
| SQL_VARCHAR | varchar |
| SQL_LONGVARCHAR | text |
| SQL_DECIMAL | varchar |
| SQL_NUMERIC | varchar |
| SQL_BIT | bit |
| SQL_TINYINT | int2 |
| SQL_SMALLINT | int2 |
| SQL_INTEGER | int4 |
| SQL_BIGINT | varchar |
| SQL_REAL | float4 |
| SQL_DOUBLE | float8 |
| SQL_FLOAT | float8 |
| SQL_BINARY | not supported |
| SQL_VARBINARY | not supported |
| SQL_LONGVARBINARY | not supported |
| SQL_DATE | not supported |
| SQL_TIME | not supported |
| SQL_TIMESTAMP | not supported |
Data type Mapping from Postgres Data types to ODBC Data types
This information can be queried by the SQLColumns catalog call.
Table8.13.Default Rule Book settings
| Postgres type | SQL type | Precision |
|---|---|---|
| bool | SQL_CHAR | 1 |
| char | SQL_CHAR | 1 |
| name | SQL_VARCHAR | 32 |
| char16 | SQL_CHAR | 16 |
| int2 | SQL_SMALLINT | |
| int4 | SQL_INTEGER | |
| regproc | SQL_VARCHAR | 16 |
| text | SQL_LONGVARCHAR | 8000 |
| oid | SQL_INTEGER | (*) |
| tid | SQL_VARCHAR | 19 |
| xid | SQL_VARCHAR | 12 |
| cid | SQL_VARCHAR | 3 |
| oid8 | SQL_VARCHAR | 89 |
| smgr | SQL_VARCHAR | 12 |
| char2 | SQL_VARCHAR | 2 |
| char4 | SQL_VARCHAR | 4 |
| char8 | SQL_VARCHAR | 8 |
| filename | SQL_VARCHAR | 255 |
| float4 | SQL_REAL | |
| float8 | SQL_DOUBLE | |
| abstime | SQL_VARCHAR | 60 |
| reltime | SQL_VARCHAR | 60 |
| tinterval | SQL_VARCHAR | 60 |
| unknown | SQL_VARCHAR | 255 |
| bpchar | SQL_CHAR | 255 |
| varchar | SQL_VARCHAR | 255 |
| date | SQL_CHAR | 10 |
| time | SQL_CHAR | 16 |
| other type | SQL_LONGVARCHAR | 8000 |
(*) Note: An oid is returned as a SQL_INTEGER, because otherwise it would not be useable for SQLSpecialColumns.
Binary data / large objects are not supported in this release.
8.2.12.MySQL
Table8.14.Default Rule Book settings
|
Rule Book Section & parameters |
Default Rule Book Settings |
Notes |
|---|---|---|
|
[Environment MySQL] |
||
|
;ODBC_CATALOGS= |
Y |
Uncomment after loading odbccat defs |
Agent Section
OpSysLogin= Yes; Users are validated against the operating system.
The following options can be used in the ConnectOptions field of the rule book (oplrqb.ini) to override client Options settings:
-
-H <hostname>. Connect to server running on <hostname>. This defaults to localhost if unspecified
-
-P <port>. Contact server on port <port>, which defaults to (3306) is unspecified.
-
-T. Disable all ODBC transaction support. The agent will never issue any extra statements for transaction management (commit, rollback, modification of transaction isolation level)
This ODBC database agent has been built and verified using MySQL release 3.23.48.
Data type Mapping from ODBC Data types to MySQL Data types
This information can be queried by the SQLTypeInfo catalog call.
Table8.15.Default Rule Book settings
| SQL type | MySQL type |
|---|---|
| SQL_CHAR | char |
| SQL_VARCHAR | varchar |
| SQL_LONGVARCHAR | text |
| SQL_DECIMAL | decimal |
| SQL_NUMERIC | decimal |
| SQL_BIT | not supported |
| SQL_TINYINT | tinyint |
| SQL_SMALLINT | smallint |
| SQL_INTEGER | integer |
| SQL_BIGINT | bigint |
| SQL_REAL | real |
| SQL_DOUBLE | double |
| SQL_FLOAT | double |
| SQL_BINARY | tinyblob |
| SQL_VARBINARY | tinyblob |
| SQL_LONGVARBINARY | longblob |
| SQL_DATE | date |
| SQL_TIME | time |
| SQL_TIMESTAMP | timestamp |
Data type Mapping from MySQL Data types to ODBC Data types
This information can be queried by the SQLColumns catalog call.
Table8.16.Default Rule Book settings
| MySQL type | SQL type | Precision |
|---|---|---|
| bigint | SQL_BIGINT | 19 |
| blob | SQL_VARBINARY | 2^16-1 |
| char(n) | SQL_CHAR | n |
| date | SQL_CHAR | 32 |
| datetime | SQL_CHAR | 32 |
| decimal(p,s) | SQL_DECIMAL | p |
| double | SQL_DOUBLE | 15 |
| enum | SQL_VARCHAR | 255 |
| float | SQL_REAL | 7 |
| int | SQL_INTEGER | 10 |
| longblob | SQL_LONGVARBINARY | 2^32-1 |
| longtext | SQL_LONGVARCHAR | 2^32-1 |
| mediumblob | SQL_VARBINARY | 2^24-1 |
| mediumint | SQL_INTEGER | 8 |
| mediumtext | SQL_LONGVARCHAR | 2^24-1 |
| set | SQL_VARCHAR | 255 |
| smallint | SQL_SMALLINT | 5 |
| text | SQL_LONGVARCHAR | 2^16-1 |
| time | SQL_VARCHAR | 32 |
| timestamp(n) | SQL_VARCHAR | n |
| tinyblob | SQL_VARBINARY | 255 |
| tinyint | SQL_TINYINT | 3 |
| tinytext | SQL_VARCHAR | 255 |
| varchar(n) | SQL_VARCHAR | n |
| varchar(n) binary | SQL_VARCHAR | n |
| year | SQL_VARCHAR | 4 |
8.2.13.OpenLink ODBC Agent Installation & Configuration
The OpenLink ODBC Agent is an ODBC Proxy Service that facilitates the integration of non OpenLink ODBC Drivers in the Sophisticated OpenLink Multi Tier ODBC Architecture, thereby extending the benefit of this architecture beyond the scope of OpenLink ODBC drivers.
Typical Utilization:
A typical and very popular use of the OpenLink ODBC Agent is the exposure of tradition desktop database engines within your organization to your new Intranet or Internet based infrastructures, using a client-server distributed computing model. This implies that you can have multiple concurrent clients within your Intranet or remote Internet clients connecting to your Microsoft Access, DBASE, Fox PRO, Paradox database engines without any compromises in security and with astonishing performance.
Installation:
After downloading the OpenLink Data Access Driver Suite for your chosen desktop operating system please perform the following steps:-
-
Move into your temporary installation directory
-
Extract the contents of the OpenLink ZIP archive into the directory in step 1
-
Double click on the program "setup.exe"
-
Follow the on-screen instructions
Post Installation & Pre Configuration Check List
-
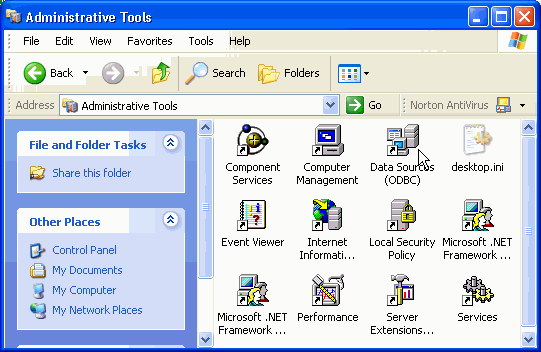
Verify that the ODBC Driver Manager exists on your system by opening up your desktop's control panel group. This will be under Administrative Tools on a Windows XP system.
Figure8.18.Admin Assistant
-
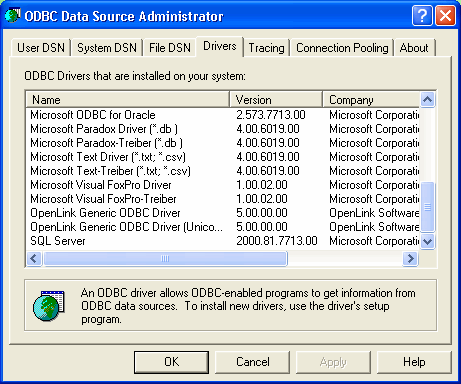
Verify the existence of an ODBC Driver for the desktop database engine that you will be connecting with (the example below shows OpenLink and Microsoft drivers installed:
Figure8.19.Admin Assistant
-
Verify the existence of an ODBC System Data Source Name (DSN) for the database engine that you will be exposing via the OpenLink ODBC Agent, this ODBC DSN must be associated with the appropriate ODBC Driver for your desktop database
-
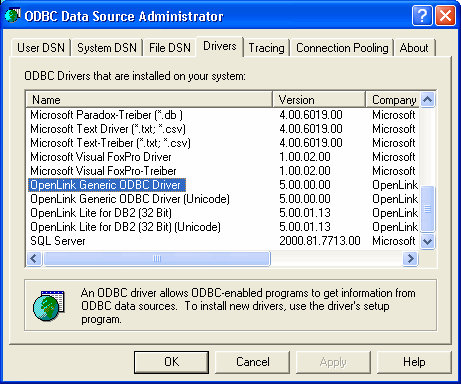
Verify the existence of an OpenLink ODBC Driver installation on your PC
Figure8.20.Admin Assistant
Configuring An OpenLink ODBC Agent Based ODBC Data Source Name (DSN)
-
Open up the ODBC Administrator within your desktop control panel, and then Click on the "Add" button to indicate that you want to add a new ODBC DSN to the current list of installed ODBC DSNs
Figure8.21.Admin Assistant
-
Click on the appropriate ODBC Driver that you will be associating this new ODBC DSN with, in this case the "OpenLink Generic ODBC Driver"
Figure8.22.Admin Assistant

-
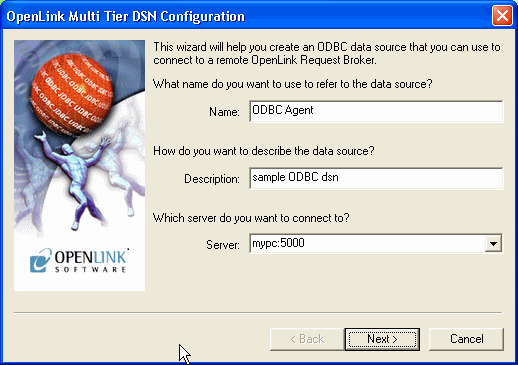
Choose a Name for your OpenLink ODBC DSN and then type it into the "Name" field, the example below presumes the DSN is to be called "ODBC Agent"
Type a comment to describe the DSN.
Enter the name and port of the machine hosting the OpenLink ODBC agent in the "Server" field. The example below presumes that the machine network alias for your desktop computer is "mypc" (note: you can also use the machines actual IP address or even use the "localhost" account if you are connecting to a local as opposed to remote non OpenLink ODBC DSN). The port is the default of 5000.
Figure8.23.Admin Assistant
-
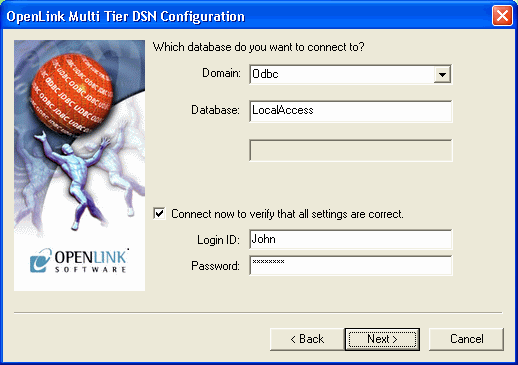
Choose an OpenLink "Server Type" of "ODBC" from the "Domain" listbox
Type the name of the non OpenLink ODBC DSN that you would like to associate this OpenLink ODBC DSN with into the "Database" field. The example below presumes the existence of a non OpenLink ODBC DSN named "LocalAccess" that is bound to the Microsoft ODBC Driver for MS Access.
When the "Connect now.." tick box is checked, a test connection is made to verify the Data Source connection.
If there is no check then the Login ID and Password fields are ignored, and no test is performed.
The Login ID is the default database UserID to use when logging on to a remote database engine (identified by the Domain above).
Password is for the login of the above UserID.
Figure8.24.Admin Assistant
-
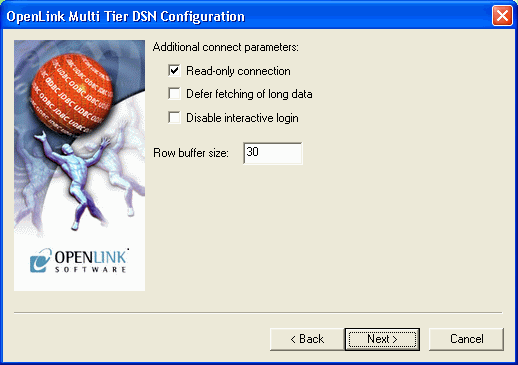
Now define additonal connection parameters:
Read-only connection. Specify whether the connection is to be "Read-only". Make sure the checkbox is unchecked to request a "Read/Write" connection.
Defer fetching of long data. Check this box to defer the fetching of long data.
Disable interactive login. Suppress the ODBC "Username" and "Password" login dialog box when interacting with your ODBC DSN from within an ODBC compliant application.
Row Buffer Size. This attribute specifies the number of records to be transported over the network in a single network hop. Values can range from 1 to 99.
Figure8.25.Admin Assistant
-
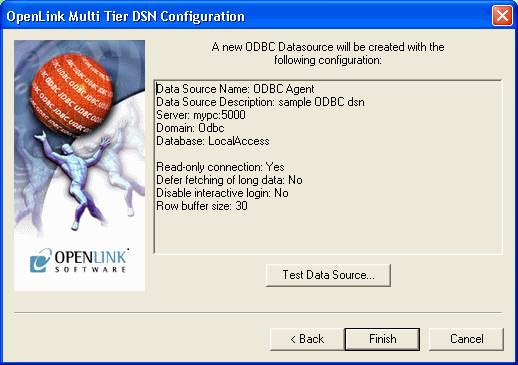
The details of the DSN are now shown. To test the DSN, press the Test Data Source button.
Figure8.26.Admin Assistant
-
If a Test is requested then the status of the DSN test connection is shown:
Figure8.27.Admin Assistant

-
Click on the "Finish" button to complete the creation of your new OpenLink ODBC DSN.
Making A Test Connection To Your OpenLink ODBC Agent Based ODBC DSN
To verify that your installation and configuration is ready for use, please follow the steps below in order to make a test connection to the OpenLink ODBC DSN that you have just created:-
-
Start the OpenLink Request Broker in debug mode, this can be done from a DOS shell by executing the command : oplrqb -dv or from your Services Panel (note you must change the startup mode to manual to enable the OpenLink Request Broker run in Debug Mode)
-
Locate the program "VBDemo" or "C++ Demo" situated within the "OpenLink Data Access Drivers" group on your desktop (Windows start menu item)
-
Attempt to make a connection to the OpenLink ODBC DSN
-
If step 3 is successful and you see data exchanged between your ODBC Client and your OpenLink ODBC DSN, exit the ODBC application, and then shutdown and restart the Broker without the Debug Mode options using the command: oplrqb -v. If step 3 is unsuccessful repeat step 3 and then capture the Request Broker output and proceed to instigating contact with OpenLink Technical support via the OpenLink Support Page
-
Establish connection between your own ODBC Applications and the OpenLink ODBC DSN created in step 3
-
Shutdown the Request Broker using the command: oplshut -f
Adding An OpenLink ODBC Agent To An Early OpenLink System
-
Place the ODBC Agent executable in the openlink/bin sub-directory
-
Edit the OpenLink "Session Rules" Book (the file oplrqb.ini) using a text editor
-
Insert a new OpenLink Session Mapping rule to the top of the "[Mapping Rules]" section of the Rule Book in the manner depicted below:
odbc:*:*:*:*:*:* = accept odbc_agent
-
Then create a new OpenLink Agent section as follows:
              [odbc_agent]
              Program = odbc_sv
Note: Program key must be set to the exact file name. (For NT this would be odbc_sv.exe)
-
Save the file
-
Shutdown and restart your OpenLink Request Broker.
8.2.14.OpenLink ODBC-JDBC Agent Bridge Installation & Configuration
The OpenLink ODBC-JDBC Agent bridge is a JDBC Proxy Service enabling ODBC connectivity to a JDBC data repository via an existing JDBC driver for the data repository. Thus essentially it is the reverse of the more traditional JDBC-ODBC driver bridge used for accessing databases via JDBC.
Typical Utilization:
A typical and very popular use of the OpenLink ODBC-JDBC Agent bridge would be to access a Database written purely in Java for which a JDBC driver is the only data access mechanism available. As databases written purely in Java become more popular the use of the ODBC-JDBC bridge will become more relevant.
Installation:
After downloading the OpenLink Data Access Driver Suite for your chosen desktop operating system please perform the following steps:-
-
Move into your temporary installation directory
-
Extract the contents of the OpenLink ZIP archive into the directory in step 1
-
Double click on the program "setup.exe"
-
Follow the on-screen instructions
Post Installation & Pre Configuration Check List
-
Verify that the ODBC Driver Manager exists on your system by opening up your desktop's control panel group
Figure8.28.Admin Assistant
-
Verify the Java environment for the JDBC driver to be used is configured. In particular the CLASSPATH and PATH environment variables must be set correctly for a successful connection. If this is not set in the user's environment by default, you can configure this via the OpenLink session Rules Book (oplrqb.ini) via the relevant [Environment JDBCXX] section where XX = 12 or 13, indicating the version of the JDK in use. Example here is wrapped across lines for presentation.
[Environment JDBC12] CLASSPATH = .;D:\Software\oracle\ora81\jdbc\lib\classes12.zip;D:\Softwa re\oracle\ora81\jdbc\lib\nls_charset12.zip;c:\program files\openlink\vi rtuoso 2.0\jdk1.2\virtjdbc2.jar;c:\program files\openlink\jdk1.2\opljdb c2.jar PATH = D:\Software\oracle\ora81\bin;D:\Software\oracle\ora81\jdbc\lib;D :\Software\jdk1.2\jre\bin;D:\Software\jdk1.2\jre\bin\classic;C:\WINNT\S YSTEM32;C:\WINNT -
Verify the existence of an OpenLink ODBC Driver installation on your PC
Figure8.29.Admin Assistant
Configuring An OpenLink ODBC-JDBC Agent Bridge Based ODBC Data Source Name (DSN)
-
Open up the ODBC Administrator within your desktop control panel, and then Click on the "Add" button to indicate that you want to add a new ODBC DSN to the current list of installed ODBC DSNs
Figure8.30.Admin Assistant
-
Click on the appropriate ODBC Driver that you will be associating this new ODBC DSN with, in this case the "OpenLink Generic 32 Bit Driver v4.0"
Figure8.31.Admin Assistant
-
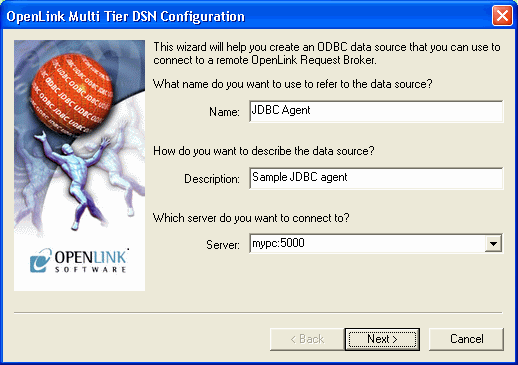
Choose a Name for your OpenLink ODBC DSN and then type it into the "Name" field, the example below presumes the DSN is to be called "JDBC Agent"
Type a comment to describe the DSN.
Enter the name and port of the machine hosting the OpenLink ODBC agent in the "Server" field. The example below presumes that the machine network alias for your desktop computer is "mypc" (note: you can also use the machines actual IP address or even use the "localhost" account if you are connecting to a local as opposed to remote JDBC driver). The port is the default of 5000.
Figure8.32.Admin Assistant
-
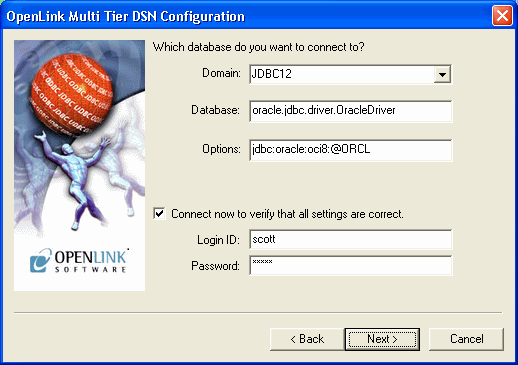
Choose an OpenLink "Server Type" of "JDBCXX" from the "Domain" listbox where XX can be 12 or 13 to represent a JDK 1.2 or 1.3 installation is in use.
Type the name of the JDBC driver you would like to use for your connection into the "Database" field. The example below assumes you are connecting to Oracle 8i using the JDBC driver provided by Oracle named "oracle.jdbc.driver.OracleDriver".
Type the JDBC connect string for the Database you wish to connect to in the "Options" field. The example below assumes you are connecting to Oracle 8i using the JDBC connect string of "jdbc:oracle:oci8:@ORCL".
When the "Connect now.." tick box is checked, a test connection is made to verify the Data Source connection.
If there is no check then the Login ID and Password fields are ignored, and no test is performed.
The Login ID is the default database UserID to use when logging on to a remote database engine (identified by the Domain above).
Password is for the login of the above UserID.
Figure8.33.Admin Assistant
-
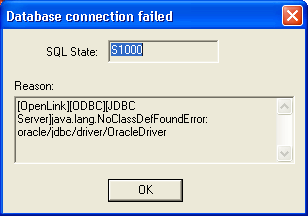
If a test is perfomed, then errors are reported like in this example:
Figure8.34.Admin Assistant
-
Now define additonal connection parameters:
Read-only connection. Specify whether the connection is to be "Read-only". Make sure the checkbox is unchecked to request a "Read/Write" connection.
Defer fetching of long data. Check this box to defer the fetching of long data.
Disable interactive login. Suppress the ODBC "Username" and "Password" login dialog box when interacting with your ODBC DSN from within an ODBC compliant application.
Row Buffer Size. This attribute specifies the number of records to be transported over the network in a single network hop. Values can range from 1 to 99.
Figure8.35.Admin Assistant

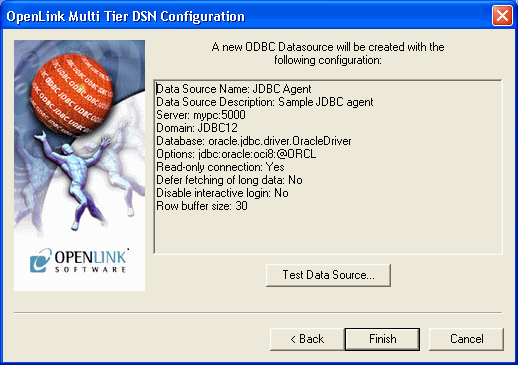
-
The details of the DSN are now shown. To test the DSN, press the Test Data Source button.
Figure8.36.Admin Assistant
-
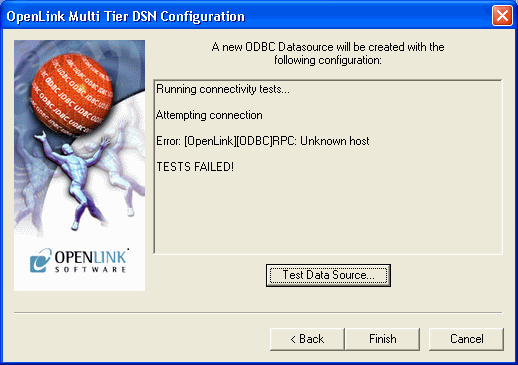
If a Test is requested then the status of the DSN test connection is shown. Here is an example error message:
Figure8.37.Admin Assistant
-
Click on the "Finish" button to complete the creation of your new OpenLink ODBC DSN.
Making A Test Connection To Your OpenLink ODBC-JDBC agent ODBC DSN
To verify that your installation and configuration is ready for use, please follow the steps below in order to make a test connection to the OpenLink ODBC DSN that you have just created:-
-
Start the OpenLink Request Broker in debug mode, this can be done from a DOS shell by executing the command : oplrqb -dv or from your Services Panel (note you must change the startup mode to manual to enable the OpenLink Request Broker run in Debug Mode)
-
Locate the program "VBDemo" or "C++ Demo" situated within the "OpenLink Data Access Drivers" group on your desktop (Windows start menu item)
-
Attempt to make a connection to the OpenLink ODBC DSN
-
If step 3 is successful and you see data exchanged between your ODBC Client and your OpenLink ODBC DSN, exit the ODBC application, and then shutdown and restart the Broker without the Debug Mode options using the command: oplrqb -v. If step 3 is unsuccessful repeat step 3 and then capture the Request Broker output and proceed to instigating contact with OpenLink Technical support via the OpenLink Support Page
-
Establish connection between your own ODBC Applications and the OpenLink ODBC DSN created in step 3
-
Shutdown the Request Broker using the command: oplshut -f
Adding An OpenLink ODBC-JDBC Agent To An Early OpenLink System
-
Place the ODBC-JDBC Agent executable in the openlink/bin sub-directory
-
Edit the OpenLink "Session Rules" Book (the file oplrqb.ini) using a text editor
-
Insert a new OpenLink Domain alias at the top of the "[Domain Alias]" section of the Rule Book in the manner depicted below:
JDBC12 = jdbc12
-
Insert a new OpenLink Session Mapping rule to the top of the "[Mapping Rules]" section of the Rule Book in the manner depicted below:
jdbc12:*:*:*:*:*:* = accept generic_jdbc12
-
Then create a new OpenLink Agent section as follows:
              [generic_jdbc12]
              Program = jdbc12_mv.exe
              Environment = JDBC12
              ReUse       = always
Note: Program key must be set to the exact file name. (For Unix this would be jdbc12_mv)
-
Then create a new OpenLink Environment section as follows: (lines wrapped for presentation here)
[Environment JDBC12] CLASSPATH = .;D:\Software\oracle\ora81\jdbc\lib\classes12.zip;D:\Softwa re\oracle\ora81\jdbc\lib\nls_charset12.zip;c:\program files\openlink\vi rtuoso 2.0\jdk1.2\virtjdbc2.jar;c:\program files\openlink\jdk1.2\opljdb c2.jar PATH = D:\Software\oracle\ora81\bin;D:\Software\oracle\ora81\jdbc\lib;D :\Software\jdk1.2\jre\bin;D:\Software\jdk1.2\jre\bin\classic;C:\WINNT\S YSTEM32;C:\WINNT -
Save the file
-
Shutdown and restart your OpenLink Request Broker.
ODBC-JDBC agent
Table8.17.Default Rule Book settings
|
Rule Book Section & parameters |
Default Rule Book Settings |
Notes |
|---|---|---|
|
[Environment Jdbc12*] [Environment Jdbc13*] |
Parameters are common to JDBC 1.2 and 1.3 | |
|
JET_SQLSTATISTICSOFF= |
FALSE |
If it is set to 'TRUE', the function SQLStatistics returns an empty ResultSet. It helps to resolve the problem with the SQLStatistics for some jdbc drivers. |
|
JET_DROPCATALOGFROMDBMETACALLS= |
FALSE |
If it is sets to 'TRUE', the NULL will be assigned to the field 'Catalog' in the ResultSet of : SQLTables, SQLColumns & SQLStatistics calls. |
|
JET_DROPSCHEMAFROMDBMETACALLS= |
FALSE |
If it is sets to 'TRUE', the NULL will be assigned to the field 'Schema' in the ResultSet of : SQLTables, SQLColumns & SQLStatistics calls. |
|
JET_NOSUPPORTOFQUOTEDIDENTIFIER= |
FALSE |
If it is sets to 'TRUE', the call SQLGetInfo for 'SQL_IDENTIFIER_QUOTE_CHAR' will return the space (" "). It can be used if DBMS doesn't support quoted SQL like select * from "account" |
|
PATCHNULLSIZEOFSQLCHAR= |
If DBMS is returning a field of type SQLCHAR or SQLVARCHAR with zero size, the size will be replaced with the value of PATCHNULLSIZEOFSQLCHAR |
Typical settings for PointBase, HyperSonic and InstantDb are as follows:
          [Environment Jdbc12PointBase]
          ;CLASSPATH =.;e:\java\pointbase\embedded\classes\pbembedded34EV.jar
          ;PATH =
          JET_DROPCATALOGFROMDBMETACALLS = YES
          JET_DROPSCHEMAFROMDBMETACALLS =  YES
          JET_NOSUPPORTOFQUOTEDIDENTIFIER = YES
          [Environment Jdbc12HyperSonic]
          ;CLASSPATH = .;e:\java\hypersonic\demo\hsql.jar
          ;PATH =
          PATCHNULLSIZEOFSQLCHAR = 4096
          JET_SQLSTATISTICSOFF = YES
          [Environment Jdbc12InstantDB]
          ;CLASSPATH = .;e:\InstantDB\Classes\idb.jar
          ;PATH =
          JET_NOSUPPORTOFQUOTEDIDENTIFIER = YES
          JET_DROPSCHEMAFROMDBMETACALLS =  YES
8.2.15.OpenLink Proxy Agent
An OpenLink Proxy agent is a specialized Agent that acts on behalf of another remotely or locally situated OpenLink Database Agent. This Agent format is typically used in 3-Tier Internet based environments in which you place an Agent on an external machine (typically running your Web Server) and then have it masquerade for an actual database agent behind your organization's firewall.
A Proxy Agent can also be used in conjunction with the Session Rules Book for centralized configuration and control of all of your OpenLink Clients, by controlling the configuration of all of the OpenLink Session Elements on one or more server machines.
Like other Proxy services, an OpenLink Client connects to the Proxy Agent instead of to the actual service; the Proxy Agent then connects to the actual service that presumably lies on a machine that shouldn't normally be accessible from outside the network. With this setup, it is possible to grant selective access to databases that are otherwise not accessible from the Internet; this greatly enhances the functionality of data access standards like JDBC, ODBC, OLE-DB.
Installation
The OpenLink Proxy Agent is automatically installed with your Request Broker on any platform.
You have to install a Request Broker installation archive on the machine that is to act as a host for the OpenLink Proxy agent (typically the middle tier machine in a three 3-tier architecture). You then install another Request Broker archive and relevant Database Agents archives on the machine(s) hosting the backend database engine(s) that you are connecting to via an OpenLink Client.
Configuration
You configure the Proxy Agent like all other OpenLink Agents using the Admin Assistant. The process is broken into two parts, the first part involves creating a Proxy Agent Template, the second part involves a Session Rules that conditionally associates OpenLink Clients with the Proxy Agent Template that you have created.
The configuration guide that follows presumes that we are creating a Proxy on a middle-tier server for the OpenLink Virtuoso Database engine such that any OpenLink Client connection (ODBC, JDBC, UDBC, or OLE-DB) to this Server ends up being connected to Virtuoso. The steps that follow guide you through this process.
Creating Proxy Agent Initialization Template
-
Start the Request Broker your middle-tier server machine
-
Start a Web Browser session
-
Enter the following URL into your browser:
If you started the Request Broker on your local machine enter:
http://localhost:8000/
(assuming you accepted port 8000 as the Admin Assistant port number at installation time).
If the Request Broker in on another machine enter:
http://<hostname or IP address>:8000/
(assuming you accepted port 8000 as the Admin Assistant port number at installation time).
-
Navigate the Admin Assistant menu tree as follows: OpenLink Database Agent(s) Settings-->Database Agent(s) Settings (Form).
Figure8.38.Admin Assistant
-
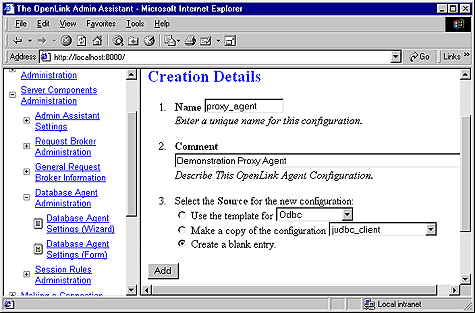
Scroll to the bottom of the Agent Templates listing page and then click on the "Add" button, this opens up a default agent initialization template page, enter a Name and Description for your new Agent Initialization Template, then select the "create blank entry" radio button and then click the "Add" hyperlink. Reinitialize the Broker when prompted.
Figure8.39.Admin Assistant
-
Navigate the Admin Assistant menu tree as follows: OpenLink Database Agent(s) Settings-->Database Agent(s) Settings (Form). Then locate the new Agent Template created in the previous step. Now click on the "Edit" hyperlink.
Enter values into the following fields representing key OpenLink Session Elements:
"User Name" - Leave empty (this is handled on the server using the Virtuoso Agent initialization Template)
"Password" - ditto
"Database Name" - ditto
"Read Only" - ditto
"Connect Options" - ditto
"Server Options" - ditto
"Server Type" - Virtuoso (you enter an valid OpenLink Domain values here, e.g Oracle 8, Informix 7, Progress 83B etc.)
"Host Name" - enter IP address or network alias of database server machine. this examples presumes the IP address of the database server 123.123.123.100
"Executable Name" - enter "proxy_sv" (Linux or UNIX) or "proxy_sv.exe" (for Windows)
In the "Client-Server Mapping Process & Control" section of this page select the "Conditionally" radio button and then hatch the "When originating from same machine" checkbox. This ensures that each new OpenLink client machine has a distinct proxy agent process servicing all the ODBC, JDBC, UDBC, OLE-DB clients on that machine thereby restricting the number of new proxy agents processes initialized.
Click on the "Update" button and the reinitialize the Request Broker.
Figure8.40.Admin Assistant
Creating Session Rule That Maps Connections to Proxy Agent's Template
-
Follow the "Server Components Administration"->"Session Rules Administration"->"Session Rules Editor" menu path which brings you to a screen identical to the one depicted below, this presents you with a list of existing session rules (all OpenLink installations come with a set of pre-configured session rules). Click on the "Add new rule" hyperlink to open up the session rule creation page.
Figure8.41.Admin Assistant
-
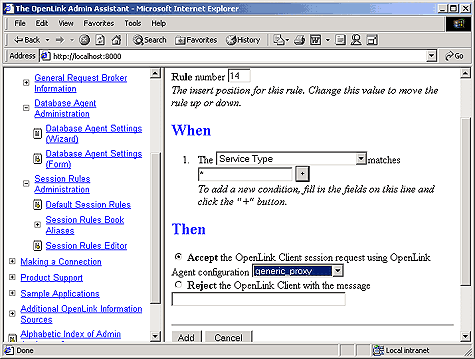
Create a new session rule by doing the following:
Set the Rule Number field to 1 (this means that this rule gets evaluated before others)
Leave the default value of "*" in the Server Type field this ensure that this rule applies to any Domain Type.
Pick the "proxy_agent" initialization template from the agent initialization template list box used by the "Then" processing instruction to determine how calls associated with this rule are to be handled.
Click on the "Add" button to save your new rule to the rule book. Then reinitialize the Request Broker.
Figure8.42.Admin Assistant
-
Create an OpenLink ODBC, JDBC, UDBC or OLE-DB client session with the Domain Type attribute set to Proxy and the Host attribute set to your middle-tier server.
If your database server is behind a firewall you need to perform the following additional additional steps:
-
Enable UDP support, and then make port 60001 available, this is the port number used by the OpenLink Request Broker. Since we are now connecting to a database server running the Request Broker that resides behind your firewall we need to open up this port.
-
Start the Request Broker on the Database Server
-
Start a Web Browser session and then initialize the Admin Assistant running on the Database Server machine by entering the following URL:
http://<hostname or IP address of Database Server machine>:8000/
(presuming you took the default number of 8000 for the Web Assistant at install time on the Database Server).
-
Navigate the Admin Assistant menu tree to: Server Components Administration--> Request Broker Administration-->Edit Request Brokers Parameters (Form).
Locate item number 4 on the form which reads "Only use ports in the range...", enter a range of TCP port numbers that you have enabled within your firewall software. The Broker will then automatically starts the Virtuoso agent (or other database agents depending on your settings) on the first available port in the range.