14.3.2.Mac OS X
The package provided for this platform is a Macintosh Installer package (.mpkg) inside a disk-image (.dmg) file. After mounting the disk-image by double clicking on it, you will have to launch the Macintosh Installer package (.mpkg). You will be guided through the installation via the Macintosh Installer application.
![[Tip]](images/tip.png) |
See Also: |
|---|---|
|
iODBC follows the Programmer and System guidelines defined by Apple, this document can be found at: developer.apple.com |
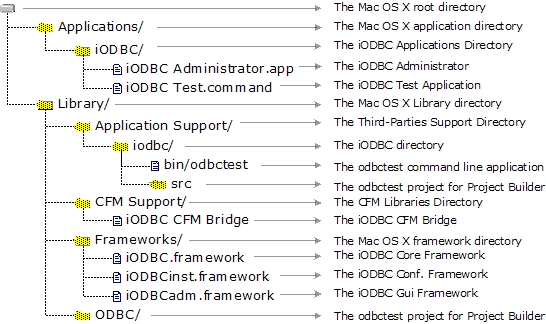
You will find the iODBC SDK installation in the following directory tree structure as installed on Mac OS X:
Figure14.5.iODBC SDK tree on Mac OS X
In Mac OS X, "frameworks" are the central components of all SDKs. They provide everything needed by developers from include files to shared libraries with which you need to link your application. All frameworks support is well managed with Project Builder, shipped by Apple. Simply drag and drop via the provided GUI the corresponding framework you want use. If you want to use a framework through the command line compiler, see below.
The framework is basically a directory, structured as below:
Figure14.6.iODBC SDK Frameworks on Mac OS X

When you need to include one of the framework header files, you have to prepend your header file name with the framework name as below :
#include <samples/my_sample_header.h>
iODBC is broken down into three frameworks, each having its own proper set of includes files and libraries.
| The iODBC.framework is the core of the ODBC driver manager. Its main task is to load run the right function with the right ODBC driver. |
| The iODBCinst.framework is the ODBC configuration manager. Its main task is to access and manage the DSN files. |
| The iODBCadm.framework is the GUI manager. Its main task is to give to the user the ability to access all the ODBC functionality through a GUI. |
First of all, you have to be sure that the compiler and linker you are using can manage frameworks correctly.
![[Note]](images/note.png) |
Note: |
|---|---|
|
The iODBC SDK is shipped with the |
Under Project Builder, you have to put all the frameworks that your application will use into your project. Implicitly, all these frameworks will be used. Also, you have to be sure that the machine where the application will be running includes all the frameworks with which you are linking. In certain cases, iODBC can be shipped with your application and all the frameworks.
This is the most straightforward way, but you can also directly
use the compiler and command line linker shipped with Project
Builder. In such case, you will have to add certain options to let
the compiler and linker know that you want to use a specific
framework. However, the sources do not require any changes. During
the compilation phase, you will have to use the "F" option to add a path to let the
compiler search for frameworks under the designated path. The
correct syntax is "Fdir",
where dir is the path you want
to add. You have to put one path, and there is no limit on the
number of F options to pass on
the command line. For iODBC, you have to add only the following two
directories:
/Library/Frameworks
/System/Library/Frameworks
A complete cc compilation command line may look like:
cc c "F/Library/Frameworks" "F/System/Library/Frameworks" mysources.c
During the linkage phase, you will have to use the same option
as above, as well as specifying at the end of the command line all
the frameworks with which you are linking, preceded by the option
framework.
A complete cc linkage
command line may look like:
cc o "myapplication" "F/Library/Frameworks" "F/System/Library/Frameworks" \
framework "iODBC" framework "iODBCinst" framework "iODBCadm"