2.9.6. Extending RDFDemo to Display Images and Longer Text Fields.
This section will guide you through extending RDFDemo so that longer text fields can be displayed as a block of text and so that links to images and web pages can be viewed in a browser window.
Pre-requisites
-
A working copy of the RDFDemo application created in Modifying the Northwind Ontology to Add Labels
Modifying the Application
Displaying Text
We will modify the form that show the details of the selected item so that when the text in the boxes is too long to be seen in full a button will appear beside the box on the form and if you click the button the complete text will be displayed in a separate window.
-
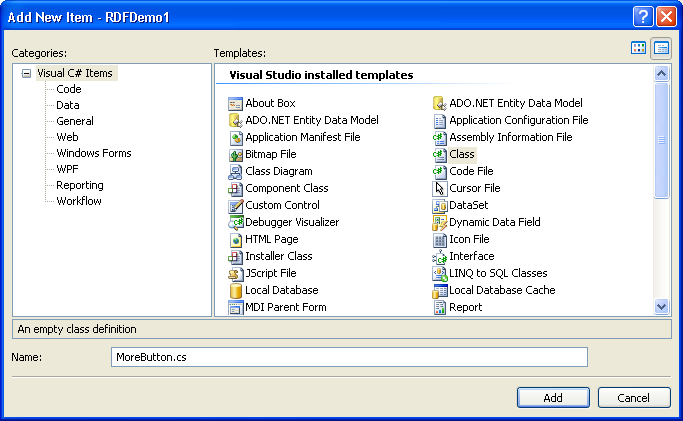
Add a new class, MoreButton that extends System.Windows.Forms.Button.
-
In the
Solution Explorer
right click on the RDFDemo project and select
Add
then
New Item
.
-
Add a new class called MoreButton.cs.
Figure 2.153. Add a new class
-
The following using statement goes at the top of the file:
using System.Windows.Forms;
-
The MoreButton class must inherit from System.Windows.Forms.Button so the class definition line should look like this:
class MoreButton : Button
-
Add the following code to the body of the MoreButton class:
 String longText;

 public MoreButton(String text)
 {
     longText = text;
     this.Text = "More";
 }

 protected override void  OnClick(EventArgs e)
 {
     Form moreForm = new Form();
     TextBox moreBox = new TextBox();
     moreBox.Text = longText;
     moreBox.Width = 300;
     moreBox.Height = 250;
     moreBox.ScrollBars = ScrollBars.Vertical;
     moreBox.Multiline = true;
     moreBox.WordWrap = true;
     moreBox.Select(0, 0);
     moreBox.ReadOnly = true;
     moreForm.Controls.Add(moreBox);
     moreForm.Width = 320;
     moreForm.Height = 280;
     moreForm.ShowDialog();
 }
-
-
In displayData in the ExtendedStringHandler class, when the labels and TextBoxes are added to the form check if the text is too big for the box. If it is then add a MoreButton that will display all the text in a separate window.
if (textBoxList[i].DataBindings[0].DataSource.ToString().Length > 80 && !(textBoxList[i].DataBindings[0].DataSource is SqlExtendedString)) { moreButtonList.Add(new MoreButton(textBoxList[i].DataBindings[0].DataSource.ToString())); moreButtonList[moreButtonList.Count - 1].Location = new Point(550, i * 22 + 50); describeForm.Controls.Add(moreButtonList[moreButtonList.Count -1]); } -
We will also need a list to hold the buttons as they are created so the following needs to be added to the member variables at the top of the ExtendedStringHandler class.
List<MoreButton> moreButtonList = new List<MoreButton>();
-
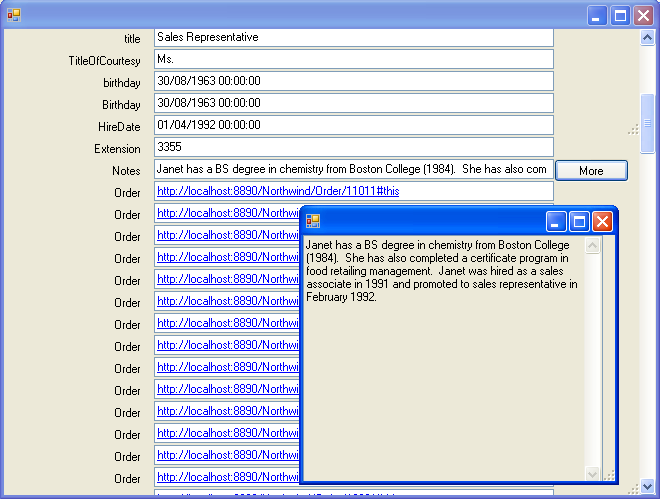
Build and run the application. If you click through to an Employee page you will see the Notes field now has a button labeled More next to it. If you click on that button the text from the Notes field is displayed in a new window.
Figure 2.154. Notes
Displaying Images and Web Pages
Next we will modify the form so that item identified as images or web pages will be opened in a browser window. Again we will do this by adding a button beside the box on the form that will open the browser window.
-
Add a new class, OpenButton that extends System.Windows.Forms.Button.
-
In the
Solution Explorer
right click on the RDFDemo project and select
Add
then
New Item
-
Add a new class called OpenButton.cs.
-
The following using statement goes at the top of the file:
using System.Windows.Forms;
-
The OpenButton class must inherit from System.Windows.Forms.Button so the class definition line should look like this:
class OpenButton : Button
-
Add the following code to the body of the OpenButton class:
String urlText;

public OpenButton(String text)
{
    urlText = text;
    this.Text = "Open";
}

protected override void  OnClick(EventArgs e)
{
    System.Diagnostics.Process.Start(urlText);
}
-
-
In displayData in the ExtendedStringHandler class, where we added the code to check for long text fields we now need to check for IRIs that identify images and web pages. As a simple first attempt we will check for matching labels. So for example, if a property label is 'image' or 'webpage', we will assume it can be opened in a browser window and put an OpenButton beside it.
if (labelList[i].Text == "website" || labelList[i].Text == "image" || labelList[i].Text == "depiction" || labelList[i].Text == "page" || labelList[i].Text == "url" || labelList[i].Text == "image skyline") { openButtonList.Add(new OpenButton(textBoxList[i].DataBindings[0].DataSource.ToString())); openButtonList[openButtonList.Count - 1].Location = new Point (550, i * 22 + 50); describeForm.Controls.Add(openButtonList[openButtonList.Count - 1]); } -
We will also need a list to hold the buttons as they are created so the following needs to be added to the member variables at the top of the ExtendedStringHandler class.
List<OpenButton> openButtonList = new List<OpenButton>();
-
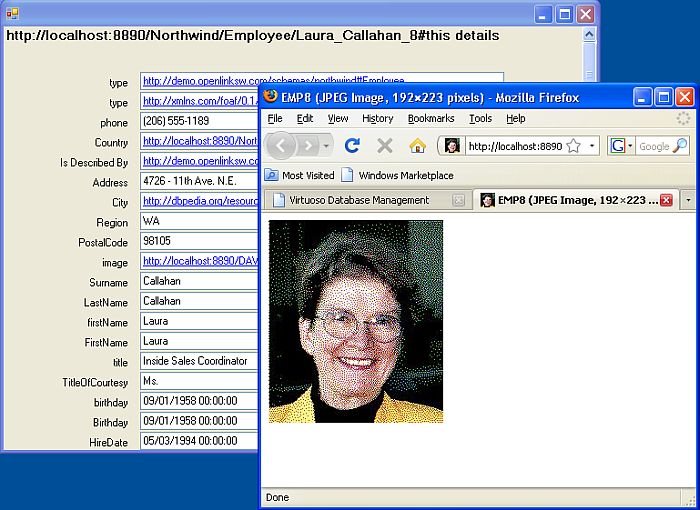
Build and run the application. If you click through to an Employee page now you will see that the Image field now has a button labeled Open next to it. If you click on that button the image is opened in your default browser.
Figure 2.155. Image
Next Steps
It has already been mentioned that the property labels are also dereferenceable IRIs. We used this feature to find a short name to display rather that the complete IRI. The next step is to make the labels clickable so the ontology itself can also be explored.