5.1.Windows Data Source Configuration
5.1.1.Creating ODBC Data Sources
Windows ODBC Data Sources
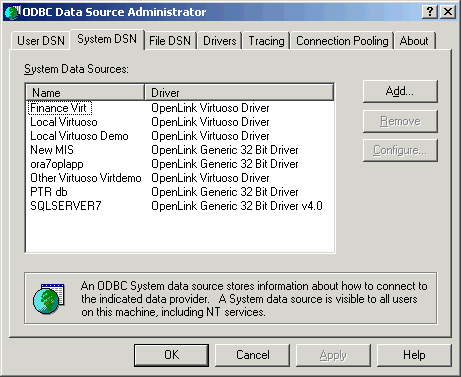
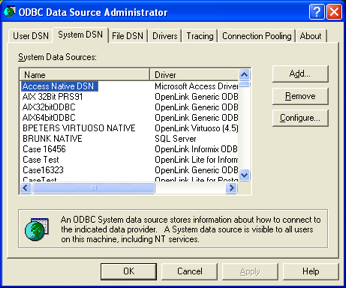
The Microsoft ODBC 2.0, 3.0 & 3.5 Driver Manager (depicted below) allows the creation of User, System, and File DSNs.
A User DSN will only be available to the user who creates the data source; a System DSN will be available to the whole system so that any user, including the system account, will be able to use that data source; A File DSN is a special 'mobile' data source that stores the data source information associated with the ODBC Driver in a file that is sharable.
The steps for creating a DSN are as follows:-
From the desired tab (User; System; File) press the Add button to begin creating a new Data source.
Figure5.1.Microsoft ODBC Administrator
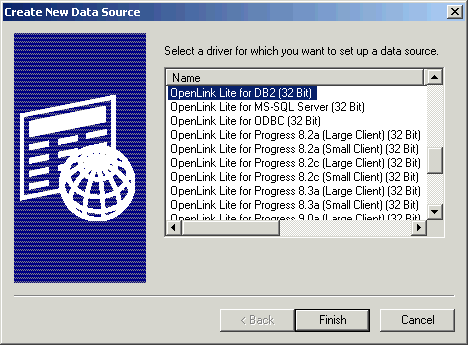
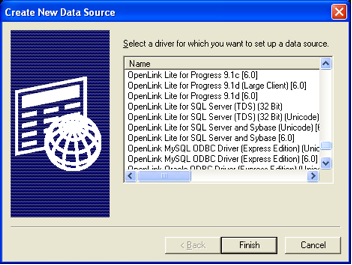
Pick the ODBC Driver to be used to create your ODBC DSN. In this example the Driver Labeled "OpenLink Lite for DB2 (32 Bit)" is highlighted.
Figure5.2.Microsoft ODBC Administrator
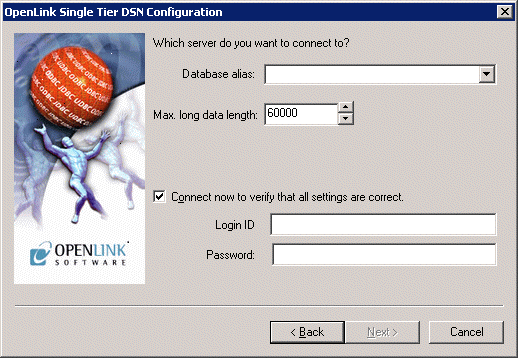
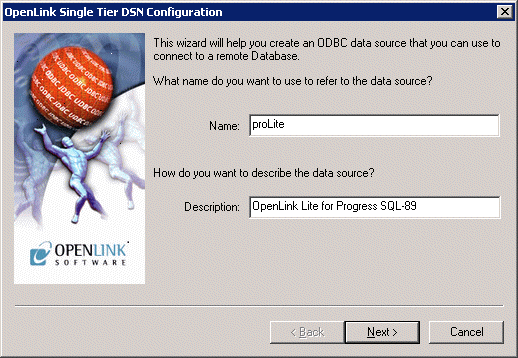
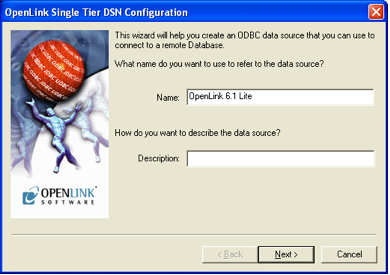
Once you have selected the appropriate OpenLink Lite Driver, you will be presented with the OpenLink ODBC Data Source Configuration Wizard for the driver selected. The Wizard has several frames, most of which require you to provide information.
Data Source Tab
The first tab is the Data Source Tab. The following parameters are common to all databases.
Figure5.3.Data Source tab (DB2 example)

-
Name. (Data source) The name of the ODBC DSN; this is how you will interact with the OpenLink Lite ODBC Driver from within ODBC-compliant applications once your ODBC DSN has been created.
-
Desription. Additional information that further describes the ODBC DSN that you are creating.
Database-Specific Tab
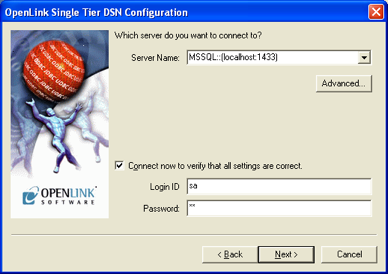
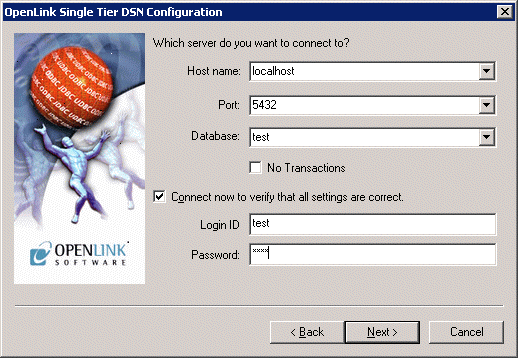
In the second frame of the wizard, you enter a database alias for the underlying communications layer of the database, and a username and password. If you select the "Connect now to verify that all settings are correct" check-box, pressing the Next> button will verify that DSN can connect.
Figure5.4.Database-specific tab (DB2 example)
OpenLink Parameters
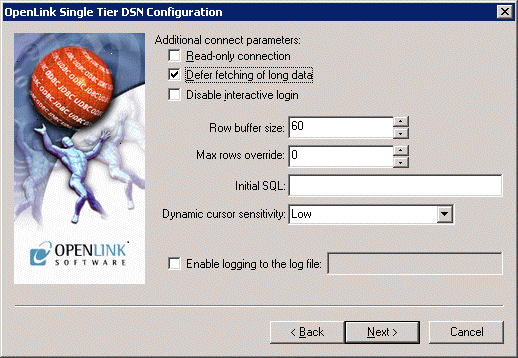
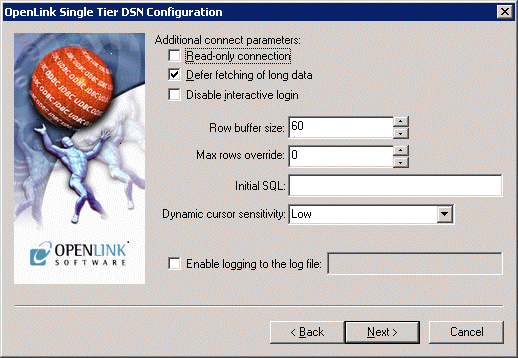
The third frame contains OpenLink-specific parameters for the DSN connection; here you can set the connection to be read-only, have it defer the fetching of long (BLOB) data, disable interactive login, set a row-buffer size (the number of records to be transported over the network in a single network hop), set a file containing SQL statements to run on login, set the dynamic cursor sensitivity level, and enable logging to a file.
Figure5.5.OpenLink Parameters tab (DB2 example)
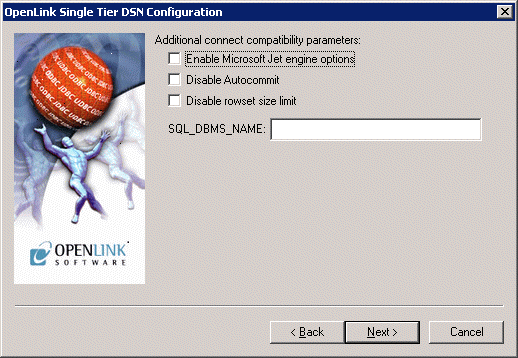
ODBC Parameters
The fourth frame contains more custom parameters: you can enable changes for the MS Jet Engine, disable autocommitting, and disable the rowset size limit. You can also set the SQL_DBMS_NAME (required for some applications, notably Access).
Figure5.6.ODBC Parameters tab (DB2 example)

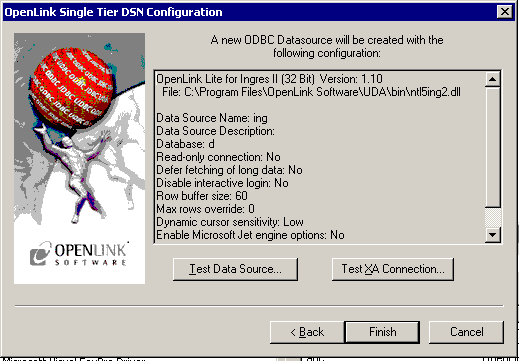
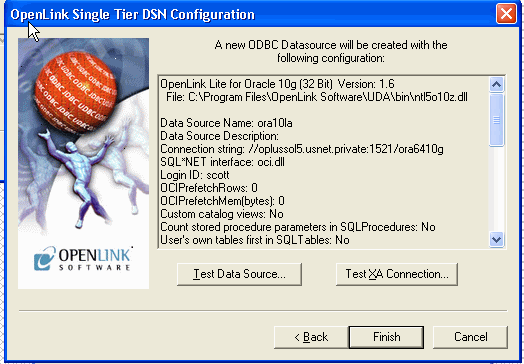
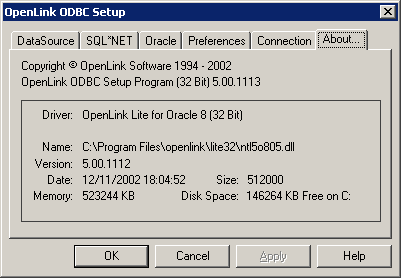
`About' frame
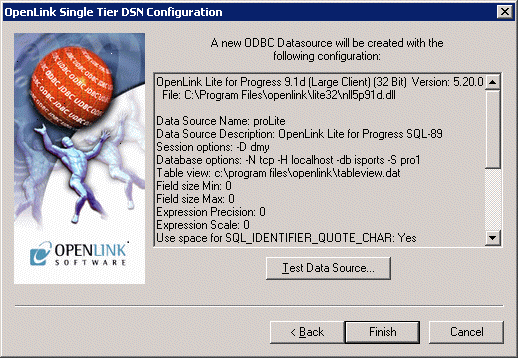
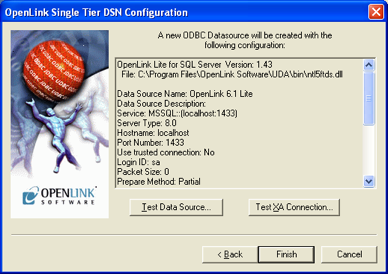
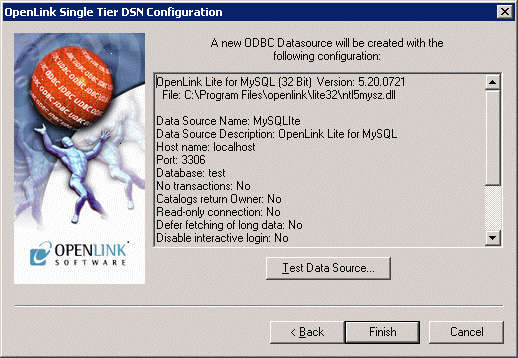
The fifth and final frame in the wizard shows the details of the connection - the driver name and version and DSN configuration parameters; it also gives you the option to test the data-source.
Figure5.7.`About' tab (DB2 example)

Glossary of Standard Configuration Options
-
Name. (Data source) The name of the ODBC DSN; this is how you will interact with the OpenLink Lite ODBC Driver from within ODBC-compliant applications once your ODBC DSN has been created.
-
Desription. Additional information that further describes the ODBC DSN that you are creating.
-
MaxRows Override. Allows you to define a limit on the maximum number of rows to returned from a query. The default value of 0 means no limit.
-
Initial SQL. Lets you specify a file containing SQL statements that will be run against the database upon connection, automatically.
-
Enable Microsoft Jet Engine Options. Extra support or altered functionality for better compatibility with Microsoft Jet using applications such as Microsoft Access.
-
Disable AutoCommit. Change the default commit behaviour of the OpenLink Lite Driver. The default mode is AutoCommit mode (box unchecked).
-
Disable Rowset Size Limit. Disable the limitation enforced by the cursor library. The limitation is enforced by default to prevent the Driver claiming all available memory in the event that a resultset is generated from an erroneous query is very large. The limit is normally never reached.
-
High Cursor Sensitivity
Enables or disables the row version cache used with dynamic cursors.
When dynamic cursor sensitivity is set high, the Cursor Library calculates checksums for each row in the current rowset and compares these with the checksums (if any) already stored in the row version cache for the same rows when fetched previously. If the checksums differ for a row, the row has been updated since it was last fetched and the row status flag is set to SQL_ROW_UPDATED. The row version cache is then updated with the latest checksums for the rowset.
From the user's point of view, the only visible difference between the two sensitivity settings is that a row status flag can never be set to SQL_ROW_UPDATED when the cursor sensitivity is low. (The row status is instead displayed as SQL_ROW_SUCCESS.) In all other respects, performance aside, the two settings are the same - deleted rows don't appear in the rowset, updates to the row since the row was last fetched are reflected in the row data, and inserted rows appear in the rowset if their keys fall within the span of the rowset.
If your application does not need to detect the row status SQL_ROW_UPDATED, you should leave the 'High Cursor Sensitivity' checkbox unchecked, as performance is improved. The calculation and comparison of checksums for each row fetched carries an overhead.
If this option is enabled, the table oplrvc must have been created beforehand using the appropriate script for the target database.
-
Row Buffer Size. This attribute specifies the number of records to be transported over the network in a single network hop. Values can range from 1 to 99.
-
Default UserID. This attribute specifies the default username to be used when attempting to make a connection. You may still override this at run time.
-
Hide Login Dialog. Suppress the ODBC "Username" and "Password" login dialog box when interacting with your ODBC DSN from within an ODBC compliant application.
-
Read Only connection. Specify whether the connection is to be "Read-only". Make sure the checkbox is unchecked to request a "Read/Write" connection.
5.1.2.DB2
DB2 Options
Figure5.9.DB2 Options tab
-
Database Alias. The DB2 Connect Alias for the database to which you wish to connect.
5.1.3.Informix 7 and 9

Informix 9 - Connect
Figure5.14.Informix 9 - Connect tab
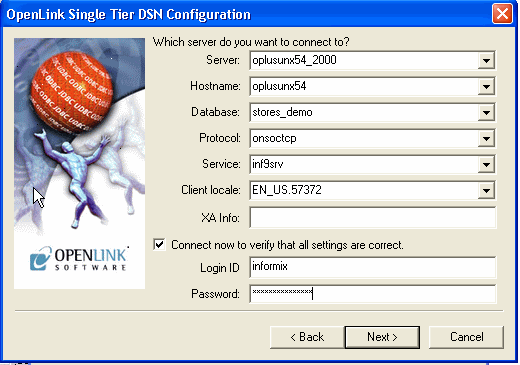
Enter details of the Informix server.
-
Server. The name of the Informix server that you want to communicate with.
-
Hostname. The network hostname of the machine hosting the Informix server.
-
Database. The name of the database on the server that you want to connect to.
-
Protocol. The informix network protocol identifier.
-
Service. The service name as configured in the winnt\system32\drivers\etc\services or windows\services file
-
Client Locale
Define the client locale. This takes the form:
[language_territory.]codeset[@modifier]
For example:
57371
                en_us.57372
                en_us.utf8@dict
An Informix 9 Lite driver should use UTF-8 as the codeset. The language and territory should not matter; so it should be possible, for example, to use French (fr_fr) or American English (en_us).
For Informix clients on Windows, the client locale is typically set through SetNet32. Rather than rely on the SetNet32 settings, our Lite driver instead sets the client locale at runtime.
It is possible to use a codeset number (Eg. 57372) rather than a codeset name (UTF8) to specify UTF-8 as the codeset. Either form can be used. The registry file included in an Informix client installation lists the supported code sets and the correspondence between codeset names and numbers.
The optional modifier has a maximum of four alphanumeric characters. This specification modifies the cultural-convention settings that the language and territory settings imply. The modifier usually indicates a special type of localized order that the locale supports. For example, you can set @modifier to specify dictionary or telephone book collation order.
-
Username & Password. If you enter the username and password here, and check the "Connect now" checkbox, proceeding to `Next>' will make a test connection to verify the above parameters.
-
XA Info. In the case of an OpenLink driver, this parameter is an ODBC Datasource Name (DSN): see the XA documentation for more about this.
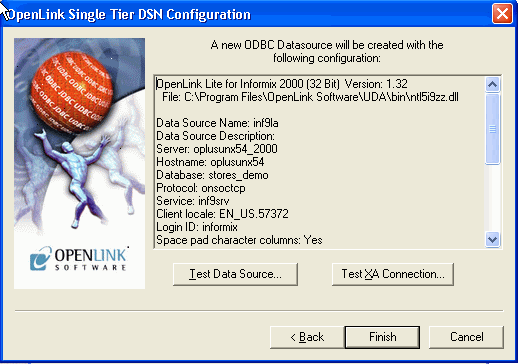
Informix 9 Options
Figure5.15.Informix 9 Options tab
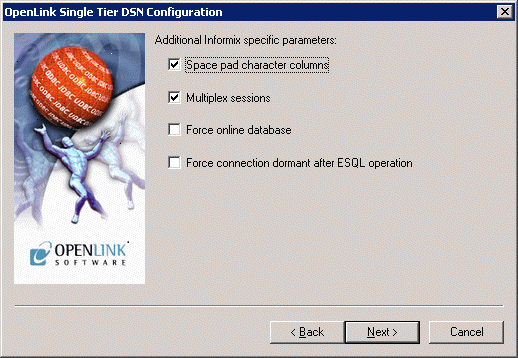
Enter options for the Informix connection:
-
Space Pad Character colums. If set, then colums are padded to full width by using the space character.
-
Multiplex Sessions. determine the connection parallelization mode.
-
Force Online Database. If set, then the database will always appear as online.

5.1.4.Ingres and OpenIngres

Ingres Net
Figure5.20.Ingres - Net tab
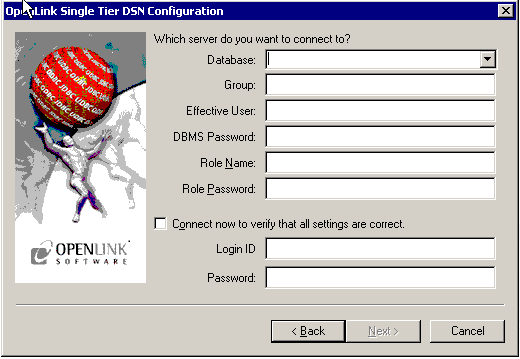
Enter details here about the Ingres server.
-
Connection. Takes the form <vnode>::<dbname> where vnode is the name of the virtual node configured either in the Ingres V(isual)DBA or Ingres Netutil utility, and dbname is the name of the database at the vnode destination that you want to connect to.
-
Roles & Effective Users
Ingres allows you to connect as a particular role or effective user. From iidbdb you could execute:
create role myrole with password=myrolepwd;\gto create a role; it is then this role and password you would enter in the above dialog.


5.1.5.Oracle 8, 9, and 10

SQL*NET tab
Figure5.25.SQL*NET tab
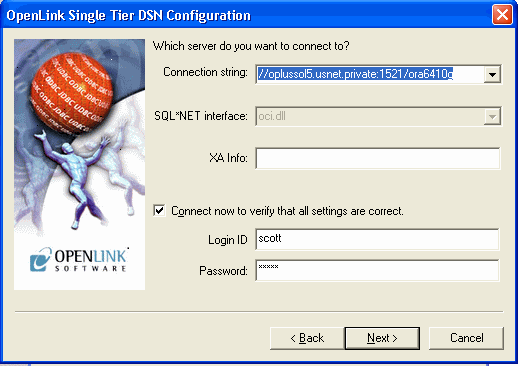
Enter details here for the SQL*NET.
-
Connection String. This needs to be a valid SQL*Net connect string. Typically this will only need to be the TNS Name as defined using the Oracle Easy Net configuration utility.
-
SQL*net Interface. This lets you select the SQL*Net DLL to be used. AutoScan is the default and best option. If this does not work then try and pick the option that seems to best suite your version of Oracle. If you are using Oracle 8i then use 'oci.dll'.
-
XA Info. In the case of an OpenLink driver, this parameter is an ODBC Datasource Name (DSN): see the XA documentation for more about this.
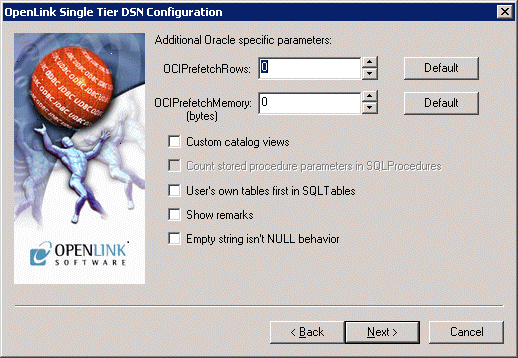
Oracle tab
Figure5.26.Oracle tab
contains the options:
-
Custom Catalog Views
You must run the ODBCCATx.SQL script against your database as user internal before this option can be checked! Enabling this gives best functionality and support especially for ODBC catalog calls.
These scripts exist for each version of Oracle supported, the files "odbccat6.sql", "odbccat7.sql", and "odbccat8.sql" representing Oracle versions 6 up to version 8 respectively. These scripts are to be applied to your Oracle instance to enable efficient and extended functionality between OpenLink and Oracle when handling ODBC, JDBC, UDBC, and OLE-DB catalog calls such as SQLForeignKeys() and SQLPrimaryKeys() functions. These functions have significant impact on the performance of your OpenLink clients.
To run these scripts you need to start the Oracle server manager (svrmgr or sqldba if you do this from the command line). Connect as internal and run the script by locating the relevant script file as you would any other Oracle SQL script file.
-
Count Stored Procedure Parameters in SQLProcedures. Enable 'strict' parameter use.
Transparent Application Failover (TAF) tab
Figure5.27.Oracle tab
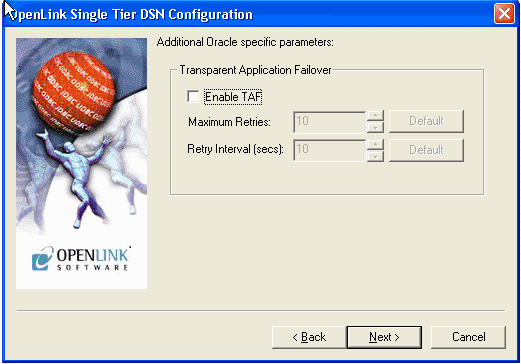
When OpenLink's TAF support is enabled, in the event that a failover attempt fails, the Lite driver or Multi-Tier agent will instruct Oracle to retry. By default, the maximum number of failover attempts is 10 and the interval between retry attempts is 10 seconds. The default values can be overridden.
See the Oracle RAC/TAF documentation for more.

5.1.6.Progress 9.1 SQL-92

Progress 9 tab
Figure5.33.Progress 9 tab
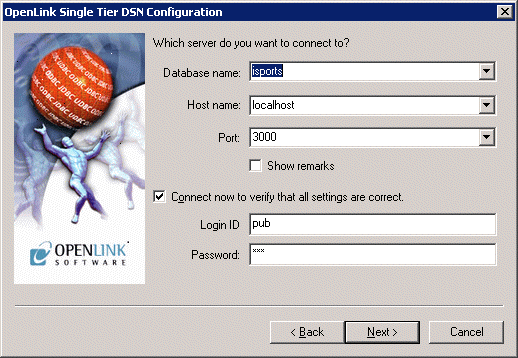
Enter details here to specify Progress connection information.
-
Database name. Name of the Progress database.
-
Host name. Domain name or IP number of the machine hosting the database.
-
Port. TCP port on which the database is listening.


5.1.7.Other Progress
Progress tab
Figure5.38.Progress tab
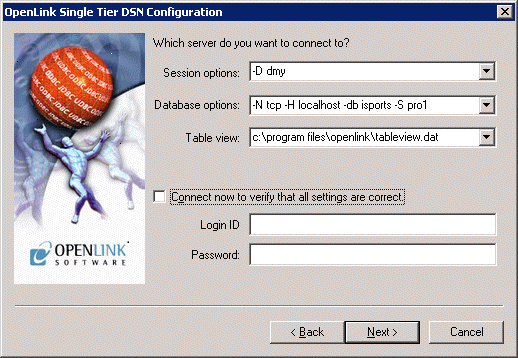
Enter details here to specify Progress connection information.
-
Session Options
Any Progress server startup options are accepted in this box. Note: These options are required for the Small Client driver only.
Typical options could be:
-SV -S <service> -H <hostname> -N TCP
-
Database Options
Any valid Progress Database connection options. See your Progress manual for a complete list of accepted options.
When using the Small Client driver, enter the following minimum database information in this box:
-db <dbname>
When using the Large Client driver, enter the following minimum database information in this box:
-db <dbname> -S <service> -H <hostname> -N <protocol>
Note: The <service> entry must meet the following requirements:
-
It must be listed in the Progress database server's /etc/services file, with a corresponding TCP port to which to bind.
-
It must be listed with the same name as above in your Windows \system32\drivers\etc\services file, matching the TCP port used for the database server's Progress service name.
To connect to multiple databases and make use of array fields see the tableview guide
-
-
Table View. The full path and file name of the .dat 'tableview' file created after running the setup.p applications. See tableview guide for more information.
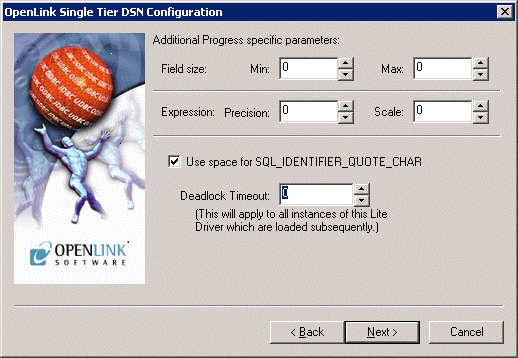
Additional Progress-specific parameters
Figure5.39.Additional Progress-specific parameters tab
-
Field size. Enter the minimum and maximum sizes for a char(N) field here
-
Expression Precision & Scale. This is the default precision and scale for anonymous numeric fields in the resultset.
-
Use space for SQL_IDENTIFIER_QUOTE_CHAR. Check this to enable a workaround for Business Objects' handling of the space-character in quoting an identifier.


Connecting Progress Lite to Multiple Databases and Gaining Access to Arrays
Utility and functionality for the Progress Driver that enables the user to connect to multiple databases and use array fields. This is only applicable to drivers not built against Progress SQL92 Libraries.
After installing a Progress Lite Driver you should find the following files in the lite32 directory:
setup.p
setup.i
oplrvc1.p
oplrvc2.p
setup.p is a Progress script program. When the program runs it will ask you what databases you wish to connect to and generate a catalog file of all the databases and tables within into a tableview file (.dat), and will create its associated parameter file (.pf).
Doing this allows you to connect to multiple databases, allows you to see all the tables in all databases from SQLTables, and allows you to use arrays fields through ODBC.
Prior to running this program you must ensure that all database servers for the databases you wish to include are running since the program will need to connect to them.
Make sure that your $DLC environment variable is set correctly to point to your DLC directory.
e.g. DLC=/dbs/progress/dlc
export DLC
Go to the openlink/lite32 directory, and type the following:
$DLC/bin/pro -p setup.p
![[Note]](images/note.png) |
Note: |
|---|---|
|
This may vary between versions. In Progress 6, pro is in the dlc directory not dlc/bin. |
You may also need to set a PROPATH environment variable to include the current working directory and the directory containing the setup.p utility files.
You will get the following screens:
.       @@@@@@   @@@@@@   @@@@@@@   @@@@@   @@@@@@   @@@@@@@   @@@@@    @@@@@
       @     @  @     @  @     @  @     @  @     @  @        @     @  @     @
      @     @  @     @  @     @  @        @     @  @        @        @
     @@@@@@   @@@@@@   @     @  @  @@@@  @@@@@@   @@@@@     @@@@@    @@@@@
    @        @   @    @     @  @     @  @   @    @              @        @
   @        @    @   @     @  @     @  @    @   @        @     @  @     @
  @        @     @  @@@@@@@   @@@@@   @     @  @@@@@@@   @@@@@    @@@@@
                           Progress Software Corporation
                                    14 Oak Park
                            Bedford, Massachusetts 01730
                                    617-280-4000
       PROGRESS is a registered trademark of Progress Software Corporation
      Copyright 1984,1985,1986,1987,1988,1989,1990,1991,1992,1993,1994,1995
                        by Progress Software Corporation
                             All Rights Reserved
PROGRESS Version 7.3C as of Thu Jun 29 15:05:14 EDT 1995
Followed by:
+-----------------------------------------------------+
| Enter a number of databases you want to connect to. |
| The first database is your master database.         |
+-----------------------------------------------------+
+-----------------------------------------------------------------------------+
| # DbName                         Connect String                           OK|
|-- ------------------------------ ---------------------------------------- --|
| 1 ______________________________ ________________________________________ __|
|                                                                             |
|                                                                             |
|                                                                             |
|                                                                             |
|                                                                             |
|                                                                             |
|                                                                             |
|                                                                             |
|                                                                             |
+-----------------------------------------------------------------------------+
Enter data or press PF4 to end.
At this point you will need to give the program information to contact the databases you want to include here. As shown below.
+-----------------------------------------------------+
| Enter a number of databases you want to connect to. |
| The first database is your master database.         |
+-----------------------------------------------------+
+-----------------------------------------------------------------------------+
| # DbName                         Connect String                           OK|
|-- ------------------------------ ---------------------------------------- --|
| 1 /users/progress/dbs/pro7test__ -N tcp -H 194.152.95.26 -S pro7test_____ __|
|                                                                             |
|                                                                             |
|                                                                             |
|                                                                             |
|                                                                             |
|                                                                             |
|                                                                             |
|                                                                             |
|                                                                             |
+-----------------------------------------------------------------------------+
Enter data or press PF4 to end.
After entering the line of information press return. There will be a little pause while the program checks that the database server is running and can be contacted. When this is verified OK will appear at the end of the line.
+-----------------------------------------------------+
| Enter a number of databases you want to connect to. |
| The first database is your master database.         |
+-----------------------------------------------------+
+-----------------------------------------------------------------------------+
| # DbName                         Connect String                           OK|
|-- ------------------------------ ---------------------------------------- --|
| 1 /users/progress/dbs/pro7test__ -N tcp -H 194.152.95.26 -S pro7test_____ OK|
|                                                                             |
|                                                                             |
|                                                                             |
|                                                                             |
|                                                                             |
|                                                                             |
|                                                                             |
|                                                                             |
|                                                                             |
+-----------------------------------------------------------------------------+
Enter data or press PF4 to end.
The cursor will move to the next line. Repeat the above procedure for each database. Press PF4 when finished. You will then need to supply the name for the .dat and .pf files to be created.
+-----------------------------------------------------+
| Enter a number of databases you want to connect to. |
| The first database is your master database.         |
+-----------------------------------------------------+
+-----------------------------------------------------------------------------+
| # DbName                         Connect String                           OK|
|-- ------------------------------ ---------------------------------------- --|
| 1 /users/progress/dbs/pro7test__ -N tcp -H 194.152.95.26 -S pro7test_____ OK|
| 2 ______________________________ ________________________________________ __|
|                                                                             |
|                                                                             |
|                                                                             |
|                                                                             |
|                                                                             |
|                                                                             |
|                                                                             |
|                                                                             |
+-----------------------------------------------------------------------------+
Basename for .pf and .dat files_____________________
Enter data or press PF4 to end.
After a brief period the program will have finished:
+-----------------------------------------------------+
| Enter a number of databases you want to connect to. |
| The first database is your master database.         |
+-----------------------------------------------------+
+-----------------------------------------------------------------------------+
| # DbName                         Connect String                           OK|
|-- ------------------------------ ---------------------------------------- --|
| 1 /users/progress/dbs/pro7test__ -N tcp -H 194.152.95.26 -S pro7test_____ OK|
| 2 ______________________________ ________________________________________ __|
|                                                                             |
|                                                                             |
|                                                                             |
|                                                                             |
|                                                                             |
|                                                                             |
|                                                                             |
|                                                                             |
+-----------------------------------------------------------------------------+
Creating .pf file to use
Creating .dat file with table information
Procedure Complete. Press space bar to continue.
Now you have to integrate these files into your system.
In the Lite Driver setup dialog box you will find an option box called Table View. In this field place:
<full path and file name to .dat file>
Now you can use in the Connection Options, only:
-pf <full path and file name to .pf file>
To resolve you connection parameters since they are include in this file.
5.1.8.Microsoft or Sybase SQL Server (TDS)
Installation
The OpenLink ODBC Driver for SQL Server and Sybase for Windows is distributed in a single .msi file.
Click the Open link that appears in your Downloads dialog.
Figure5.43.lite_tds_SQL_Open.png

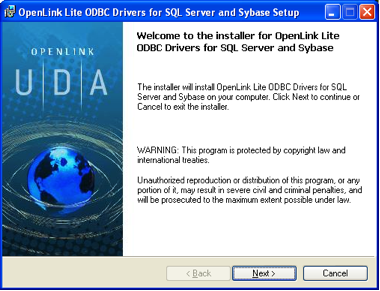
The installer will display a "Welcome" message. Click "Next."
Figure5.44.lite_tds_SQL_Welcome.png
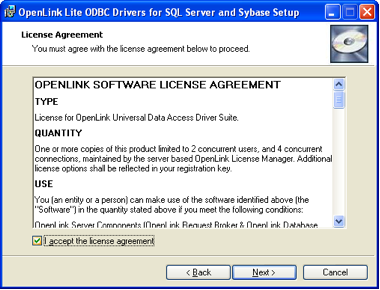
The next screen will display the License Agreement for the OpenLink Lite Driver. Please read and check the "I accept the license agreement" checkbox. Then, click Next.
Figure5.45.lite_tds_SQL_Agreement.png
Your driver needs a license file to operate. Click the Browse button to locate a commercial or evaluation license that you have previously downloaded onto your local hard drive. Alternatively, click the Try & Buy button to obtain a commercial or evaluation license.
Figure5.46.lite_tds_SQL_License.png
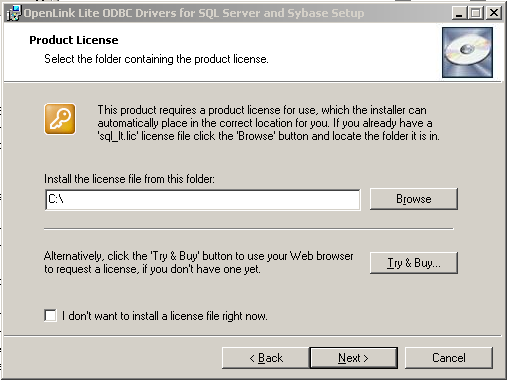
You can check the "I don't want to install a license file right now" check box. This option will permit you to install the product. However, you will not be able to use the product until you obtain a commercial or evaluation license key.
Figure5.47.lite_tds_SQL_InstallOptions.png
Click Next.
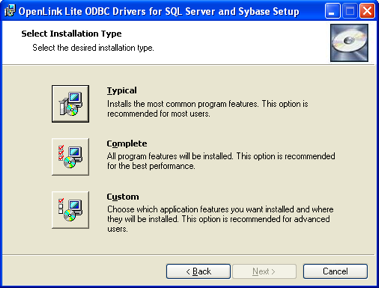
Choose among the Typical, Complete, or Custom installation types.
Figure5.48.lite_tds_SQL_InstallOptions.png
Click Next.
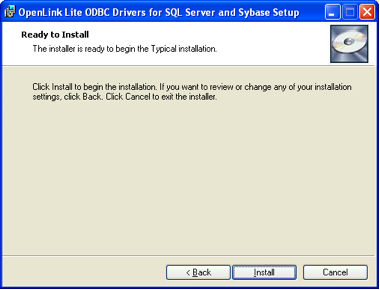
Click the Install button.
Figure5.49.lite_tds_SQL_InstallButton.png
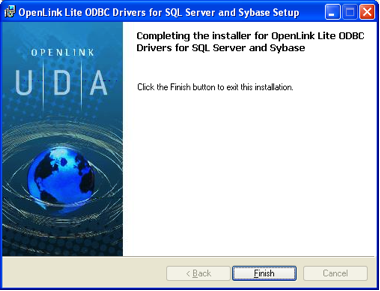
Installation is complete. Click the Finish button.
Figure5.50.lite_tds_SQL_FinishButton.png
You may be prompted to restart your computer, if you have a pre-existing OpenLink License Manager running on your computer.
Configuration
Open the ODBC Data Sources Administrator that appears in the Administrative Tools section of your Control Panel.
Figure5.51.lite_tds_MTx86_iODBC.png

Click the System DSN tab:
Figure5.52.lite_tds_SQL_System.png
Click the Add button. Then, select the OpenLink SQL Server and Sybase Lite Driver from the list of available drivers:
Figure5.53.lite_tds_SQL_Available.png
Click Finish.
The first dialog prompts for a Data Source Name and optional description.
Figure5.54.lite_tds_SQL_DSNName.png
Click Next.
The second dialog prompts for information that identifies the SQL Server DBMS and database.
Figure5.55.lite_tds_SQL_ConnTab.png
-
Server Name - Select the drop down list box to invoke the driver's Dynamic discovery of SQL Server instance on the network and choose the instance require if available.
-
Connect now to verify that all settings are correct -
-
Login ID - A valid SQL Server username
-
Password - A valid SQL Server password
Use the "Advanced" button to manually configure a connection if the SQL Server instance could not be dynamically located, as detailed below.
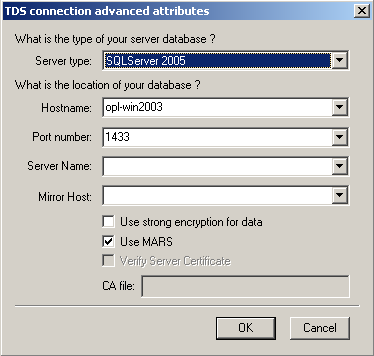
Figure5.56.lite_tds_SQL_Advanced.png
-
ServerType - An OpenLink proprietary parameter that associates the connection with a particular TDS version
-
Hostname - The hostname or IP address on which SQL Server listens
-
Port number - The TCP port on which SQL Server lists
-
Server Name - SQL Server instance name on the specified host. A SQL Server instance can also be specified by appending "\InstanceName" to the ServerName ie "ServerName\InstanceName"
-
Mirror Host - The name of the Failover Server hosting the mirrored database if configured
-
Use strong encryption of data - Enable SSL encryption of data between driver and database
-
Use Mars - Multiple Active Result Sets enables the concurrent processing of multiple statements/queries and/or result sets on a single connection
-
Verify Server Certificate - Verify the Database Server SSL certificate against the one specified in the "CA file" field
-
CA file - Specify the location of a Valid SSL Certificate for use during the connection
Click Next to continue.
The third dialog takes a combination of database specific and optional parameters:
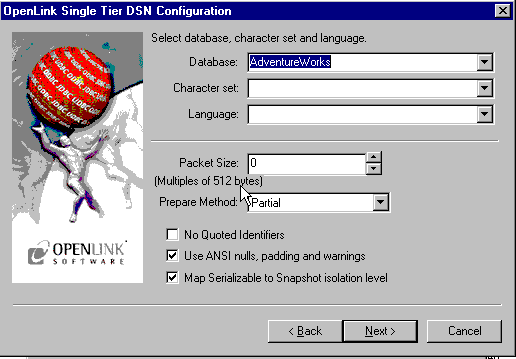
Figure5.57.lite_tds_SQL_DBSpecific.png
-
Database - The SQL Server database
-
Character set - The SQL Server character set
-
Language - The SQL Server language
-
Packet Size - A value that determines the number of bytes per network packet transferred from the database server to the client. The correct setting of this attribute can improve performance. When set to 0, the initial default, the driver uses the default packet size as specified in the Sybase server configuration. When set to -1, the driver computes the maximum allowable packet size on the first connect to the data source and saves the value in the system information. When set to x, an integer from 1 to 10, which indicates a multiple of 512 bytes (for example, Packet Size of 6 means to set the packet size to 6 * 512 equal 3072 bytes). For you to take advantage of this connection attribute, you must configure the System 10 server for a maximum network packet size greater than or equal to the value you specified for Packet Size.
-
Prepare Method - This option is specific to the TDS Driver for MS & SQL Server SQLServers. It can take the values None, Partial Full (connectoptions -O [0, 1, 2] respectively). It is used to determine whether stored procedures are created on the server for calls to SQLPrepare.
-
No Quoted Identifiers - This option indicates that the underlying driver does not support quoted identifiers, which is required for Jet engine based products like MS Access.
-
Use ANSI nulls, padding and warnings - This option affects TDS agent & Lite Driver connections to MS SQLServer databases. SQL Server connectivity is not affected.
-
Map Serializable to Snapshot isolation level - Enable Snapshot transaction isolation level in the driver. Snapshot Isolation is a new transaction isolation level available in SQL Server 2005
Click Next to continue.
The fourth dialog enables you to set optional, ODBC connection parameters:
Figure5.58.lite_tds_SQL_Options.png
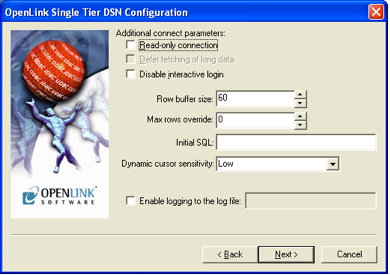
-
Read-only connection - Specifies whether the connection is "Read-only." Make sure the checkbox is unchecked to request a "Read/Write" connection.
-
Defer fetching of long data - Defers fetching of LONG (BINARY, BLOB etc.) data unless explicitly requested in a query. This provides significant performance increases when fields in query do not include LONG data fields.
-
Disable interactive login - Suppresses the ODBC "Username" and "Password" login dialog boxes when interacting with your ODBC DSN from within an ODBC compliant application.
-
Row Buffer Size - This attribute specifies the number of records to be transported over the network in a single network hop. Values can range from 1 to 99.
-
Max rows Override - Allows you to define a limit on the maximum number of rows to be returned from a query. The default value of 0 means no limit.
-
Initial SQL - Lets you specify a file containing SQL statements that will be run automatically against the database upon connection.
-
Dynamic Cursor Sensitivity - Enables or disables the row version cache used with dynamic cursors. When dynamic cursor sensitivity is set high, the Cursor Library calculates checksums for each row in the current rowset and compares these with the checksums (if any) already stored in the row version cache for the same rows when fetched previously. If the checksums differ for a row, the row has been updated since it was last fetched and the row status flag is set to SQL_ROW_UPDATED. The row version cache is then updated with the latest checksums for the rowset. From the user's point of view, the only visible difference between the two sensitivity settings is that a row status flag can never be set to SQL_ROW_UPDATED when the cursor sensitivity is low. (The row status is instead displayed as SQL_ROW_SUCCESS.) In all other respects, performance aside, the two settings are the same. Deleted rows don't appear in the rowset. Updates to the row since the row was last fetched are reflected in the row data, and inserted rows appear in the rowset, if their keys fall within the span of the rowset. If your application does not need to detect the row status SQL_ROW_UPDATED, you should leave the 'High Cursor Sensitivity' checkbox unchecked, as performance is improved. The calculation and comparison of checksums for each row fetched carries an overhead. If this option is enabled, the table oplrvc must have been created beforehand using the appropriate script for the target database.
-
Enable logging to the log file - Check the checkbox and use the associated textbox to provide the full path to a file in which to log diagnostic information.
Click Next to continue.
The fifth dialog enables you to set additional parameters to enhance compatibility with applications:
Figure5.59.lite_tds_SQL_Compatibility.png
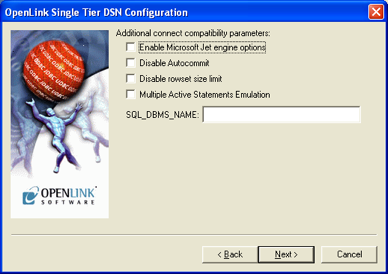
-
Enable Microsoft Jet engine options - Check this checkbox if you intend to use this driver with Microsoft Access.
-
Disable
-
Disable rowset size limit - Disables a limitation enforced by the cursor library. This limitation is enforced by default. It prevents the driver from claiming all available memory in the event that a resultset generated from an erroneous query is very large. The limit is normally never reached.
-
Multiple Active Statements Emulation - Enables use of Multiple Active statements in an ODBC application even if the underlying database does not allow this, as it is emulated in the driver.
-
SQL_DBMS Name - Manually overrides the SQLGetInfo(SQL_DBMS_NAME) response returned by the driver. This is required for products like Microsoft InfoPath for which the return the value should be "SQL Server".
Click Next to continue.
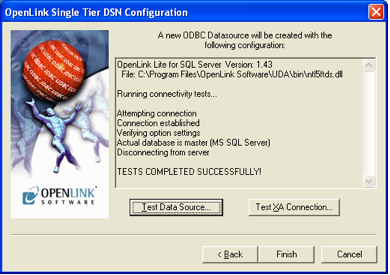
The final dialog enables you to text your Data Source. Click the Test Data Source button.
Figure5.60.lite_tds_SQL_Test.png
A connection has been established:
Figure5.61.lite_tds_SQL_Connected.png
5.1.9.ODBC-JDBC Lite Bridges for Java

JDBC tab
Figure5.63.JDBC tab

Enter details here for the JDBC Driver to connect with:
-
JDBC Driver. The name of the JDBC Driver to be used for the connection
-
URL String. The JDBC connectstring URL for the JDBC Driver
-
Login ID & Password. Enter the username and password to use for the connection here. If you check the `Connect now' box, pressing `Next>' will make a test connection to verify the above parameters.
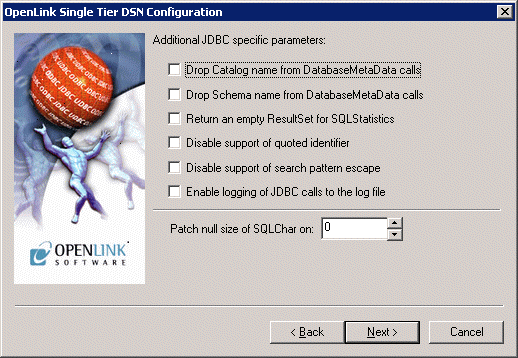
JDBC Parameters
Figure5.64.JDBC Parameters tab
-
Drop Catalog name from DatabaseMetaData calls. Enable this option to have the catalog name not appear for tables, views and procedures when requesting database meta-data.
-
Drop Schema name from DatabaseMetaData calls. Enable this option to have the schema-name not appear for tables, views and procedures when requesting database meta-data.
-
Return an empty resultset for SQLStatistics. Check this box to have SQLStatistics() return an empty resultset - use this if the underlying database does not support retrieving statistics about a table (e.g. what indexes there are on it).
-
Disable support of quoted identifier. If it is set, the call SQLGetInfo for 'SQL_IDENTIFIER_QUOTE_CHAR' will return the space (" "). It can be used if DBMS doesn't support quoted SQL like select * from "account"
-
Disable support of search pattern escape. If it is set, the call SQLGetInfo for 'SQL_LIKE_ESCAPE_CLAUSE' will return the space (" "). It can be used if DBMS doesn't support SQL escape patterns


5.1.10.MySQL

MySQL Options
Figure5.69.MySQL Options tab
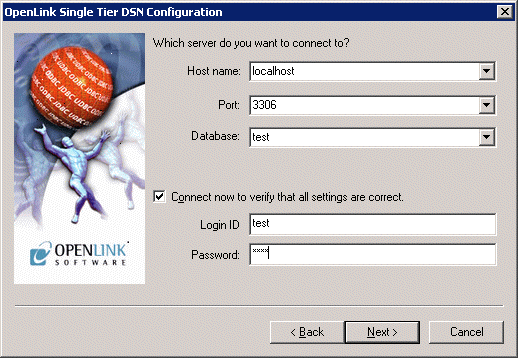
-
Hostname. The hostname on which the MySQL database server to be connected to is running on.
-
Port. The port number on which the MySQL database server is running on the host machine. Defaults to 3306 if not specified.
-
Database. The database name to which the connection is to be made.
MySQL Options
Figure5.70.MySQL Options tab
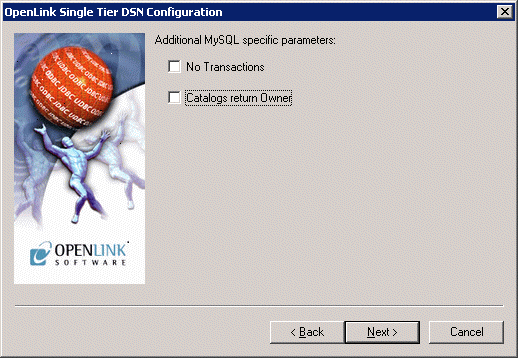
-
No Transactions. Disable ODBC transaction management. All transactions will be automatically committed. This prevents palloc() failures with out-of-memory errors when doing really big transactions such as Exporting 10000 records from MS/Access.


5.1.11.PostgreSQL

PostgreSQL Options
Figure5.75.PostgreSQL Options tab
-
Hostname. The hostname on which the PostgreSQL database server to be connected to is running on.
-
Port. The port number on which the PostgreSQL database server is running on the host machine. Defaults to 3306 if not specified.
-
Database. The database name to which the connection is to be made.
-
No Transactions. Disable ODBC transaction management. All transactions will be automatically committed. This prevents palloc() failures with out-of-memory errors when doing really big transactions such as Exporting 10000 records from MS/Access.


5.1.12.Connect String parameters
Common Connect string
You may sometimes be required to build a complete ODBC Connection String to access an ODBC Datasource.
A connection string has the following syntax:
          connection-string ::= empty-string[;] | attribute[;] | attribute; connection-string
          empty-string ::=
          attribute ::= attribute-keyword=attribute-value | DRIVER=[{]attribute-value[}]
          attribute-keyword ::= DSN | UID | PWD | driver-defined-attribute-keyword
          attribute-value ::= character-string
          driver-defined-attribute-keyword ::= identifier
where character-string has zero or more characters; identifier has one or more characters; attribute-keyword is not case-sensitive; attribute-value may be case-sensitive; and the value of the DSN keyword does not consist solely of blanks.
The following list describes valid attributes and their values common to all databases:
-
DSN. Datasource name.
-
UID. Username.
-
PWD. Password.
-
DRIVER. The name of the ODBC Driver to be used. This will be the name displayed in the ODBC Administrator or returned by the SQLDrivers function.
-
ReadOnly. Yes/No - make the session readonly.
-
FetchBufferSize or FBS. 2 digit integer value to determine the number of rows to buffer in each fetch.
-
NoLoginBox or NLB. Yes/No - suppress the authentication dialog box that will appear if either username or password have been omitted.
-
MaxRows. integer value to limit the number of returned rows.
-
NoAutoCommit. Yes/No - define the default behaviour of the driver to adopt.
-
Jet. Yes/No - enable Microsoft Jet Engine compatibility features.
-
NoRowSetSizeLimit. Yes/No
-
SVAST. Yes/No - System views as system tables.
-
IntialSQL. Points to a file containing a list of initial SQL statements to be executed against the Database on connnect.
Informix Connect string
The following list describes valid attributes and their values that are specific to Informix:
-
Protocol. Informix protocol identifier.
-
Service. Service name as in the etc\services file.
-
Host. hostname of the machine hosting the Informix server.
-
InfServer. Name of the Informix server.
-
Database. name of the database on the Informix server.
-
MultiSess. Yes/No - Multiplex Session.
Ingres and OpenIngres Connect string
The following list describes valid attributes and their values that are specific to Ingres and OpenIngres:
-
Database. name of the database alias.
-
IngServer. <vnode>::<dbname>.
Oracle Connect string
The following list describes valid attributes and their values that are specific to Oracle:
-
OraCatalogs. Yes/No.
-
QuotedIdentifiers. Yes/No.
-
SQLNETConnect. SQL*Net connect string usually just the TNS name.
-
SQLNETInterface. Interface DLL or AutoScan for Driver self determination.
Progress Connect string
The following list describes valid attributes and their values that are specific to Progress:
-
Options. Valid Progress connection options.
-
TableView
full path and filename to the tableview file.
See tableview guide for more information.
-
ServerOptions. Valid Progress server options.
-
SQLNETInterface. Interface DLL or AutoScan for Driver self determination.
Microsoft or Sybase SQLServer (TDS) Connect string
The following list describes valid attributes and their values that are specific to Microsoft SQLServer:
-
TDSServer. The IP address or alias name for the server running SQL Server.
-
TDSPort. The TCP port number the SQLServer instance is running on
-
TDSVer. The TDS Protocol version for the type of SQLServer instance being used.
-
TDSDBase. The name of the SQLServer Database
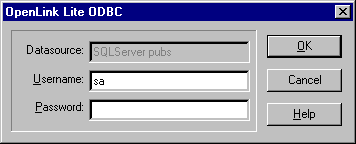
5.1.13.Testing the ODBC Data Source
Once you have configured an ODBC Data Source you can test it using the Test Connection button on the DataSources tab.
For a more thorough test, you can use the sample applications provided in the OpenLink Lite Driver installer (unless you chose not to install them). You will have short-cuts to the sample applications in the 'Start' Menu.
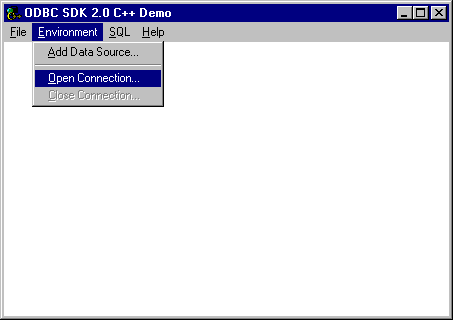
The sample application 'CPP Demo 32 Bit' is a good application to use to test an ODBC Data Source. It is simple, allows you to execute simple SQL Queries and includes source code.
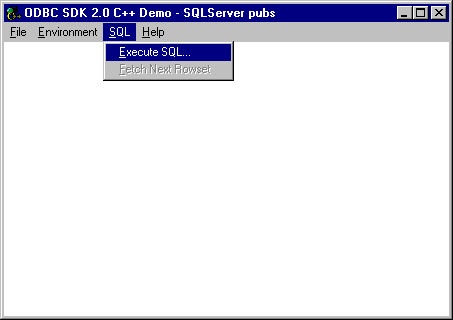
When the application has been started, select 'Open Connection' from the Environment menu item.
Figure5.79.CPP (C++) Demo
Select the data source you recently created and now want to test. Unless you configured the data source to hide the login dialog prompt you will be presented with it. You need to enter a valid username and password to authenticate the connection.
Figure5.80.CPP (C++) Demo
Once the connection has been established you should observe that the title bar of the application now includes the name of the data source that you connected to.
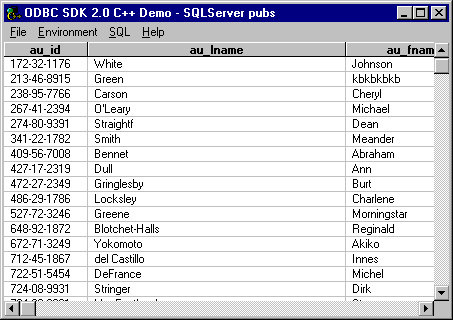
Use the SQL/Execute SQL menu item to query the database and validate basic communication between the Driver and the Database.
Figure5.81.CPP (C++) Demo
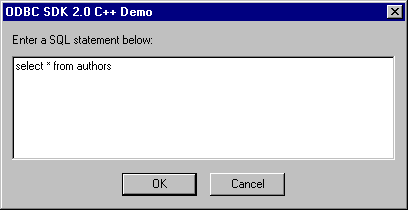
Enter a valid SQL Statement. You will need to know a valid table name within the database to be able to retrieve information from it. To simply return all available data in a particular table of your choice simply change the name 'authors' (show below) to the name of the table you wish to query. Press OK to execute the query.
Figure5.82.CPP (C++) Demo
If the query executes successfully you will see a table of the data returned by the query.
Figure5.83.CPP (C++) Demo