5.2.Unix Data Source Configuration
The OpenLink ODBC Lite for UNIX is the family name of a suite of Single Tier ODBC Drivers supporting a wide range of leading relational database engines. These drivers do not require the installation of any additional software on the server machine hosting the database engine. This is due to the fact that Single Tier driver implementations depend on the database(s) that you are connecting with to provide database connectivity and network services (this software typically installed at database engine installation time).
Before a Lite Driver can be used, a data source must be defined either manually, or by using the HTTP based iODBC Administrator.
5.2.1.Creating Data Sources Using iODBC Administrator
The OpenLink Lite Drivers for Unix can be installed within a previously installed Multi-Tier installation or completely standalone. If installed within a Multi-Tier installation the Lite Driver can share the Admin Assistant installed with the Multi-Tier for configuring data source. In the absence of a Multi-tier installation, an HTTP based iODBC Administrator is installed and used to configure the drivers. The download wizard for Unix Lite will always offer install.sh and the HTTP based iODBC Administrator, and then show the available Lite Drivers for the required operating system.
A Lite driver package contains only the driver and installation files, e.g. the sql_lt.taz file contains:
      bin/openlink.ini          Contains the Environment settings
      bin/inifile
      bin/freetds.conf          Part of the FreeTDS library
      lib/sql_st_lt.la
      lib/sql_st_lt.so          The actual lite driver
      scripts/SQLServer/oplrvc.sql
During the installation of the OpenLink Lite Drivers for Unix, the install.sh script will generate a file called bin/iodbc-admin-httpd.sh. This is a shell script used to start and stop the HTTP based iODBC Administrator. The usage is as follows:
      $ iodbc-admin-httpd.sh start  # Starts the HTTP based iODBC Administrator
      $ iodbc-admin-httpd.sh stop   # Tries to stop the HTTP based iODBC Administrator
      $ iodbc-admin-httpd.sh status # Shows if the program is running
Wizard Based Configuration
-
Start up the HTTP based iODBC Administrator, as explained above.
-
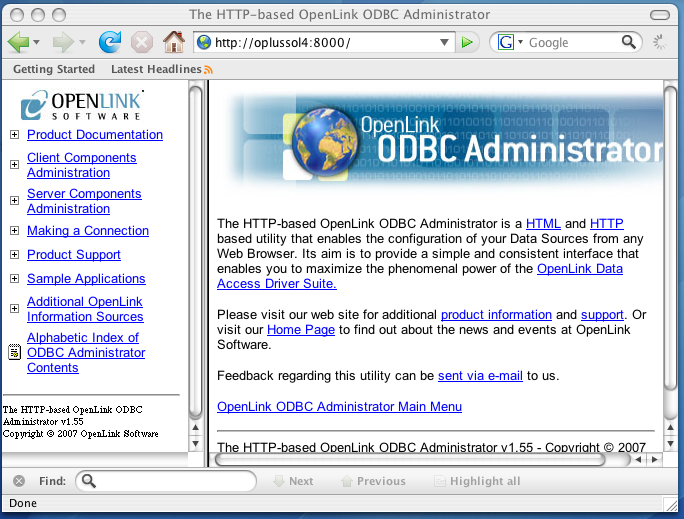
Open up your Internet Browser and then enter the following URL: http://localhost:8000/ (note the OpenLink HTTP based iODBC Administrator listens at port 8000 by default, this value is set at installation time).
-
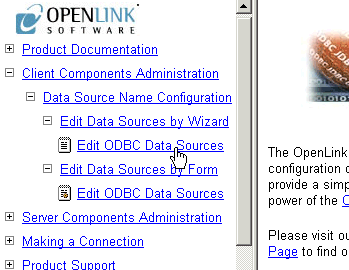
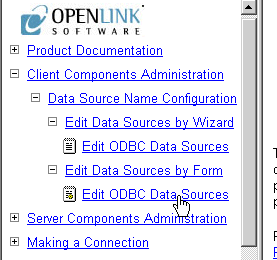
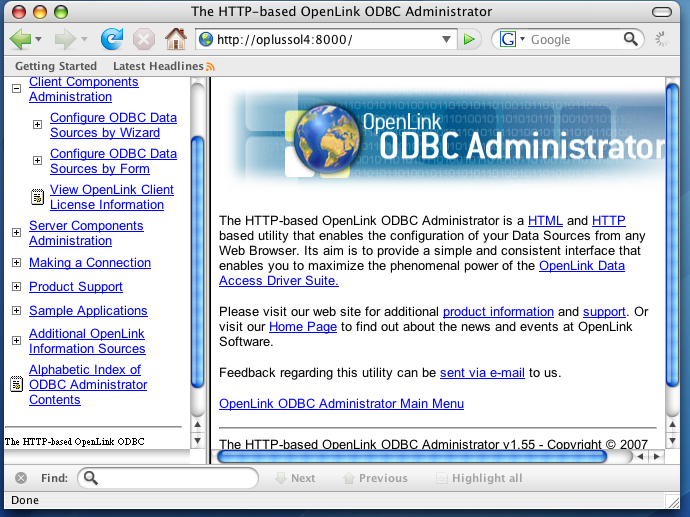
Expand the menu by clicking on the "Client Components Administration", then "Data Source Name Configuration", and "Edit Data Sources by Wizard".
Figure5.84.
-
Click on the "Edit ODBC Data Sources" hyperlink, this takes you into the actual ODBC Data Source configuration wizard.
Figure5.85.
-
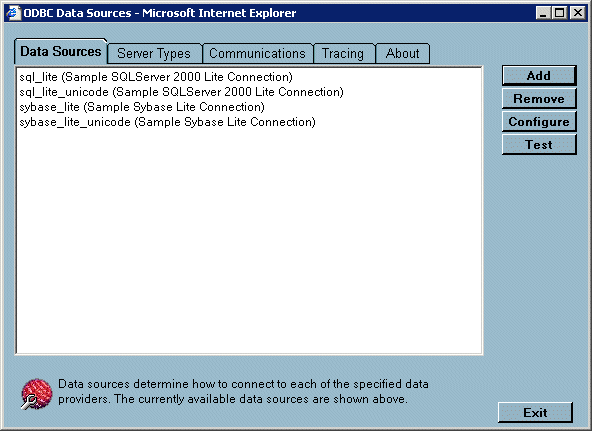
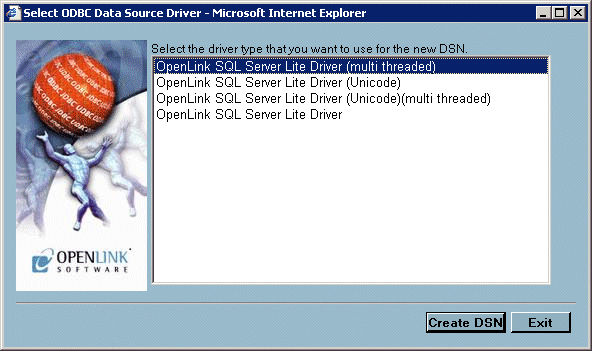
Click the "Add" button to commence the process of creating a new Lite ODBC DSN, the wizard presents you with a list of Lite Drivers installed on your system. Select the driver required. In this example the OpenLink SQL Server Lite Driver is highlighted. Then click on the "Next" button.
Figure5.86.
-
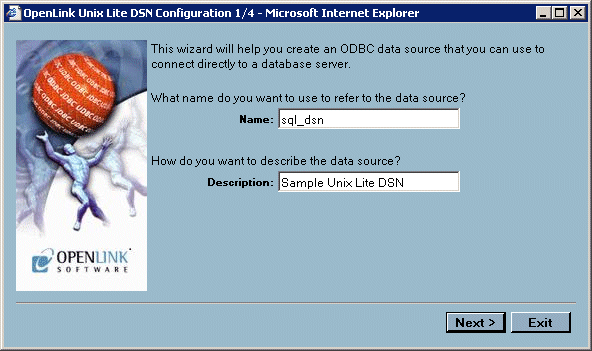
Enter values into the "Name" and "Description" fields as follows:
Name. Enter a value that uniquely identifies the DSN being created. This example uses the name "sqlserver_dsn" to indicate that this DSN will be connecting to SQL Server database.
Description. Enter a value that provides additional information that helps in describing the purpose of the DSN that you are creating.
Once completed click on the "Next" button.
Figure5.87.
-
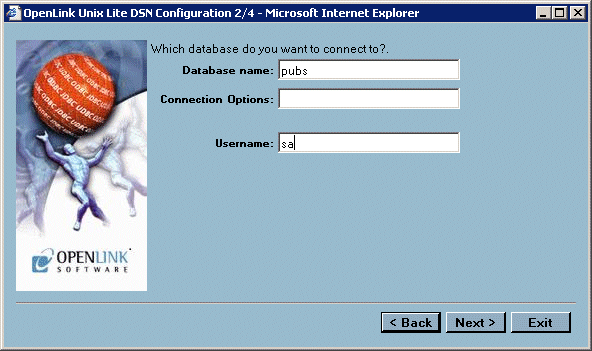
Enter values into the "Database Name", "Server", and "Username" fields as follows:
Database Name. Enter the name of the database you which to make a connection to. Note in the case of the ODBC-JDBC Bridge this would be the name of the JDBC Driver to be used.
Connection Options
Enter database server connection values for the database that your are connecting to.
The label shown named Server will change according to the ServerType selected on the previous wizard page to provide a more suitable cue. The table below shows the alternative descriptions and there significance.
Table5.1.OpenLink Lite for Unix Server Types
Server Type Label Name Description DB2 Server/Adapter Name of DB2 Instance. Informix Server Informix Connect connection parameters. Ingres & OpenIngres Ingres Net (vnode) Name of Ingres vnode to connect to. Oracle NET 8 Service Name Name of Oracle 8 service as defined with TNS Listener or Oracle 8 SID. Progress DB Connection Options Progress connection options. SQLServer Server SQLServer server name. ODBC-JDBC Bridge URL String JDBC Connect String
Username. Enter a valid username for the database that you are connecting to, you can leave this blank and be prompted for values at actual database connect time.
Click on the "Next" button.
Figure5.88.
-
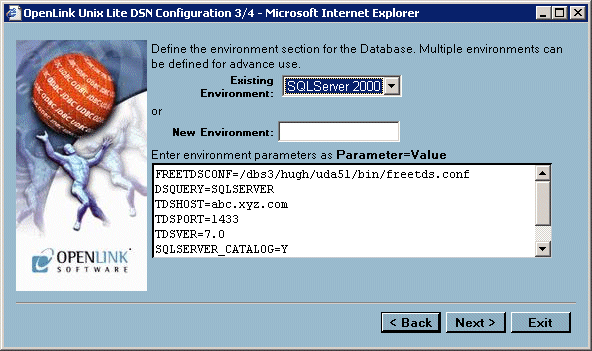
Select the Environment section name used to identify the group of environment parameters for the Database. In most cases this does not need to be changed. For advanced use, multiple environments may be defined. The pick list of existing Environment groups contains only the currently defined Environments that are associated with the same Driver currently being configured. Choose from an existing environment, or create a new environment by entering a name.
Enter environment values into the text area as parameter=value with each parameter on a separate line.
Once completed click on the "Next" button.
Figure5.89.
These environment varable values are database specific and are described in detail later in this section. The list below will allow you to quickly jump to the relevant section:
DB2 Informix Ingres & OpenIngres Oracle Progress SQL92 Microsoft or Sybase SQL Server ODBC-JDBC Bridge for Java -
Enter values into the following fields:
Read-only connection. Check this box if you require a read only session.
Disable Interactive Login. Check this box if you do not want to be presented with a login dialog window.
Defer fetching of long data. Check this box to defer the fetching of long data. See the Release Notes section for more details.
Once completed click on the "Next" button.
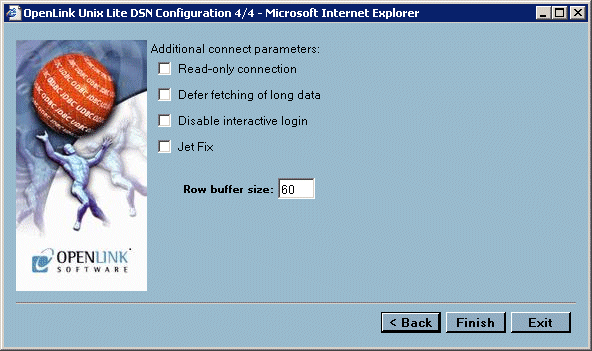
Enter values into the "Row Buffer Size", and "Jet Fix" fields as follows:
Row Buffer Size. Enter a value that represents the number of records that you would like your ODBC driver to retrieve during each network hop. A network hop represents the number of times your OpenLink ODBC send a message across the network to retrieve records from your remote database server. The feature can be used to improve ODBC record retrieval performance.
Jet Fix. Check this box to overcome an old Jet Engine problem of large numeric types mapped to TEXT (drivers will return SQLServer as database type)
Once completed click on the "Finish" button to save the DSN.
Figure5.90.
-
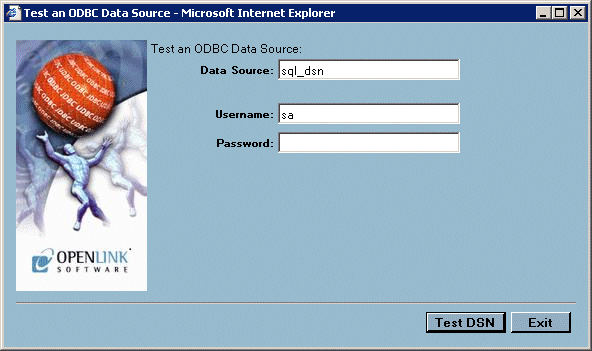
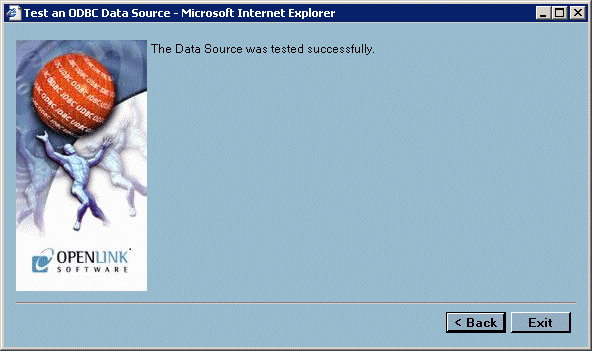
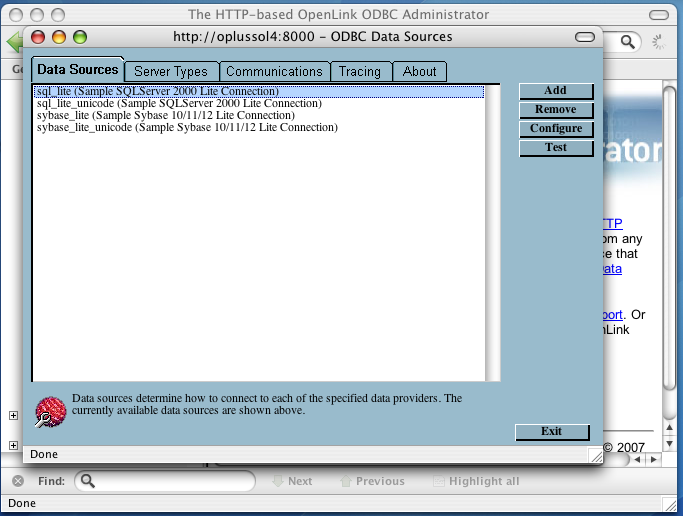
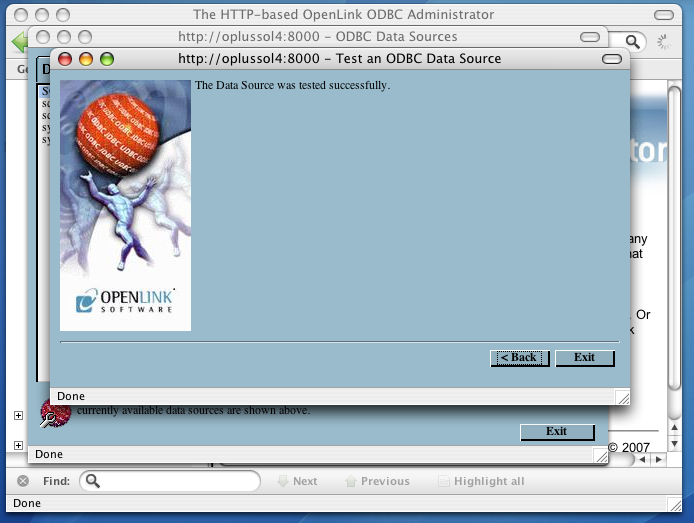
Now that the DSN has been saved, it can be verified. Select the DSN to test and hit the "Test" button .
Figure5.91.
-
Click the "Test" button to actually commence the ODBC DSN Test process, you will be presented with dialogs that indicate success or failure at the end of this process.
Figure5.92.
-
Click on the "exit" button to exit the ODBC DSN configuration wizard
Form Based Configuration
The OpenLink HTTP based iODBC Administrator also allows the more experienced OpenLink ODBC user to manage ODBC DSNs via a forms based interface. Like the wizard based approach, this is done entirely from within your browser. In the sections that follow, a step by guide and illustrative screen shots are used to demonstrate the process of creating the same Lite ODBC DSN created in the prior section using the Wizard approach.
-
Start up the HTTP based iODBC Administrator, as explained earlier.
-
Open up your Internet Browser and then enter the following URL: http://localhost:8000/ (note the OpenLink HTTP based iODBC Administrator listens at port 8000 by default, this value is set at installation time).
-
Expand the menu by clicking on the "Client Components Administration", then "Data Source Name Configuration", and "Edit Data Sources by Form".
-
Click on the "Edit ODBC Data Sources" hyperlink to commence the process of creating a new ODBC DSN.
Figure5.93.
-
On the right side of the HTTP based iODBC Administrator pane is your start page for configuring Lite DSNs using the Forms approach. This page presents to you a list of currently configured ODBC DSNs on the machine. Click the "Add" hyperlink in the Action Column
Figure5.94.

-
You are now presented with a table listing that comprises ODBC Drivers installed on your system, move on to the row that identifies the ODBC Driver that you will be creating your DSN for, then click on the "New" hyperlink.
Figure5.95.

-
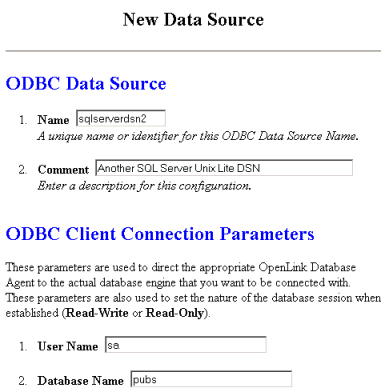
Enter values into the fields presented on the ODBC DSN form as follows:
Name. Enter a value that uniquely identifies the DSN being created. This example uses the name "sqlserver2" to indicate that this DSN will be connecting to SQL Server database.
Description. Enter a value that provides additional information that helps in describing the purpose of the DSN that you are creating.
Username. Enter a valid username for the database that you are connecting to, you can leave this blank and be prompted for values at actual database connect time.
Database Name. Enter the name of an actual SQL Server database.
Read-only connection. Check this box if you require a read only session.
No Login Dialog Box. Check this box if you do not want to be presented with a login dialog window.
Defer fetching of long data. Check this box to defer the fetching of long data. See the Release Notes section for more details.
Jet Fix. Check this box to overcome an old Jet Engine problem of large numeric types mapped to TEXT (drivers will return SQLServer as database type)
Server. Enter database server connection values for the database that your are connecting to.
Row Buffer Size. Enter a value that represents the number of records that you would like your ODBC driver to retrieve during each network hop. A network hop represents the number of times your OpenLink ODBC send a message across the network to retrieve records from your remote database server. The feature can be used to improve ODBC record retrieval performance.
Environment
Select the Environment section name used to identify the group of environment parameters for the Database. In most cases this does not need to be changed. For advanced use, multiple environments may be defined. The pick list of existing Environment groups contains only the currently defined Environments that are associated with the same Driver currently being configured. Choose from an existing environment, or create a new environment by entering a name.
Enter environment values into the text area as parameter=value with each parameter on a separate line.
These environment varable values are database specific and are described in detail later in this section. The list below will allow you to quickly jump to the relevant section:
DB2 Informix Ingres & OpenIngres Oracle Progress SQL92 Microsoft or Sybase SQL Server ODBC-JDBC Bridges for Java Figure5.96.
-
Click on the "Add" button at the foot of the page to complete the creation of your new ODBC DSN.
-
The DSN may then be tested, or you can return to the DSN list.
5.2.2.Manual Configuration
-
Edit the file bin/openlink.ini, and make sure the environment section for the driver contains the right entries. In case of the SQLServer Lite Driver this section looks like this:
          [Environment SQLServer 2000]
          FREETDSCONF        = /home/openlink/bin/freetds.conf
          DSQUERY            = SQLSERVER   ; Load this section from freetds.conf
          TDSHOST            = host.domain ; Point this to your SQLServer machine
          TDSPORT            = 1433
          TDSVER             = 7.0
          SQLSERVER_CATALOG  = Y
          CURSOR_SENSITIVITY = LOW         ; Set to HIGH after loading oplrvc.sql
These environment varable values are database specific and are described in detail later in this section. The list below will allow you to quickly jump to the relevant section:
DB2 Informix Ingres & OpenIngres Oracle Progress SQL92 Microsoft or Sybase SQL Server (TDS) ODBC-JDBC Bridges for Java In the case of SQLServer Driver, you only need to set the TDSHOST variable correctly. The FREETDSCONF variable is automatically set by the installer. Under normal conditions you do not have to modify the freetds.conf file nor the DSQUERY variable.
-
Edit the file bin/odbc.ini and add the correct settings to the sample DSN that is created:
          [sql_lite]
          Driver          = /home/openlink/lib/sql_st_lt.so
          Description     = Sample SQLServer 2000 Lite Connection
          ServerType      = SQLServer 2000
          Username        =
          Password        =
          Database        =
          ReadOnly        = no
          FetchBufferSize = 60
In the case of SQLServer Driver, you only need to modify Username, Password and Database. All modifications except the Driver keyword will be saved when reinstalling this or any other Lite Driver.
-
For most Lite drivers the LD_LIBRARY_PATH (or SHLIB_PATH or LIBPATH) environment variables must be set before you can load the driver. Therefore you will not find any mention of them in the openlink.ini file, as these settings are set by the driver after it is properly loaded.
If the installer finds the right environment variables e.g. INFORMIXDIR, it will note the appropriate LD_LIBRARY_PATH settings, and add them automatically to the openlink.sh script. This file must therefore be run before you can do anything with the Lite Drivers, e.g.:
. ./openlink.shIf you this is not executed, then the system loader library will give an error message stating it cannot find some dependent shared libraries to load.
5.2.3.DB2
OpenLink Lite Drivers for Unix can be configured in 3 ways:
| Web Based Wizard |
| Web Based Forms |
| Manually |
Once you have configured the generic parts of the data source using one of the above listed methods, you will need to define the driver environment. Below are the common options with their descriptions for the environment section:
      [Environment DB2]
      DB2DIR             = /dbs/DB2
      DB2INSTANCE        = DB2        ; default instance
      CURSOR_SENSITIVITY = LOW        ; Set to HIGH after loading oplrvc.sql
5.2.4.Informix
OpenLink Lite Drivers for Unix can be configured in 3 ways:
| Web Based Wizard |
| Web Based Forms |
| Manually |
Once you have configured the generic parts of the data source using one of the above listed methods, you will need to define the driver environment. Below are the common options with their descriptions for the environment section:
      [Environment Informix 7.3]
      INFORMIXDIR        = /dbs/informix73
      INFORMIXSERVER     = alpha
      DELIMIDENT         = Y  ; Allow quoted identifiers
      OPL_INF_MULTISESS  = Y  ; Allow multiple sessions
      OPL_SPACEPADCHAR   = Y  ; Pad CHAR fields with spaces
      CURSOR_SENSITIVITY = LOW        ; Set to HIGH after loading oplrvc.sql
      ;FET_BUF_SIZE           = 65535         ; Size of the fetch buffer
      ;FORCE_ONLINE_DATABASE  = 1             ; Force mode to (0) SE or (1) ONLINE
      [Environment Informix 2000]
      INFORMIXDIR        = /dbs/informix2000
      INFORMIXSERVER     = alpha
      DELIMIDENT         = Y  ; Allow quoted identifiers
      OPL_INF_MULTISESS  = Y  ; Allow multiple sessions
      OPL_SPACEPADCHAR   = Y  ; Pad CHAR fields with spaces
      CURSOR_SENSITIVITY = LOW        ; Set to HIGH after loading oplrvc.sql
      ;FET_BUF_SIZE           = 65535         ; Size of the fetch buffer
      ;FORCE_ONLINE_DATABASE  = 1             ; Force mode to (0) SE or (1) ONLINE
5.2.5.Ingres
OpenLink Lite Drivers for Unix can be configured in 3 ways:
| Web Based Wizard |
| Web Based Forms |
| Manually |
Once you have configured the generic parts of the data source using one of the above listed methods, you will need to define the driver environment. Below are the common options with their descriptions for the environment section:
      [Environment Ingres II]
      II_SYSTEM          = /dbs
      II_DATE_FORMAT     = US
      ING_SET            = set lockmode session where readlock=nolock
      CURSOR_SENSITIVITY = LOW        ; Set to HIGH after loading oplrvc.sql
5.2.6.Oracle
OpenLink Lite Drivers for Unix can be configured in 3 ways:
| Web Based Wizard |
| Web Based Forms |
| Manually |
Once you have configured the generic parts of the data source using one of the above listed methods, you will need to define the driver environment. Below are the common options with their descriptions for the environment section:
      [Environment Oracle 8.0.x]
      ORACLE_HOME        = /dbs/oracle80
      ORACLE_SID         = ORCL
      ;ORACLE_SERVER          = T
      ;TWO_TASK               = P:
      ;ODBC_CATALOGS          = Y     ; Uncomment after loading odbccat8.sql
      ;MULTIPLEX_LDA          = 5     ; Allow 5 OpenLink clients on a single lda
      ;OPL_USR_TBLS_FIRST     = Y     ; Sort SQLTables starting with user tables
      SHOW_REMARKS       = N  ; Retrieve SQLColumns REMARKS field
      CURSOR_SENSITIVITY = LOW        ; Set to HIGH after loading odbccat8.sql
      ;OCI_PREFETCH_ROWS      = 100   ; Number of rows to prefetch
      ;OCI_PREFETCH_MEMORY    = 65535 ; Amount of memory to use for prefetching
      [Environment Oracle 8.1.x]
      ORACLE_HOME        = /dbs/oracle81
      ORACLE_SID         = ORCL
      ;ORACLE_SERVER          = T
      ;TWO_TASK               = P:
      ;ODBC_CATALOGS          = Y     ; Uncomment after loading odbccat8.sql
      ;MULTIPLEX_LDA          = 5     ; Allow 5 OpenLink clients on a single lda
      ;OPL_USR_TBLS_FIRST     = Y     ; Sort SQLTables starting with user tables
      SHOW_REMARKS       = N  ; Retrieve SQLColumns REMARKS field
      CURSOR_SENSITIVITY = LOW        ; Set to HIGH after loading odbccat8.sql
      ;OCI_PREFETCH_ROWS      = 100   ; Number of rows to prefetch
      ;OCI_PREFETCH_MEMORY    = 65535 ; Amount of memory to use for prefetching
5.2.7.PostgreSQL
OpenLink Lite Drivers for Unix can be configured in 3 ways:
| Web Based Wizard |
| Web Based Forms |
| Manually |
Once you have configured the generic parts of the data source using one of the above listed methods, you will need to define the driver environment. Below are the common options with their descriptions for the environment section:
      [Environment PostgreSQL]
      CURSOR_SENSITIVITY = LOW        ; Set to HIGH after loading oplrvc.sql
      ;ODBC_CATALOGS          = Y             ; Uncomment after loading odbccat defs
The following options can be used in the ConnectOptions or Options field of the client configuration:
-
-H <hostname>. Connect to postmaster on <hostname>. This defaults to localhost if unspecified
-
-P <port>. Contact postmaster on port <port>, which defaults to PGPORT (5432) is unspecified.
-
-T. Disable ODBC transaction management. All transactions will be automatically committed. This prevents palloc() failures with out-of-memory errors when doing really big transactions such as Exporting 10000 records from MS/Access.
Datatype Mapping from ODBC Datatypes to Postgres Datatypes
This information can be queried by the SQLTypeInfo catalog call.
Table5.2.Default Rule Book settings
| SQL type | Postgres type |
|---|---|
| SQL_CHAR | char |
| SQL_VARCHAR | varchar |
| SQL_LONGVARCHAR | text |
| SQL_DECIMAL | varchar |
| SQL_NUMERIC | varchar |
| SQL_BIT | bit |
| SQL_TINYINT | int2 |
| SQL_SMALLINT | int2 |
| SQL_INTEGER | int4 |
| SQL_BIGINT | varchar |
| SQL_REAL | float4 |
| SQL_DOUBLE | float8 |
| SQL_FLOAT | float8 |
| SQL_BINARY | not supported |
| SQL_VARBINARY | not supported |
| SQL_LONGVARBINARY | not supported |
| SQL_DATE | not supported |
| SQL_TIME | not supported |
| SQL_TIMESTAMP | not supported |
Datatype Mapping from Postgres Datatypes to ODBC Datatypes
This information can be queried by the SQLColumns catalog call.
Table5.3.Default Rule Book settings
| Postgres type | SQL type | Precision |
|---|---|---|
| bool | SQL_CHAR | 1 |
| char | SQL_CHAR | 1 |
| name | SQL_VARCHAR | 32 |
| char16 | SQL_CHAR | 16 |
| int2 | SQL_SMALLINT | |
| int4 | SQL_INTEGER | |
| regproc | SQL_VARCHAR | 16 |
| text | SQL_LONGVARCHAR | 8000 |
| oid | SQL_INTEGER | (*) |
| tid | SQL_VARCHAR | 19 |
| xid | SQL_VARCHAR | 12 |
| cid | SQL_VARCHAR | 3 |
| oid8 | SQL_VARCHAR | 89 |
| smgr | SQL_VARCHAR | 12 |
| char2 | SQL_VARCHAR | 2 |
| char4 | SQL_VARCHAR | 4 |
| char8 | SQL_VARCHAR | 8 |
| filename | SQL_VARCHAR | 255 |
| float4 | SQL_REAL | |
| float8 | SQL_DOUBLE | |
| abstime | SQL_VARCHAR | 60 |
| reltime | SQL_VARCHAR | 60 |
| tinterval | SQL_VARCHAR | 60 |
| unknown | SQL_VARCHAR | 255 |
| bpchar | SQL_CHAR | 255 |
| varchar | SQL_VARCHAR | 255 |
| date | SQL_CHAR | 10 |
| time | SQL_CHAR | 16 |
| other type | SQL_LONGVARCHAR | 8000 |
(*) Note: An oid is returned as a SQL_INTEGER, because otherwise it would not be useable for SQLSpecialColumns.
Binary data / large objects are not supported in this release.
5.2.8.MySQL
OpenLink Lite Drivers for Unix can be configured in 3 ways:
| Web Based Wizard |
| Web Based Forms |
| Manually |
Once you have configured the generic parts of the data source using one of the above listed methods, you will need to define the driver environment. Below are the common options with their descriptions for the environment section:
      [Environment MySQL]
      CURSOR_SENSITIVITY = LOW        ; Set to HIGH after loading oplrvc.sql
      ;ODBC_CATALOGS          = Y             ; Uncomment after loading odbccat defs
The following options can be used in the ConnectOptions or Options field of the client configuration:
-
-H <hostname>. Connect to server running on <hostname>. This defaults to localhost if unspecified
-
-P <port>. Contact server on port <port>, which defaults to (3306) is unspecified.
-
-T. Disable all ODBC transaction support. The driver will never issue any extra statements for transaction management (commit, rollback, modification of transaction isolation level)
Datatype Mapping from ODBC Datatypes to MySQL Datatypes
This information can be queried by the SQLTypeInfo catalog call.
Table5.4.Default Rule Book settings
| SQL type | MySQL type |
|---|---|
| SQL_CHAR | char |
| SQL_VARCHAR | varchar |
| SQL_LONGVARCHAR | text |
| SQL_DECIMAL | decimal |
| SQL_NUMERIC | decimal |
| SQL_BIT | not supported |
| SQL_TINYINT | tinyint |
| SQL_SMALLINT | smallint |
| SQL_INTEGER | integer |
| SQL_BIGINT | bigint |
| SQL_REAL | real |
| SQL_DOUBLE | double |
| SQL_FLOAT | double |
| SQL_BINARY | tinyblob |
| SQL_VARBINARY | tinyblob |
| SQL_LONGVARBINARY | longblob |
| SQL_DATE | date |
| SQL_TIME | time |
| SQL_TIMESTAMP | timestamp |
Datatype Mapping from MySQL Datatypes to ODBC Datatypes
This information can be queried by the SQLColumns catalog call.
Table5.5.Default Rule Book settings
| MySQL type | SQL type | Precision |
|---|---|---|
| bigint | SQL_BIGINT | 19 |
| blob | SQL_VARBINARY | 2^16-1 |
| char(n) | SQL_CHAR | n |
| date | SQL_CHAR | 32 |
| datetime | SQL_CHAR | 32 |
| decimal(p,s) | SQL_DECIMAL | p |
| double | SQL_DOUBLE | 15 |
| enum | SQL_VARCHAR | 255 |
| float | SQL_REAL | 7 |
| int | SQL_INTEGER | 10 |
| longblob | SQL_LONGVARBINARY | 2^32-1 |
| longtext | SQL_LONGVARCHAR | 2^32-1 |
| mediumblob | SQL_VARBINARY | 2^24-1 |
| mediumint | SQL_INTEGER | 8 |
| mediumtext | SQL_LONGVARCHAR | 2^24-1 |
| set | SQL_VARCHAR | 255 |
| smallint | SQL_SMALLINT | 5 |
| text | SQL_LONGVARCHAR | 2^16-1 |
| time | SQL_VARCHAR | 32 |
| timestamp(n) | SQL_VARCHAR | n |
| tinyblob | SQL_VARBINARY | 255 |
| tinyint | SQL_TINYINT | 3 |
| tinytext | SQL_VARCHAR | 255 |
| varchar(n) | SQL_VARCHAR | n |
| varchar(n) binary | SQL_VARCHAR | n |
| year | SQL_VARCHAR | 4 |
5.2.9.Progress SQL92
OpenLink Lite Drivers for Unix can be configured in 3 ways:
| Web Based Wizard |
| Web Based Forms |
| Manually |
Once you have configured the generic parts of the data source using one of the above listed methods, you will need to define the driver environment. Below are the common options with their descriptions for the environment section:
      [Environment Progress 91SQL]
      DLC                = /dbs/dlc9.1C
      PROCFG             = /dbs/dlc9.1C/progress.cfg
      CURSOR_SENSITIVITY = LOW        ; Set to HIGH after loading oplrvc.sql
5.2.10.Microsoft or Sybase SQL Server (TDS)
Installation
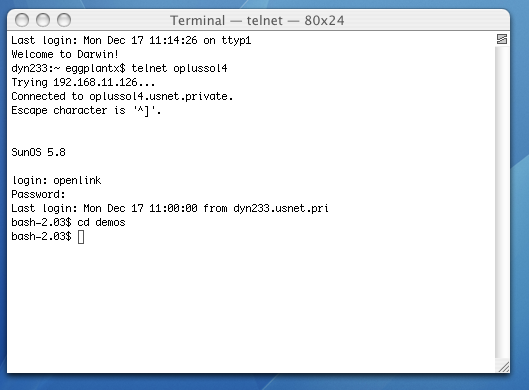
Login to your Unix or Linux client machine.
Figure5.97.lite_sql_ST_SQL_Login.png
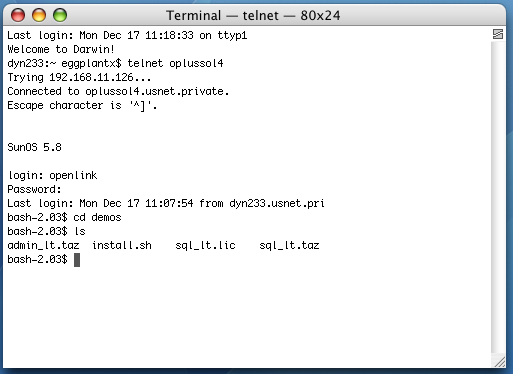
cd into the installation directory.
Figure5.98.lite_sql_ST_SQL_CD_Demos.png
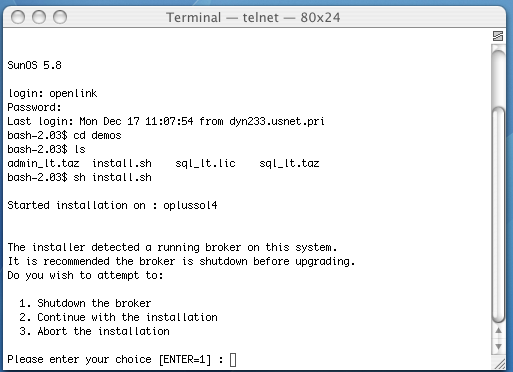
The installation files ship as an installation shell script, a driver and admin .taz file, and a license .lic file. The installation shell script should be ftp'd in ascii. The rest of the files should be ftp'd in binary, where applicable.
Figure5.99.lite_sql_ST_SQL_LS_Files.png
Run the following command to start the installation: sh install.sh
Figure5.100.lite_sql_ST_SQL_Start_Install.png
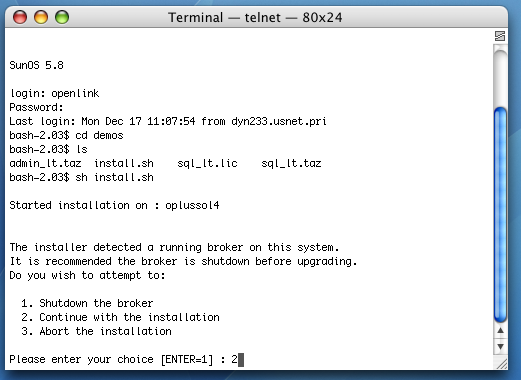
If you have a pre-existing installation running on the machine, you will be presented with the following options.
Figure5.101.lite_sql_ST_SQL_Install_2.png
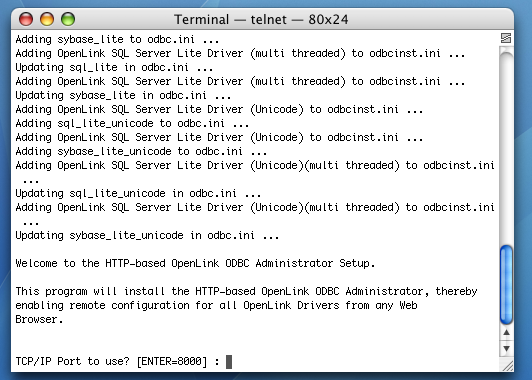
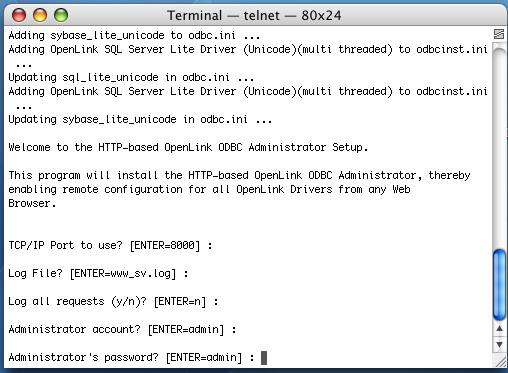
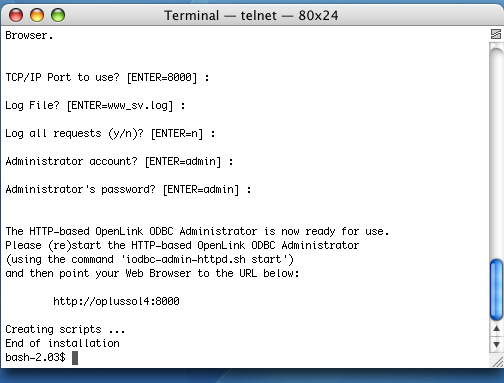
You must choose a TCP port on which to run your HTTP-based iODBC Data Sources Administrator. The default is 8000. You will need to know this port number and your local machine's IP address or hostname to access your Admistrator in a Web browser. This is how you call it: http://machine:portnumber
Figure5.102.lite_sql_ST_SQL_Install_8000.png
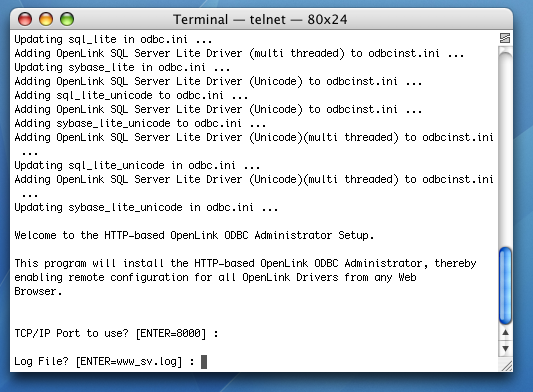
This enables you to name your administrator's log file. It is best to go with the default.
Figure5.103.lite_sql_ST_SQL_Install_log.png
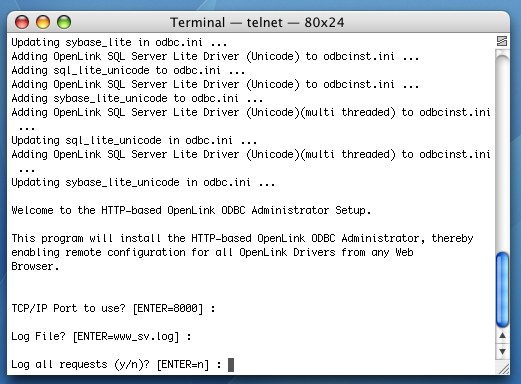
You can choose to log all requests. This is not diagnostic-level odbc tracing or connection logging. The default is no.
Figure5.104.lite_sql_ST_SQL_Install_Requests.png
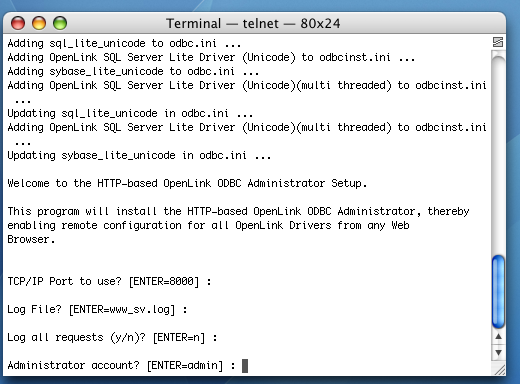
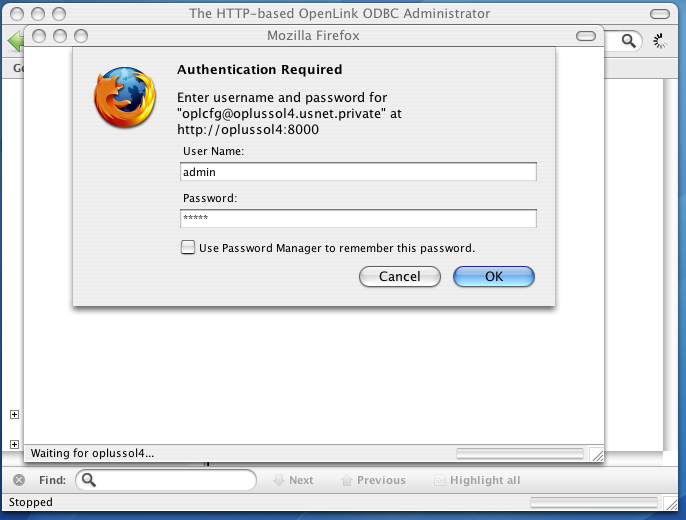
You can change the iODBC Data Source Administrator's default username from "admin". This is the name that you will need to login to OpenLink's HTTP-based iODBC Data Sources Administrator.
Figure5.105.lite_sql_ST_SQL_Install_Admin.png
You can change the iODBC Data Source Administrator's default password from "admin".
Figure5.106.lite_sql_ST_SQL_Admin_PWD.png
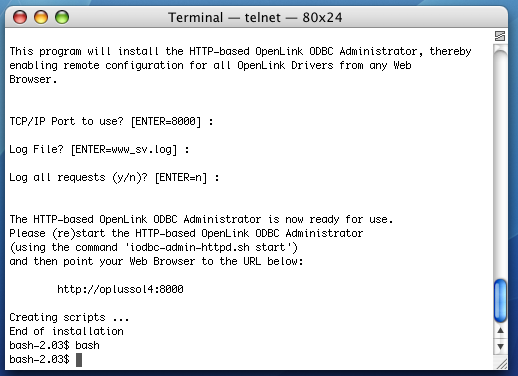
The installation is complete.
Figure5.107.lite_sql_ST_SQL_Install_End.png
Configuration
Execute the bash command to open a bash shell. If you do not have have the bash shell, substitute the sh command for the bash command. This will open the bourne shell.
Figure5.108.lite_sql_SQL_ST_Bash.png
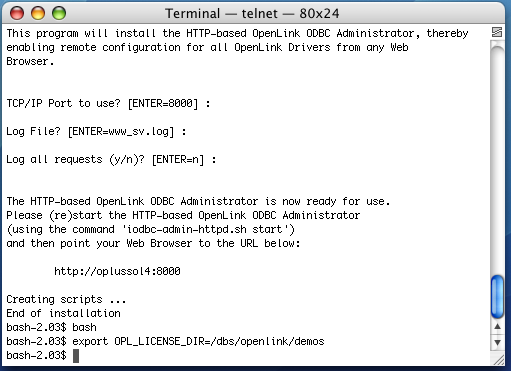
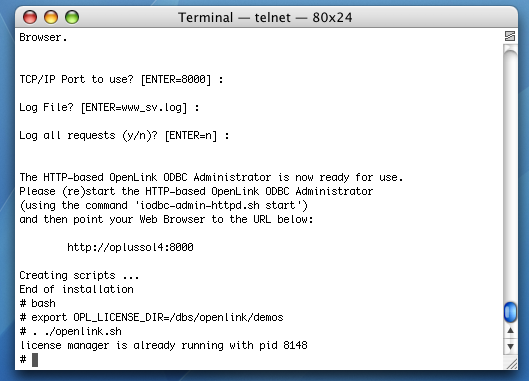
Use the export command to set an OPL_LICENSE_DIR variable that points to the directory that contains your OpenLink license. This is typically the bin sub-directory of the OpenLink installation. However, you can put your license files in /etc/, the root of the installation, or virtually anywhere else.
Figure5.109.lite_sql_SQL_ST_Export_License_DIR.png
Run the following command to set your ODBC environment variables:
. ./openlink.sh
Figure5.110.lite_sql_ST_SQL_openlinksh.png
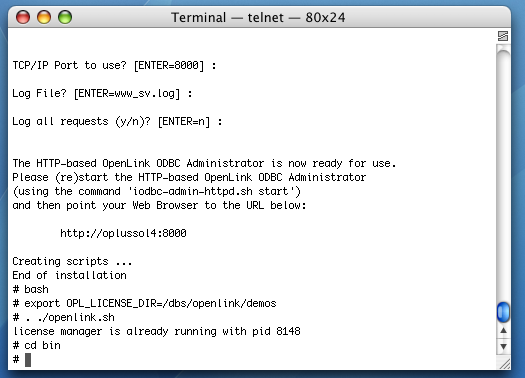
cd into the bin sub-directory of your OpenLink installation.
Figure5.111.lite_sql_ST_SQL_CD_BIN.png
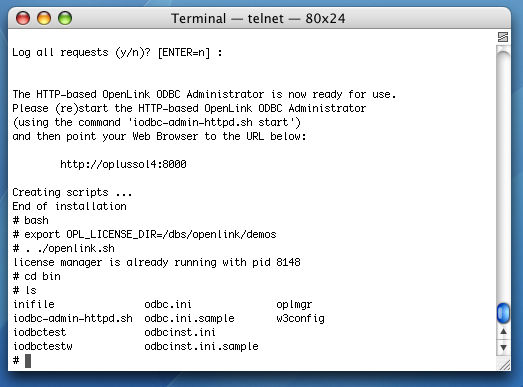
Use the ls(1) command to display your files.
Figure5.112.lite_sql_ST_SQL_LS.png
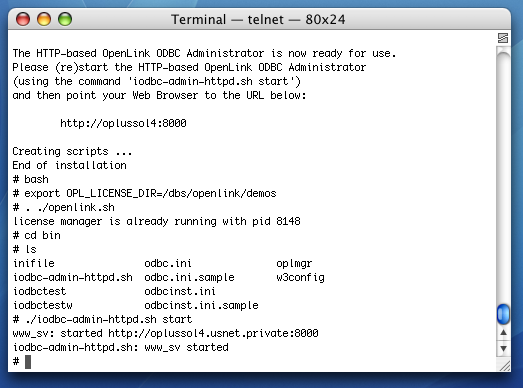
Run the following command to start your HTTP-based iODBC Data Sources Administrator:
./iodbc-admin-httpd.sh start
Figure5.113.lite_sql_ST_SQL_Start_Admin.png
Open a Web browser on any computer and type the URL for your administrator in the address bar.
Figure5.114.lite_sql_ST_SQL_Open_Admin.png
Click the Client Components Administration link in the left hand side navigation bar.
Figure5.115.lite_sql_ST_SQL_Client_Components_Admin.png
Click the Configure ODBC Data Sources link in the left hand side navigation bar.
Then, login with your username and password.
Figure5.116.lite_sql_ST_SQL_Admin_Login.png
Click the Add button.
Figure5.117.lite_sql_ST_SQL_Admin_DSN_Tab.png
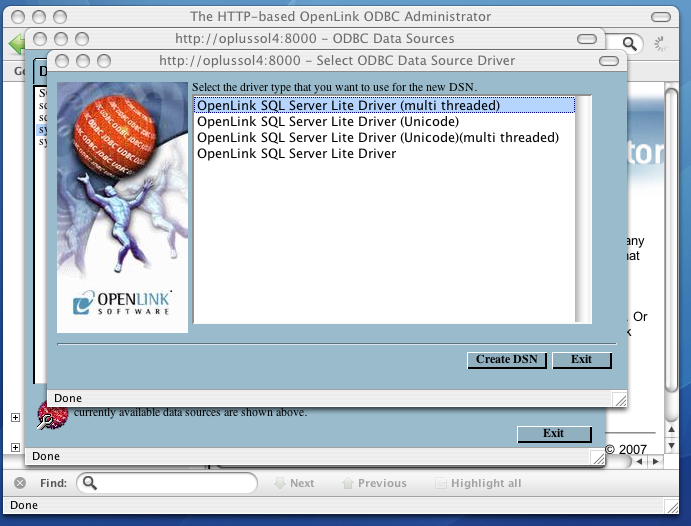
Click the OpenLink SQL Server Lite Driver (multi-threaded). Then, click Create DSN.
Figure5.118.lite_sql_ST_SQL_Choose_Driver.png
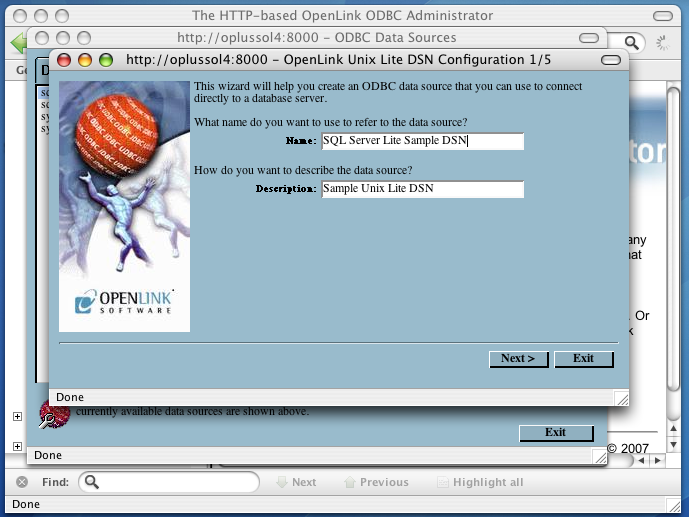
Provide a descriptive name and optional name for your DSN. Then, click Next.
Figure5.119.lite_sql_ST_SQL_Name_DSN.png
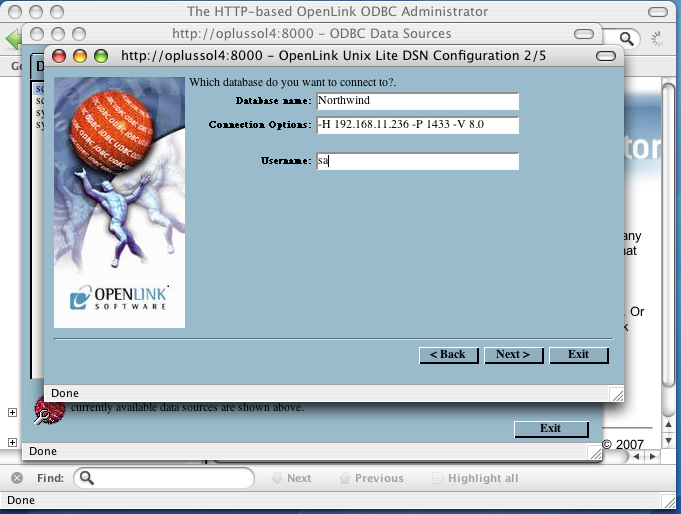
Pass the following values in the next dialog:
Figure5.120.lite_sql_ST_SQL_Connection_Attributes.png
-
Database Name - A valid SQL Server database name
-
Connection Options - The driver accepts the following Connection Options:
-
-H - Hostname of the machine on which SQL Server is running
-
-P - SQL Server TCP Port
-
-V - SQL Server version. Values supported are: 9.0 equals SQL Server 2005; 8.0 equals SQL Server 2000; 7.0 equals SQL Server 7
-
-S - SQL Server name on the specified host. A SQL Server instance can also be specified by appending "\InstanceName" to the ServerName ie "ServerName\InstanceName"
-
-F - Specify fail-over server name for Database Mirroring
-
-N - Network Packet size, a value that determines the number of bytes per network packet transferred from the database server to the client. The correct setting of this attribute can improve performance. When set to 0, the initial default, the driver uses the default packet size as specified in the Sybase server configuration. When set to -1, the driver computes the maximum allowable packet size on the first connect to the data source and saves the value in the system information.
-
-O Prepared Method, which is a value that determines whether stored procedures are created on the server for every call to SQLPrepare(). When set to Full (2), stored procedures are created for every call to SQLPrepare, which can decrease performance when processing static statements. When set to Partial(1), the initial default, the driver creates stored procedures only if the statement contains parameters. Otherwise, the statement is cached and executed directly at SQLExecute() time. When set to None (0), the driver never creates stored procedures.
-
-L - The name of a Microsoft SQL Server supported national language. The default language is English.
-
-C - The name of an installed character set on the server. By default it is the setting on the Microsoft SQL Server.
-
-A - Turn Off ANSI NULL handling
-
-E - Turn On SSL Strong Data Encryption
-
-R - Turn On SSL Server Certificate Verification
-
-D - Specify Name of Certificate Authority file to be used for SSL Certificate Verification
-
-Z - Turn On Snapshot Serializable Isolation
-
-M - Turn On Multiple Active Result Sets (MARS)
-
-
Username - SQL Server login
Click Next.
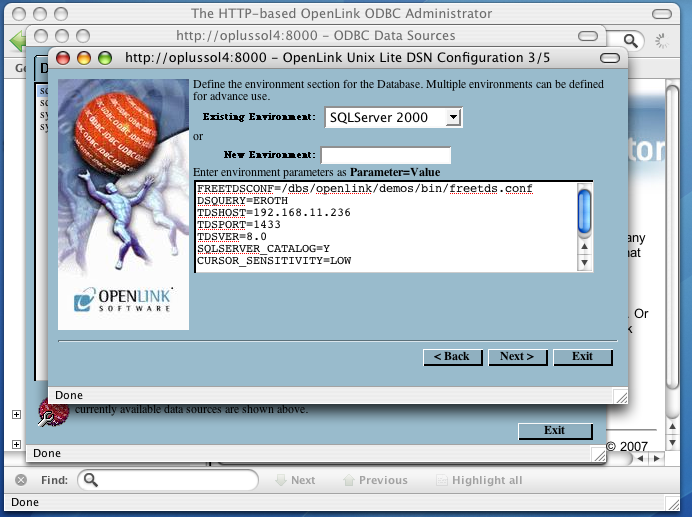
Set the following variables on the next dialog:
Figure5.121.lite_sql_ST_SQL_Environment_Variables.png
-
Existing Environment - This arbitrary heading for a collection of DBMS-related environment variables usually corresponds with the DBMS version
-
New Environment - You can choose a new heading
-
FREETDSCONF - The full path to the freetds file that installs with OpenLink's Single-Tier drivers
-
DSQUERY - SQL Server instance name
-
TDSHOST - SQL Server database server hostname or IP address
-
TDSPORT - SQL Server listen port
-
TDSVER - The SQL Server TDS version
-
SQLSERVER_CATALOG -
-
CURSOR_SENSITIVITY - Enables or disables the row version cache used with dynamic cursors. When dynamic cursor sensitivity is set high, the Cursor Library calculates checksums for each row in the current rowset and compares these with the checksums (if any) already stored in the row version cache for the same rows when fetched previously. If the checksums differ for a row, the row has been updated since it was last fetched and the row status flag is set to SQL_ROW_UPDATED. The row version cache is then updated with the latest checksums for the rowset. From the user's point of view, the only visible difference between the two sensitivity settings is that a row status flag can never be set to SQL_ROW_UPDATED when the cursor sensitivity is low. (The row status is instead displayed as SQL_ROW_SUCCESS.) In all other respects, performance aside, the two settings are the same. Deleted rows don't appear in the rowset. Updates to the row since the row was last fetched are reflected in the row data, and inserted rows appear in the rowset, if their keys fall within the span of the rowset. If your application does not need to detect the row status SQL_ROW_UPDATED, you should leave the 'High Cursor Sensitivity' checkbox unchecked, as performance is improved. The calculation and comparison of checksums for each row fetched carries an overhead. If this option is enabled, the table oplrvc must have been created beforehand using the appropriate script for the target database.
Click Next.
You can set the following, optional values on the fourth dialog:
Figure5.122.lite_sql_ST_SQL_Additional_Options.png
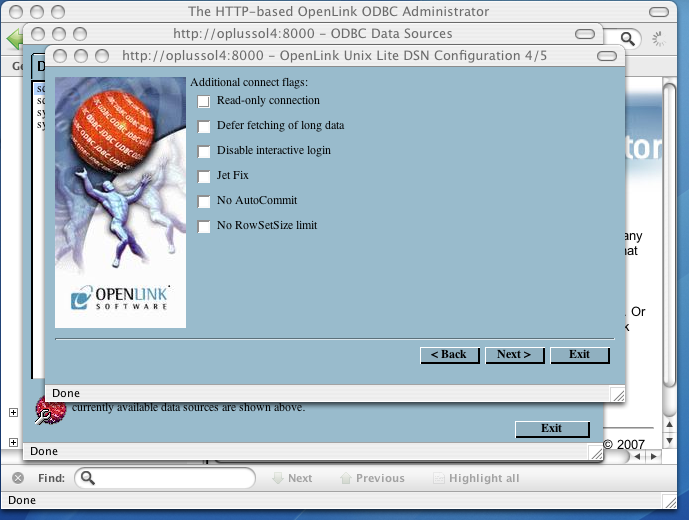
-
Read-only connection - Specifies whether the connection is "Read-only." Make sure the checkbox is unchecked to request a "Read/Write" connection.
-
Defer fetching of long data - Defers fetching of LONG (BINARY, BLOB etc.) data unless explicitly requested in a query. This provides significant performance increases when fields in query do not include LONG data fields.
-
Disable interactive login - Suppresses the ODBC "Username" and "Password" login dialog boxes when interacting with your ODBC DSN from within an ODBC compliant application.
-
Jet fix - Check this checkbox if you intend to use this driver with Microsoft Access.
-
No AutoCommit - Changes the default commit behaviour of the OpenLink driver. The default mode is AutoCommit (box unchecked).
-
No RowSetSize limit - Disables a limitation enforced by the cursor library. This limitation is enforced by default. It prevents the driver from claiming all available memory in the event that a resultset generated from an erroneous query is very large. The limit is normally never reached.
Click Next.
Additional, optional parameters appear on the fifth, and final dialog:
Figure5.123.lite_sql_ST_SQL_Additional_Options2.png
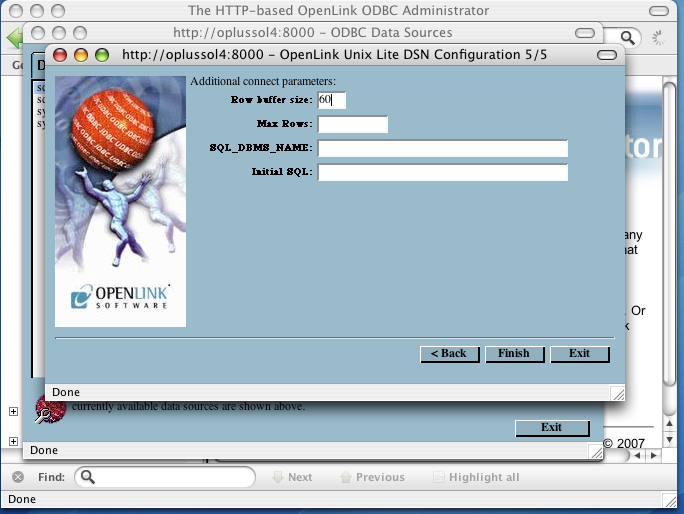
-
Row buffer size - This attribute specifies the number of records to be transported over the network in a single network hop. Values can range from 1 to 99.
-
Max Rows - Allows you to define a limit on the maximum number of rows to be returned from a query. The default value of 0 means no limit.
-
SQL_DBMS_Name - Manually overrides the SQLGetInfo(SQL_DBMS_NAME) response returned by the driver. This is required for products like Microsoft InfoPath for which the return the value should be "SQL Server".
-
Initial SQL - Lets you specify a file containing SQL statements that will be run automatically against the database upon connection.
Click Next.
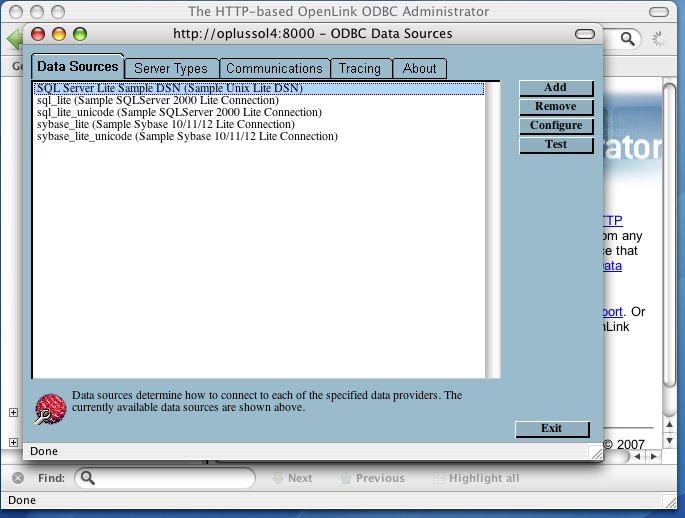
Your new DSN is highlighted and persisted on the the Data Sources tab. Click the Test tab.
Figure5.124.lite_sql_ST_SQL_Saved_DSN.png
Type your password in the password field and click test.
Figure5.125.lite_sql_ST_SQL_Authenticate.png
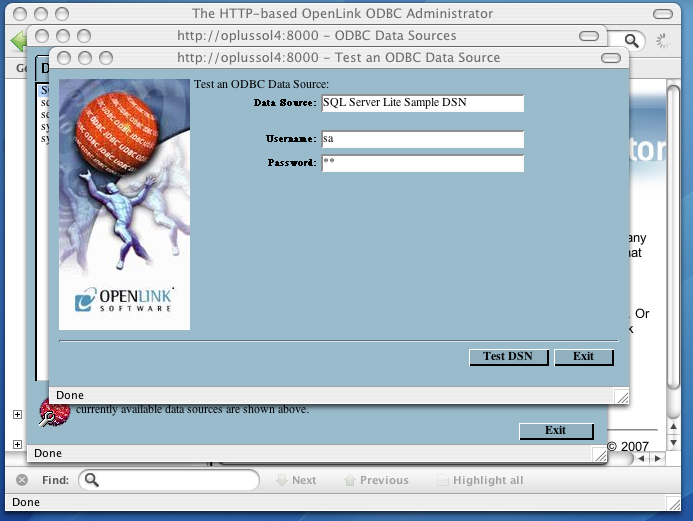
You have established a connection.
Figure5.126.lite_sql_ST_SQL_Connected.png
5.2.11.ODBC-JDBC Bridges for Java
OpenLink Lite Drivers for Unix can be configured in 3 ways:
| Web Based Wizard |
| Web Based Forms |
| Manually |
Once you have configured the generic parts of the data source using one of the above listed methods, you will need to define the driver environment. Below are the common options with their descriptions for the environment section:
      [Environment Jdbc14]
      CLASSPATH =.;c:\Program Files\OpenLink\Virtuoso 3.0\jdk14\virtjdbc3.jar
      ;PATH =
      ;JET_DROPCATALOGFROMDBMETACALLS  = YES
      ;JET_DROPSCHEMAFROMDBMETACALLS   = YES
      ;JET_NOSUPPORTOFQUOTEDIDENTIFIER = YES
      ;PATCHNULLSIZEOFSQLCHAR = 4096
      ;JET_SQLSTATISTICSOFF   = YES
Note that CLASSPATH is the critical environment variable that must be set to enable the JDBC driver class files to be located.