5.3.Mac OS X Data Source Configuration
5.3.1.Creating ODBC Data Sources
OpenLink Software's components are fully supported on Mac OS X version 10.1.x ("Puma") and 10.2.x ("Jaguar"). In most ways, this looks the same to users. However, there are some significant differences to be aware of between these Operating Systems.
As shipped from Apple, Mac OS X did not include any ODBC support until Jaguar. The ODBC Driver Manager, Data Source Administrator, etc. - all had to be delivered with the Drivers.
When Apple introduced Darwin, an Open-Source project meant to form the kernel of Mac OS X, OpenLink determined to port its open-source iODBC Driver Manager to the new platform. With the introduction of the Preview Release of Mac OS X, the traditional set of dynamic libraries was broadened to include a system of Frameworks to encourage the development of fully ODBC compliant, native Mac OS X drivers and client applications.
That set of Frameworks, along with the OpenLink ODBC Administrator (then known as the iODBC Administrator), has been included with all OpenLink installations for Mac OS X since 10.0. The OpenLink ODBC Administrator supports all core features of ODBC, and presents driver-specific DSN configuration panels, as defined by the Driver developer, through the use of Setup Libraries.
Jaguar's release marked Apple's recognition that Data Access was an important part of an Enterprise Operating System. Already part of the standard distribution of Darwin, the basic iODBC dynamic libraries are now a part of the standard installation of Mac OS X 10.2. Apple also included their own version of an ODBC Administrator, as a proof-of-concept. Apple's Administrator permits Driver Registration, Tracing, and all other core features of ODBC; however, among other hard edges, all DSN configuration must be done by manually entering Keyword-Value pairs. Further, the user must know what Keywords to use, along with their acceptable Values.
Mac OS X ODBC Data Sources
The OpenLink ODBC Administrator for Mac OS X currently supports creation of User and System Data Source Names (DSNs). Support for File DSNs will be delivered in a future release.
A User DSN is only available to the user who creates the data source. Its parameters are stored in that user's settings file ~/Library/Preferences/ODBC.preference .
A System DSN is available to the whole system so that any user, including the system itself, will be able to use that data source. Its parameters are stored in the System settings file /Library/Preferences/ODBC.preference.
A File DSN is a special 'mobile' data source that stores the data source information associated with the Driver in a file, which may then be copied and shared among different users and ODBC application host machines.
The steps for creating a DSN are as follows:-
-
Launch the OpenLink ODBC Administrator, found in the /Applications/Utilities/ directory.
Figure5.127.OpenLink ODBC Administrator icon
-
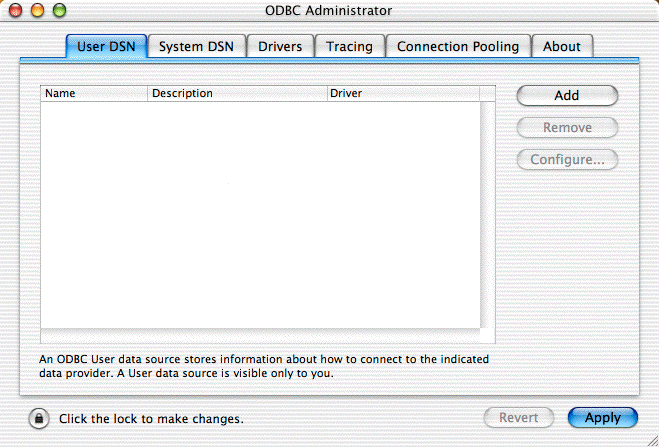
Click the tab for the kind of DSN you wish to create -- User or System. Press the Add button to begin creating a new Data source.
Figure5.128.iODBC Data Source Administrator
-
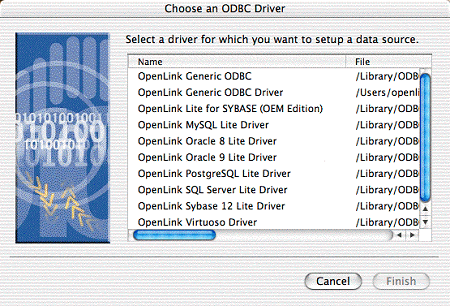
Select the Driver to be used to create your ODBC DSN. In this example the "OpenLink SQL Server Lite Driver" is highlighted. Then click the Finish button.
Figure5.129.Choose an ODBC Driver
-
You will now be presented with the ODBC Data Source Configuration dialog for the driver selected. Generally, there will be several tabs, most of which will need some information.
Common Data Source Tab
First is the Data Source Tab. The parameters on this tab are similar (not identical) for all OpenLink Single-Tier drivers. This tab always holds the Name and Description parameters. Generally, it will also include parameters describing the target database host - Hostname, Port, and, if the Driver handles more than one DBMS, Server Type. Specific information will be presented for each Driver, below.
-
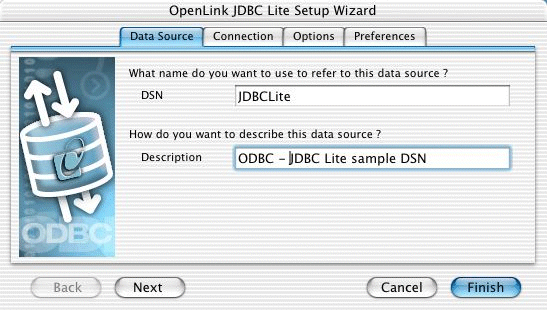
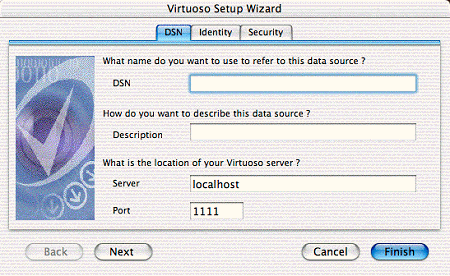
DSN. The name of the ODBC DSN. This is how you will generally refer to this data source, from within ODBC client applications.
-
Description. Any extra information you wish to note about the DSN you are creating. This is generally not displayed by ODBC client applications, though it is available to them.
-
Hostname. This is the fully qualified hostname, or IP address, of the machine hosting the DBMS you wish to access, e.g., dbms-server.example.com, or 192.168.155.123. Any hostname which will be resolved by your local DNS is acceptable.
-
Server Type. Select the version and/or vendor of the DBMS engine you will be accessing, from the list presented. If your exact version is not listed, try the closest version available. If that fails, please contact OpenLink Technical Support.
Common Connection Tab
The second and possibly third tab hold fields specific to the database communications layer. The name(s) of the tab(s), the fields, and their data, are specific to each database. The database specific settings are detailed further in the text. The following list will allow you to quick jump to the relevent section (if reading on-line):
| MySQL |
| Oracle 8 (or 9) |
| PostgreSQL |
| SQL Server |
| Virtuoso |
Common fields are:
-
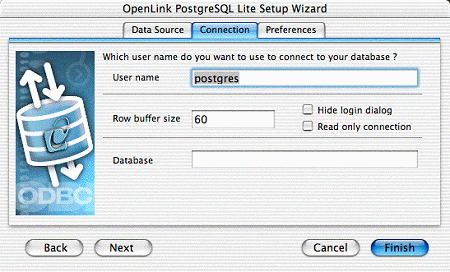
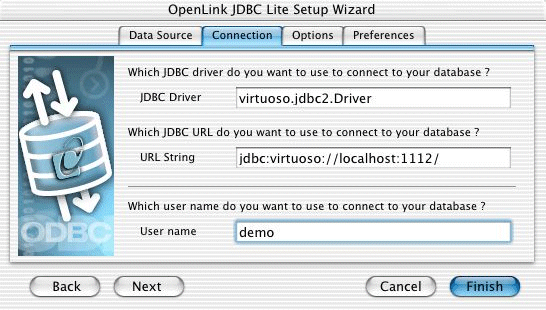
User name. This specifies the default username to be used when attempting to make a connection. You may override this at run time.
-
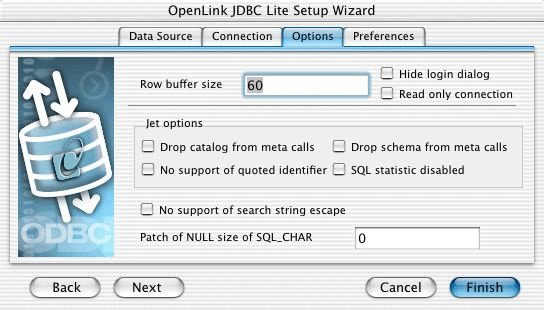
Row Buffer Size. This attribute specifies the number of records to be returned in a chunk. Values may range from 1 to 999. Setting this value too high or too low can significantly impact performance. Generally, best results are achieved with values between 50 and 150.
-
Hide Login Dialog. Suppress the ODBC "Username" and "Password" login dialog box when interacting with your ODBC DSN from within an ODBC compliant application. Please note - this requires that these values be correctly specified within the DSN, which can open a security hole.
-
Read Only connection. Specify whether the connection is to be "Read-only". Make sure the checkbox is unchecked to request a "Read/Write" connection.
Common Preferences Tab
The Preferences tab parameters are also generally common across all OpenLink Single-Tier Drivers for ODBC. All Preferences parameters are defined here, though they may not all appear on your Driver.
-
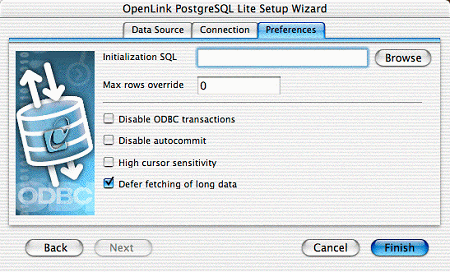
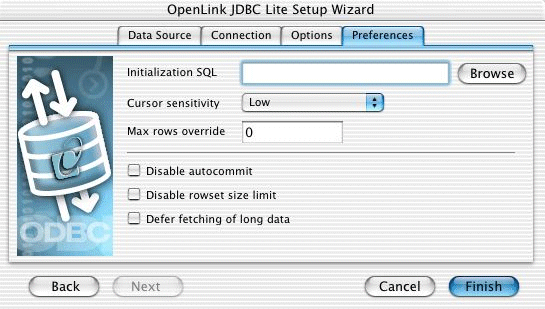
Initialization SQL. Lets you specify a file containing SQL statements that will be run against the database upon connection, automatically.
-
MaxRows Override. Allows you to limit the maximum number of rows to return from a query. The default value of 0 means no limit.
-
Enable Microsoft Jet Engine Options. Extra support or altered functionality for better compatibility with Microsoft Jet using applications such as Microsoft Access. This generally doesn't apply to Macintosh applications; however, we retain the option.
-
Disable AutoCommit. Change the default commit behaviour of the OpenLink Lite Driver. The default mode is AutoCommit mode (box unchecked).
-
Disable Rowset Size Limit. Disable any limitation enforced by the cursor library. The limitation is enforced by default, to prevent the Driver claiming all available memory when a result set is very large. The limit is normally never reached.
-
High Cursor Sensitivity
Enables or disables the row version cache used with dynamic cursors.
When dynamic cursor sensitivity is set high, the Cursor Library calculates checksums for each row in the current rowset and compares these with the checksums (if any) already stored in the row version cache for the same rows when fetched previously. If the checksums differ for a row, the row has been updated since it was last fetched and the row status flag is set to SQL_ROW_UPDATED. The row version cache is then updated with the latest checksums for the rowset.
From the user's point of view, the only visible difference between the two sensitivity settings is that a row status flag can never be set to SQL_ROW_UPDATED when the cursor sensitivity is low. (The row status is instead displayed as SQL_ROW_SUCCESS.) In all other respects, performance aside, the two settings are the same - deleted rows don't appear in the rowset, updates to the row since the row was last fetched are reflected in the row data, and inserted rows appear in the rowset if their keys fall within the span of the rowset.
If your application does not need to detect the row status SQL_ROW_UPDATED, you should leave the 'High Cursor Sensitivity' checkbox unchecked, as performance is improved. The calculation and comparison of checksums for each row fetched carries an overhead.
For this option to take effect, the table 'oplrvc' must already have been created, using the appropriate script for the target database.
-
Defer fetching of long data. Checked by default, this parameter determines whether long-data fields are retrieved after all other fields in a query, or in whatever order they appear in the query. Performance is generally best with this enabled; hence the default setting.
5.3.2.MySQL
5.3.3.Oracle 8 (or 9)
Data Source tab
Figure5.133.Oracle Data Source tab
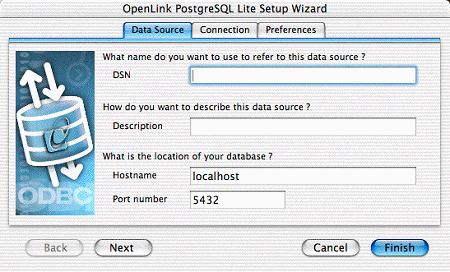
Figure5.134.Choose Oracle Directory dialog
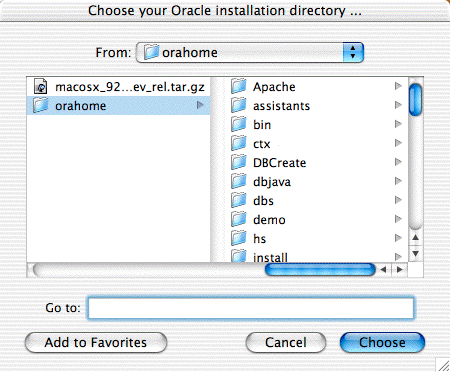
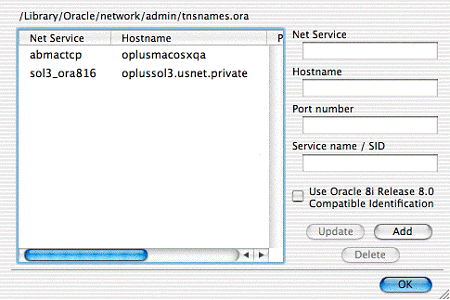
Figure5.135.Net Service Name Editor tab
5.3.4.PostgreSQL
5.3.5.ODBC-JDBC Lite Bridges for Java
5.3.6.Microsoft or Sybase SQL Server (TDS)
Installation
The OpenLink ODBC Driver for Microsoft SQL Server for Mac OS X is distributed in a single disk image (.dmg) file, which contains a Macintosh Installer mpkg.
Double-click the mpkg to start the installation process.
Figure5.145.lite_osx_sql_SQL_Dmgfile.png

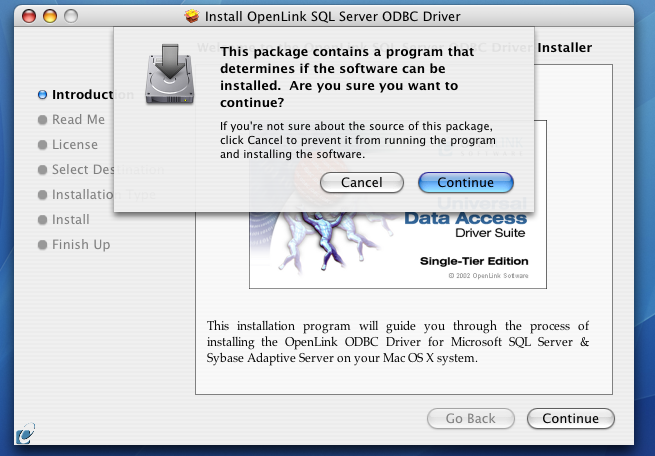
You will encounter a warning message that will ask you if you are sure that you want to install the software click to continue.
Figure5.146.lite_osx_sql_SQL_Warning.png
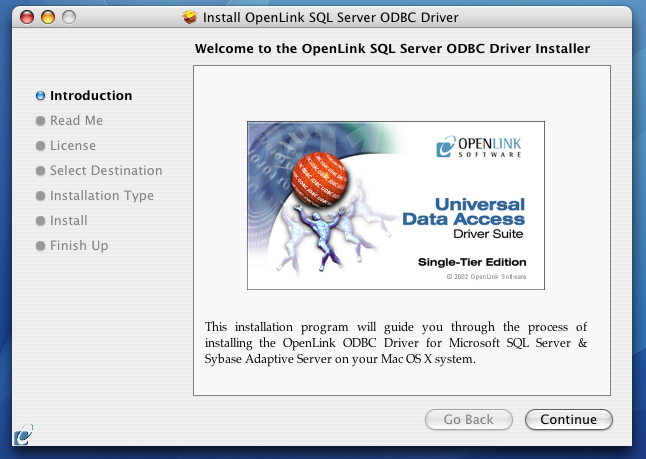
The installer will display a "Welcome" message. Click "Continue."
Figure5.147.lite_osx_sql_SQL_Welcome.png
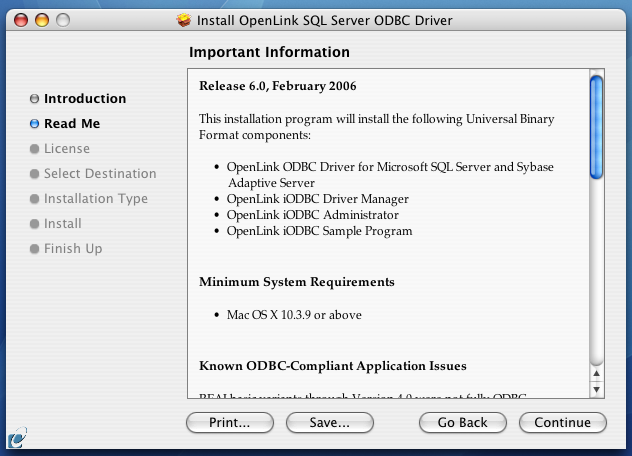
The next screen will display the Read-Me file, including any last-minute updates to these documents. Please read carefully and click "Continue" when finished.
Figure5.148.lite_osx_sql_SQL_Readme.png
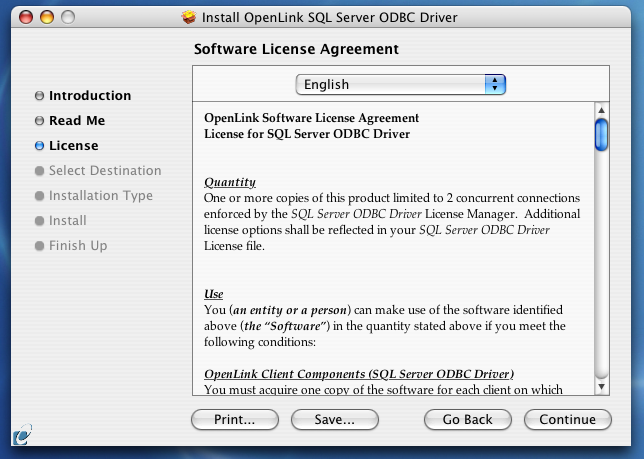
The next screen will display the License Agreement for the OpenLink Single-Tier Driver for ODBC. Please read and click "Continue".
Figure5.149.lite_osx_sql_SQL_License.png
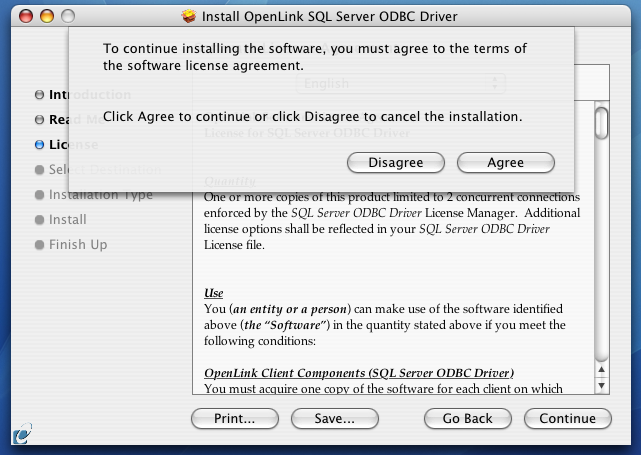
You will be prompted to "Agree" to continue the installation or "Disagree" to abort.
Figure5.150.lite_osx_sql_SQL_Agree.png
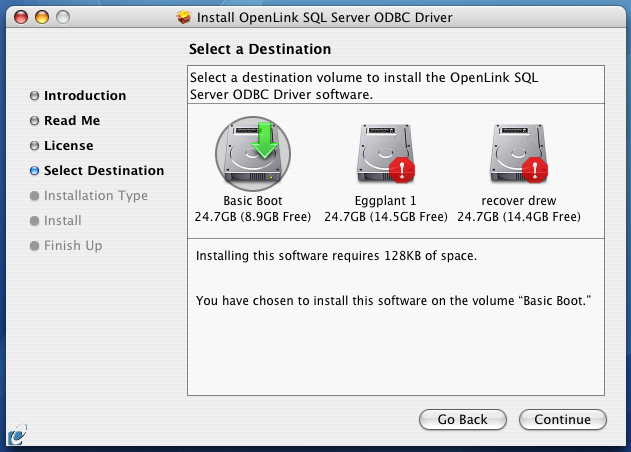
You will be asked to select a Destination Volume. Generally, this should be your Mac OS X boot volume. Click on the desired disk icon and then click "Continue".
Figure5.151.lite_osx_sql_SQL_Destination.png
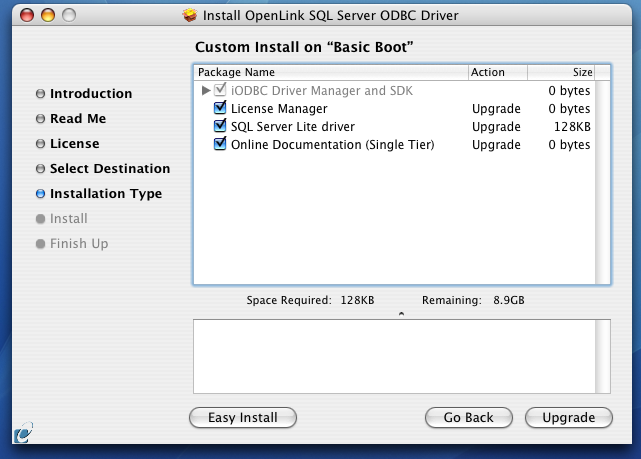
You may now choose the Easy Install, or if you are an experienced user, you may Customize which components are installed. OpenLink generally recommends the Easy Install.
If you have installed OpenLink or iODBC components in the past, click "Upgrade" to continue; otherwise, click "Install".
Figure5.152.lite_osx_sql_SQL_Easyinstall.png
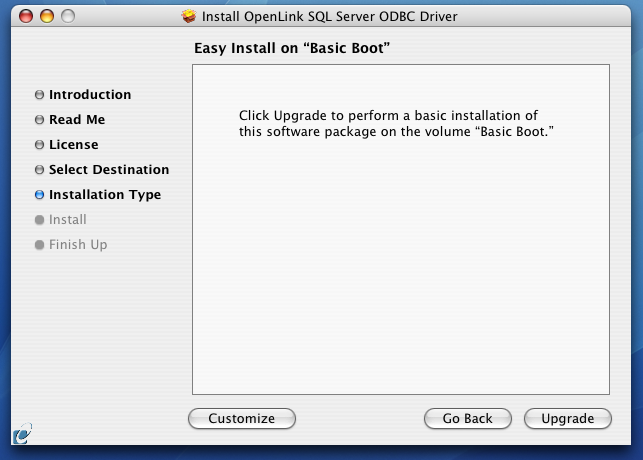
Figure5.153.lite_osx_sql_SQL_Custominstall.png
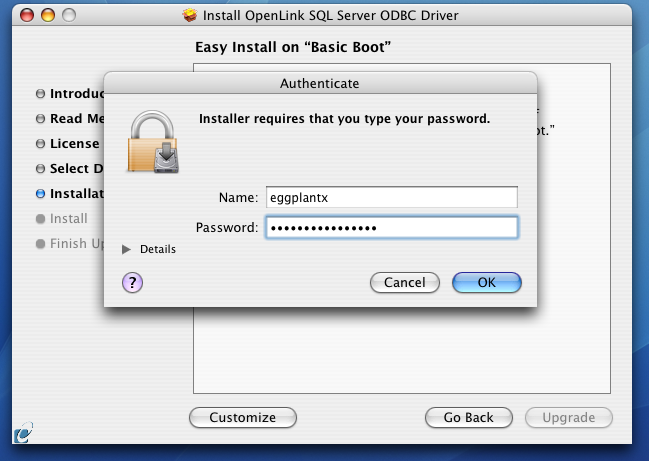
You must have an Administration username and password to install the OpenLink driver. Enter your Mac OS X Username and Password.
Figure5.154.lite_osx_sql_SQL_Authenticate.png
You will be shown a graphical progress bar as the Installation progresses, followed by System Optimization.
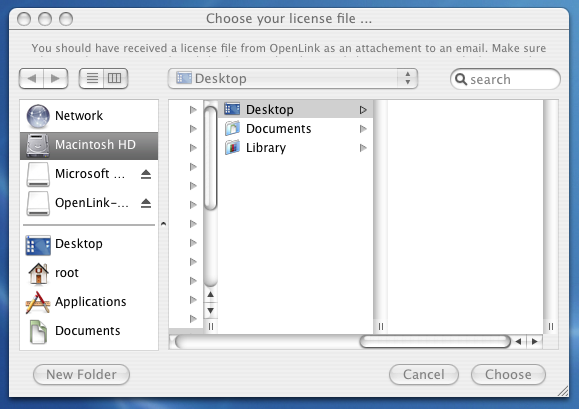
You will need to locate the license file.
Figure5.155.lite_osx_sql_Selectlicense.png
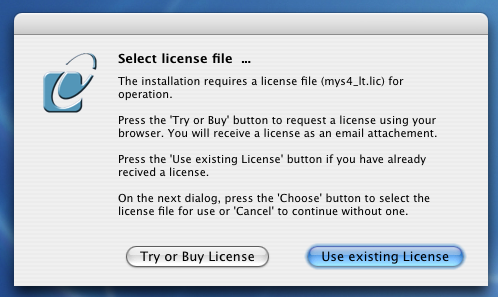
Figure5.156.lite_osx_sql_Browselicense.png
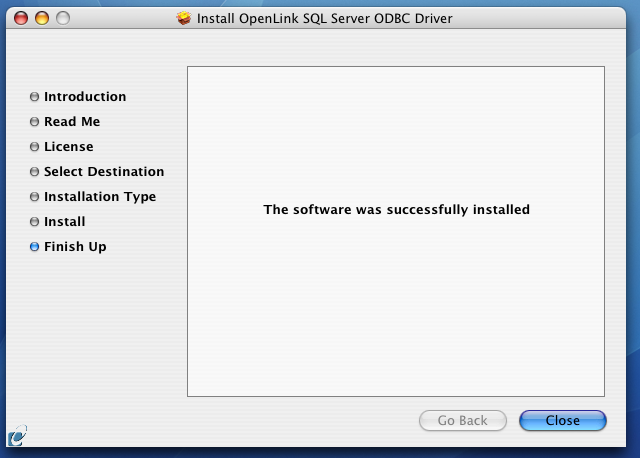
When the process is complete, you will be told that the software was successfully installed. Click "Close" and your new database driver for ODBC is ready for use.
Figure5.157.lite_osx_sql_SQL_Success.png
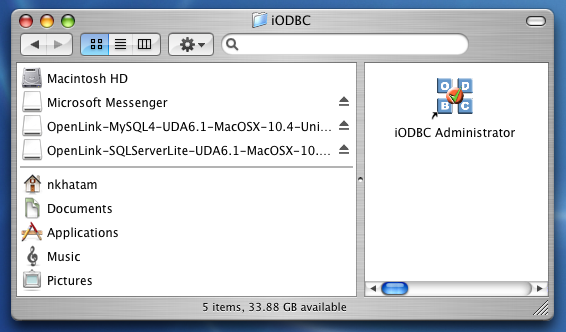
Configuration
To configure an ODBC DSN, run theOpenLink iODBC Administrator located in the /Applications/iODBC folder:
Figure5.158.lite_osx_sql_SQL_iODBC.png
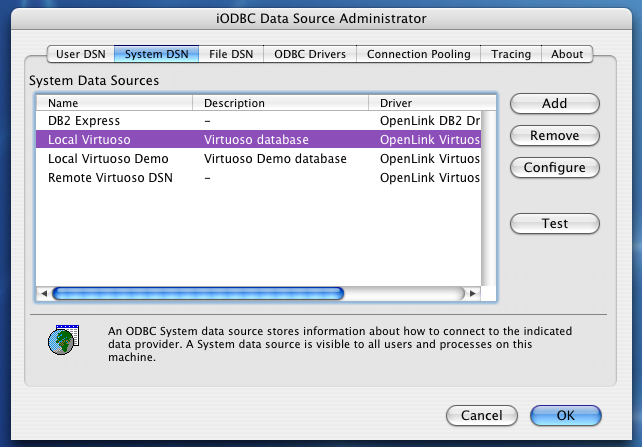
Click the System DSN tab:
Figure5.159.lite_osx_sql_SQL_System.png
Click the Add button. Then, select theOpenLink SQL Server Lite Driver from the list of available drivers:
Figure5.160.lite_osx_sql_SQL_Available.png
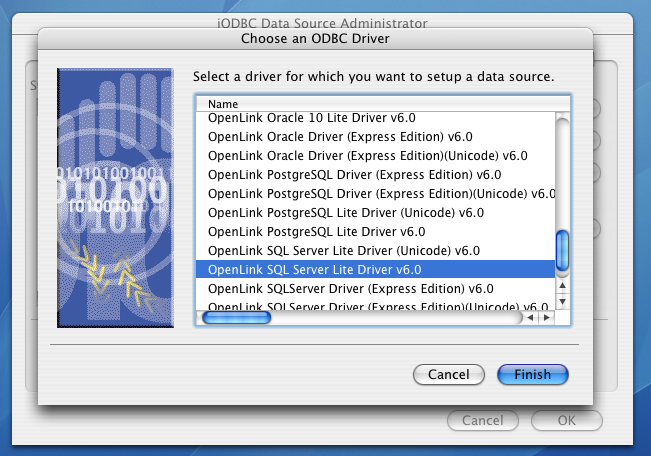
Click Finish.
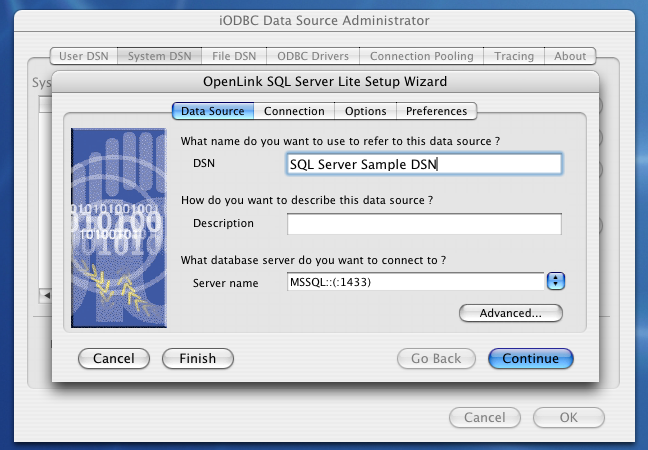
The Data Source tab prompts for a DSN name, description, and information that identifies the target SQL Server DBMS.
Figure5.161.lite_osx_sql_SQL_DSNName.png
-
DSN - A brief and meaningful title for your Data Source Name
-
Description - An optional description for your Data Source Name
-
Server Name - Select the drop down list box to invoke the driver's Dynamic discovery of SQL Server instances on the network and choose the desired instance.
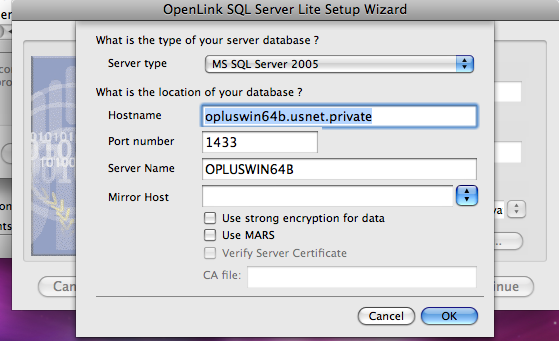
Use the "Advanced" button to manually configure a connection if the SQL Server instance could not be dynamically located, as detailed below.
Figure5.162.lite_osx_sql_SQL_Advanced.png
-
Server Type - An OpenLink proprietary parameter that associates the connection with a particular TDS version
-
Hostname - The hostname or IP address on which SQL Server listens
-
Port number - The TCP port on which SQL Server lists
-
Server Name - SQL Server instance name on the specified host. A SQL Server instance can also be specified by appending "\InstanceName" to the ServerName, ie "ServerName\InstanceName".
-
Mirror Host - The name of the Failover Server hosting the mirrored database if configured
-
Use strong encryption of data - Enable SSL encryption of data between driver and database
-
Use Mars - Multiple Active Result Sets enables the concurrent processing of multiple statements/queries and/or result sets on a single connection
-
Verify Server Certificate - Verify the Database Server SSL certificate against the one specified in the "CA file" field
-
CA file - Specify the location of a Valid SSL Certificate for use during the connection
Click OK to continue.
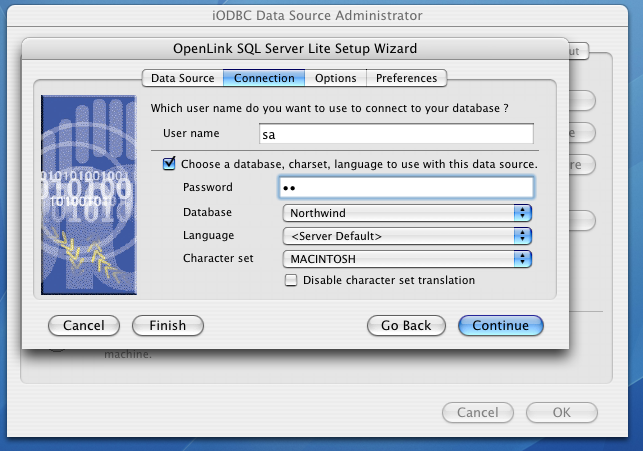
The Connection Tab takes a combination of required and optional parameters required to make a connection to the target database:
Figure5.163.lite_osx_sql_SQL_ConnTab.png
-
User name - A valid SQL Server user name
-
Choose a database, charset, language to use with the data source -
-
Password - A valid SQL Server password
-
Database - The SQL Server database
-
Language -
-
Character set -
-
Disable character set translation -
Click Continue.
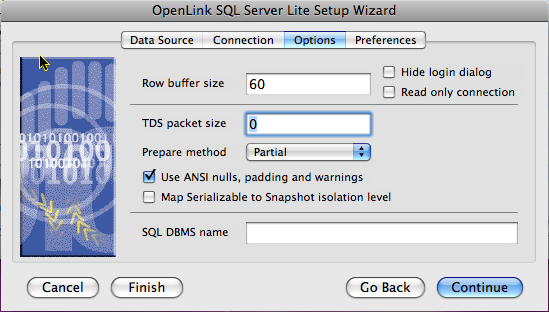
The Options tab enables you to set some standard and SQL Server-specific parameters.
Figure5.164.lite_osx_sql_SQL_Options.png
-
Row Buffer Size - This attribute specifies the number of records to be transported over the network in a single network hop. Values can range from 1 to 99.
-
Hide Login Dialog - Suppresses the ODBC "Username" and "Password" login dialog boxes when interacting with your ODBC DSN from within an ODBC compliant application.
-
Read Only connection - Specifies whether the connection is "Read-only." Make sure the checkbox is unchecked to request a "Read/Write" connection.
-
TDS packet size - A value that determines the number of bytes per network packet transferred from the database server to the client. The correct setting of this attribute can improve performance. When set to 0, the initial default, the driver uses the default packet size as specified in the Sybase server configuration. When set to -1, the driver computes the maximum allowable packet size on the first connect to the data source and saves the value in the system information. When set to x, an integer from 1 to 10, which indicates a multiple of 512 bytes (for example, Packet Size of 6 means to set the packet size to 6 * 512 equal 3072 bytes). For you to take advantage of this connection attribute, you must configure the System 10 server for a maximum network packet size greater than or equal to the value you specified for Packet Size.
-
Prepare Method - This option is specific to the TDS Driver for MS & SQL Server SQLServers. It can take the values None, Partial Full (connectoptions -O [0, 1, 2] respectively). It is used to determine whether stored procedures are created on the server for calls to SQLPrepare.
-
No Quoted Identifiers - This option indicates that the underlying driver does not support quoted identifiers, which is required for Jet engine based products like MS Access.
-
Use ANSI nulls, padding and warnings - This option affects TDS agent & Lite Driver connections to MS SQLServer databases. SQL Server connectivity is not affected.
-
Map Serializable to Snapshot isolation level - Enable Snapshot transaction isolation level in the driver. Snapshot Isolation is a new transaction isolation level available in SQL Server 2005
-
SQL_DBMS Name - Manually overrides theSQLGetInfo(SQL_DBMS_NAME) response returned by the driver. This is required for products like MicrosoftInfoPath for which the return the value should be "SQL Server".
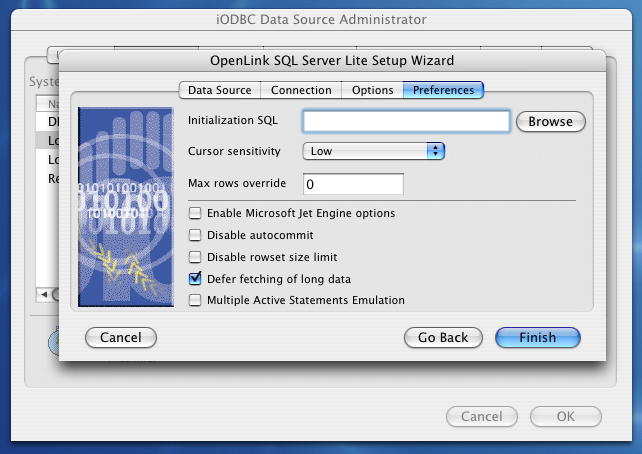
Click Continue to view additional preferences that can be set for the connection.
Figure5.165.lite_osx_sql_SQL_Preferences.png
-
Initialization SQL - Lets you specify a file containing SQL statements that will be run automatically against the database upon connection.
-
Cursor Sensitivity - Enables or disables the row version cache used with dynamic cursors. When dynamic cursor sensitivity is set high, the Cursor Library calculates checksums for each row in the current rowset and compares these with the checksums (if any) already stored in the row version cache for the same rows when fetched previously. If the checksums differ for a row, the row has been updated since it was last fetched and the row status flag is set to SQL_ROW_UPDATED. The row version cache is then updated with the latest checksums for the rowset. From the user's point of view, the only visible difference between the two sensitivity settings is that a row status flag can never be set to SQL_ROW_UPDATED when the cursor sensitivity is low. (The row status is instead displayed as SQL_ROW_SUCCESS.) In all other respects, performance aside, the two settings are the same. Deleted rows don't appear in the rowset. Updates to the row since the row was last fetched are reflected in the row data, and inserted rows appear in the rowset, if their keys fall within the span of the rowset. If your application does not need to detect the row status SQL_ROW_UPDATED, you should leave the 'High Cursor Sensitivity' checkbox unchecked, as performance is improved. The calculation and comparison of checksums for each row fetched carries an overhead. If this option is enabled, the table oplrvc must have been created beforehand using the appropriate script for the target database.
-
MaxRows Override - Allows you to define a limit on the maximum number of rows to be returned from a query. The default value of 0 means no limit
-
Enable Microsoft Jet Engine options -
-
Disable rowset size limit - Removes OpenLink's default 100-row rowset restriction
-
Defer fetching of long data - Defers fetching of LONG (BINARY, BLOB etc.) data unless explicitly requested in a query. This provides significant performance increases when fields in query do not include LONG data fields.
-
Multiple Active Statements Emulation -
Click the Finish button to save your new Data Source Name.
5.3.7.Virtuoso
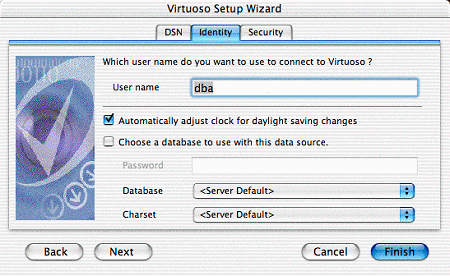
Identity tab
Figure5.167.Virtuoso Identity tab
-
Adjust Clock. When selected the ???? will ??? for daylight saving changes. This is so that ???.
-
Choose a Database. If selected the pick options for the Database name and Character set are accessed from the datasource.
-
Password. This field is enabled if the above field is checked. Password is used to make a connection to the datasource to obtain the choices for subsequent fields.
-
Database. The name of the Virtuoso database that is to be accessed by the data source. This is a dynamically generated menu, showing only those databases actually available on the data source when the DSN is configured. If you need to manually specify this information, you may edit the appropriate ODBC.preference text file. Please contact OpenLink Technical Support, for assistance.
-
Character Set. The name of an installed character set on the Virtuoso server. The default is the setting active on the Virtuoso Server. This is a dynamically generated menu, showing only those databases actually available on the data source when the DSN is configured. If you need to manually specify this information, you may edit the appropriate ODBC.preference text file. Please contact OpenLink Technical Support, for assistance.
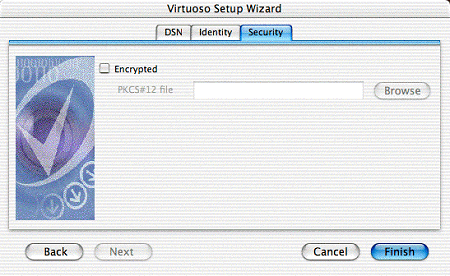
Security tab
Figure5.168.Virtuoso Security tab
-
Encrypted. Enable encryption.
-
PKCS#12 file. Name of certificate file to be used.
5.3.8.Testing the ODBC Data Source
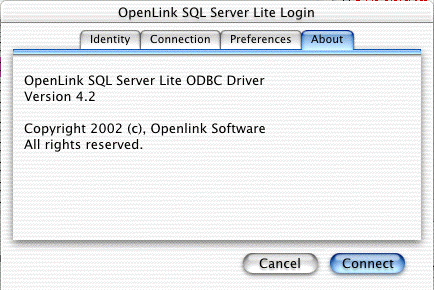
Once an ODBC Data Source has been configured, you can test it by highlighting the desired DSN and clicking the Test button, on the User DSN or System DSN tabs of the OpenLink ODBC Administrator. This will present you with the following multi-tab dialog box, with the opportunity to override any of the DSN parameters on the fly.
Figure5.169.OpenLink ODBC Administrator
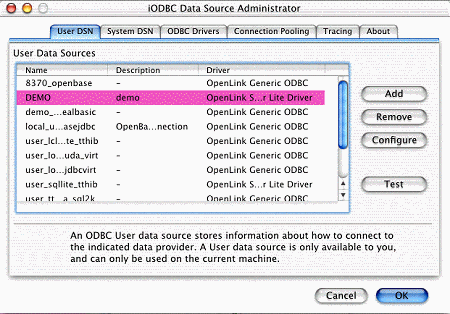
Figure5.170.SQL Server Single-Tier DSN Connection Test, Identity tab
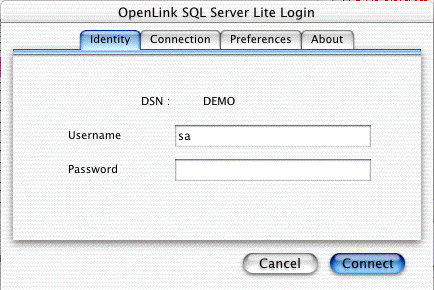
Figure5.171.SQL Server Single-Tier DSN Connection Test, Connection tab
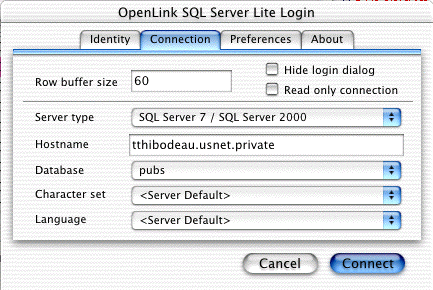
Figure5.172.SQL Server Single-Tier DSN Connection Test, Preferences tab
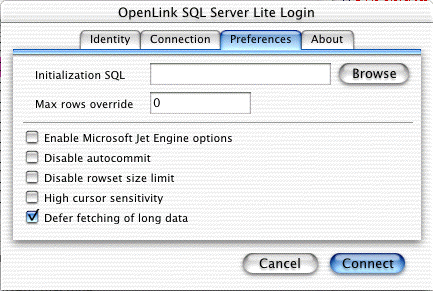
Figure5.173.SQL Server Single-Tier DSN Connection Test, About tab
When all parameters are as desired, click Connect, and a successful test will bring the following message:
Figure5.174.DSN Connection Test Results

Unsuccessful test connections may present any of a number of error messages. To resolve those errors, please refer to the troubleshooting section of this manual.
For more thorough testing, you can use odbctest, a sample application installed along with the OpenLink Lite Driver. odbctest is a simple command-line, ODBC compliant, Interactive SQL client.
It may be accessed through the Terminal application, by issuing the command
/Library/iodbc/bin/odbctest
At the SQL command prompt enter "?" for a list of ODBC DSNs on your machine, or enter a valid ODBC Connect String (e.g., with the DSN created above, named "DEMO", you would enter:
DSN=DEMO;UID=<Username>;PWD=<Password>
).
From here, any valid SQL Statement may be executed. Generally, you will need to know a valid table name within the database to be able to retrieve information from it. Within odbctest, the command 'tables' will return a list of all tables accessible through your active connection.
If the query executes successfully you will see a table of the data returned by the query; if unsuccessful, you will see the entire error message returned from the backend DBMS.

