8.2.13.OpenLink ODBC Agent Installation & Configuration
The OpenLink ODBC Agent is an ODBC Proxy Service that facilitates the integration of non OpenLink ODBC Drivers in the Sophisticated OpenLink Multi Tier ODBC Architecture, thereby extending the benefit of this architecture beyond the scope of OpenLink ODBC drivers.
Typical Utilization:
A typical and very popular use of the OpenLink ODBC Agent is the exposure of tradition desktop database engines within your organization to your new Intranet or Internet based infrastructures, using a client-server distributed computing model. This implies that you can have multiple concurrent clients within your Intranet or remote Internet clients connecting to your Microsoft Access, DBASE, Fox PRO, Paradox database engines without any compromises in security and with astonishing performance.
Installation:
After downloading the OpenLink Data Access Driver Suite for your chosen desktop operating system please perform the following steps:-
-
Move into your temporary installation directory
-
Extract the contents of the OpenLink ZIP archive into the directory in step 1
-
Double click on the program "setup.exe"
-
Follow the on-screen instructions
Post Installation & Pre Configuration Check List
-
Verify that the ODBC Driver Manager exists on your system by opening up your desktop's control panel group. This will be under Administrative Tools on a Windows XP system.
Figure8.18.Admin Assistant

-
Verify the existence of an ODBC Driver for the desktop database engine that you will be connecting with (the example below shows OpenLink and Microsoft drivers installed:
Figure8.19.Admin Assistant

-
Verify the existence of an ODBC System Data Source Name (DSN) for the database engine that you will be exposing via the OpenLink ODBC Agent, this ODBC DSN must be associated with the appropriate ODBC Driver for your desktop database
-
Verify the existence of an OpenLink ODBC Driver installation on your PC
Figure8.20.Admin Assistant

Configuring An OpenLink ODBC Agent Based ODBC Data Source Name (DSN)
-
Open up the ODBC Administrator within your desktop control panel, and then Click on the "Add" button to indicate that you want to add a new ODBC DSN to the current list of installed ODBC DSNs
Figure8.21.Admin Assistant
-
Click on the appropriate ODBC Driver that you will be associating this new ODBC DSN with, in this case the "OpenLink Generic ODBC Driver"
Figure8.22.Admin Assistant
-
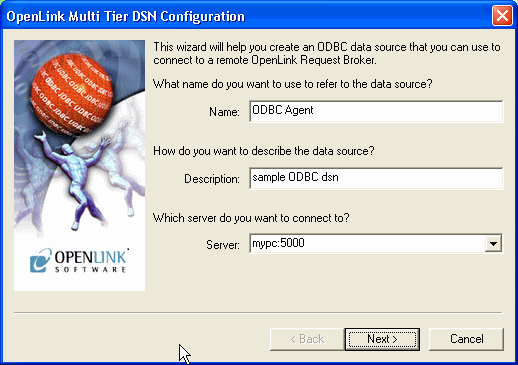
Choose a Name for your OpenLink ODBC DSN and then type it into the "Name" field, the example below presumes the DSN is to be called "ODBC Agent"
Type a comment to describe the DSN.
Enter the name and port of the machine hosting the OpenLink ODBC agent in the "Server" field. The example below presumes that the machine network alias for your desktop computer is "mypc" (note: you can also use the machines actual IP address or even use the "localhost" account if you are connecting to a local as opposed to remote non OpenLink ODBC DSN). The port is the default of 5000.
Figure8.23.Admin Assistant
-
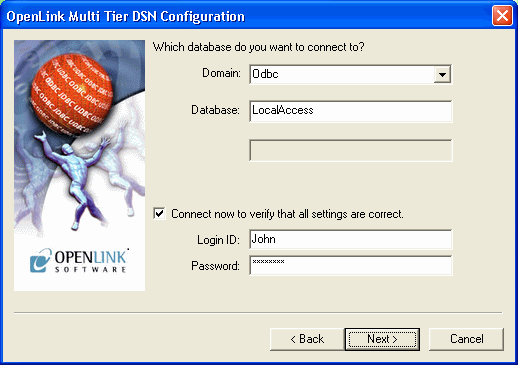
Choose an OpenLink "Server Type" of "ODBC" from the "Domain" listbox
Type the name of the non OpenLink ODBC DSN that you would like to associate this OpenLink ODBC DSN with into the "Database" field. The example below presumes the existence of a non OpenLink ODBC DSN named "LocalAccess" that is bound to the Microsoft ODBC Driver for MS Access.
When the "Connect now.." tick box is checked, a test connection is made to verify the Data Source connection.
If there is no check then the Login ID and Password fields are ignored, and no test is performed.
The Login ID is the default database UserID to use when logging on to a remote database engine (identified by the Domain above).
Password is for the login of the above UserID.
Figure8.24.Admin Assistant
-
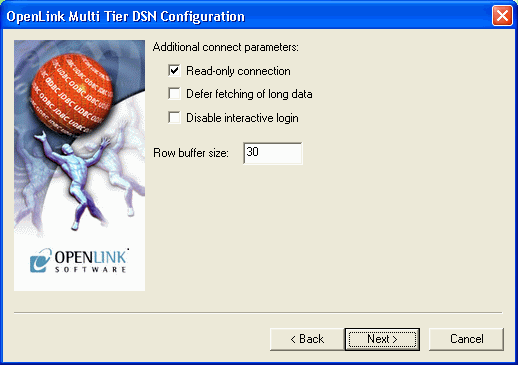
Now define additonal connection parameters:
Read-only connection. Specify whether the connection is to be "Read-only". Make sure the checkbox is unchecked to request a "Read/Write" connection.
Defer fetching of long data. Check this box to defer the fetching of long data.
Disable interactive login. Suppress the ODBC "Username" and "Password" login dialog box when interacting with your ODBC DSN from within an ODBC compliant application.
Row Buffer Size. This attribute specifies the number of records to be transported over the network in a single network hop. Values can range from 1 to 99.
Figure8.25.Admin Assistant
-
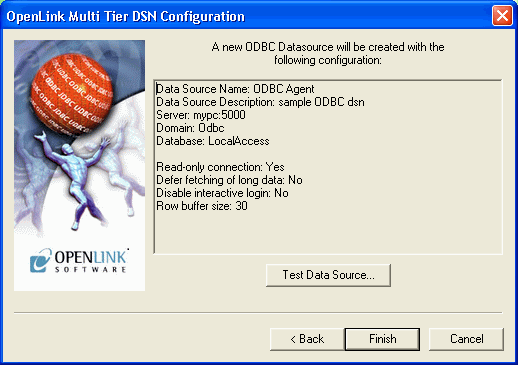
The details of the DSN are now shown. To test the DSN, press the Test Data Source button.
Figure8.26.Admin Assistant
-
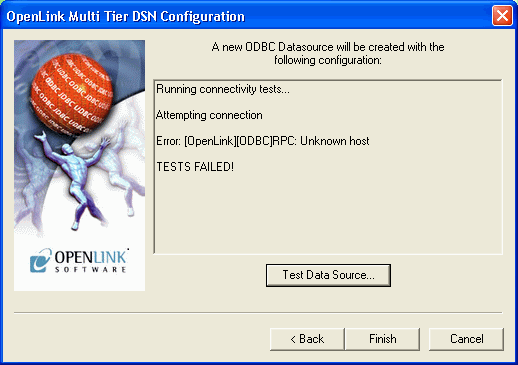
If a Test is requested then the status of the DSN test connection is shown:
Figure8.27.Admin Assistant
-
Click on the "Finish" button to complete the creation of your new OpenLink ODBC DSN.
Making A Test Connection To Your OpenLink ODBC Agent Based ODBC DSN
To verify that your installation and configuration is ready for use, please follow the steps below in order to make a test connection to the OpenLink ODBC DSN that you have just created:-
-
Start the OpenLink Request Broker in debug mode, this can be done from a DOS shell by executing the command : oplrqb -dv or from your Services Panel (note you must change the startup mode to manual to enable the OpenLink Request Broker run in Debug Mode)
-
Locate the program "VBDemo" or "C++ Demo" situated within the "OpenLink Data Access Drivers" group on your desktop (Windows start menu item)
-
Attempt to make a connection to the OpenLink ODBC DSN
-
If step 3 is successful and you see data exchanged between your ODBC Client and your OpenLink ODBC DSN, exit the ODBC application, and then shutdown and restart the Broker without the Debug Mode options using the command: oplrqb -v. If step 3 is unsuccessful repeat step 3 and then capture the Request Broker output and proceed to instigating contact with OpenLink Technical support via the OpenLink Support Page
-
Establish connection between your own ODBC Applications and the OpenLink ODBC DSN created in step 3
-
Shutdown the Request Broker using the command: oplshut -f
Adding An OpenLink ODBC Agent To An Early OpenLink System
-
Place the ODBC Agent executable in the openlink/bin sub-directory
-
Edit the OpenLink "Session Rules" Book (the file oplrqb.ini) using a text editor
-
Insert a new OpenLink Session Mapping rule to the top of the "[Mapping Rules]" section of the Rule Book in the manner depicted below:
odbc:*:*:*:*:*:* = accept odbc_agent
-
Then create a new OpenLink Agent section as follows:
[odbc_agent] Program = odbc_sv![[Note]](images/note.png)
Note: Program key must be set to the exact file name. (For NT this would be odbc_sv.exe)
-
Save the file
-
Shutdown and restart your OpenLink Request Broker.