8.2.15.OpenLink Proxy Agent
An OpenLink Proxy agent is a specialized Agent that acts on behalf of another remotely or locally situated OpenLink Database Agent. This Agent format is typically used in 3-Tier Internet based environments in which you place an Agent on an external machine (typically running your Web Server) and then have it masquerade for an actual database agent behind your organization's firewall.
A Proxy Agent can also be used in conjunction with the Session Rules Book for centralized configuration and control of all of your OpenLink Clients, by controlling the configuration of all of the OpenLink Session Elements on one or more server machines.
Like other Proxy services, an OpenLink Client connects to the Proxy Agent instead of to the actual service; the Proxy Agent then connects to the actual service that presumably lies on a machine that shouldn't normally be accessible from outside the network. With this setup, it is possible to grant selective access to databases that are otherwise not accessible from the Internet; this greatly enhances the functionality of data access standards like JDBC, ODBC, OLE-DB.
Installation
The OpenLink Proxy Agent is automatically installed with your Request Broker on any platform.
You have to install a Request Broker installation archive on the machine that is to act as a host for the OpenLink Proxy agent (typically the middle tier machine in a three 3-tier architecture). You then install another Request Broker archive and relevant Database Agents archives on the machine(s) hosting the backend database engine(s) that you are connecting to via an OpenLink Client.
Configuration
You configure the Proxy Agent like all other OpenLink Agents using the Admin Assistant. The process is broken into two parts, the first part involves creating a Proxy Agent Template, the second part involves a Session Rules that conditionally associates OpenLink Clients with the Proxy Agent Template that you have created.
The configuration guide that follows presumes that we are creating a Proxy on a middle-tier server for the OpenLink Virtuoso Database engine such that any OpenLink Client connection (ODBC, JDBC, UDBC, or OLE-DB) to this Server ends up being connected to Virtuoso. The steps that follow guide you through this process.
Creating Proxy Agent Initialization Template
-
Start the Request Broker your middle-tier server machine
-
Start a Web Browser session
-
Enter the following URL into your browser:
If you started the Request Broker on your local machine enter:
http://localhost:8000/
(assuming you accepted port 8000 as the Admin Assistant port number at installation time).
If the Request Broker in on another machine enter:
http://<hostname or IP address>:8000/
(assuming you accepted port 8000 as the Admin Assistant port number at installation time).
-
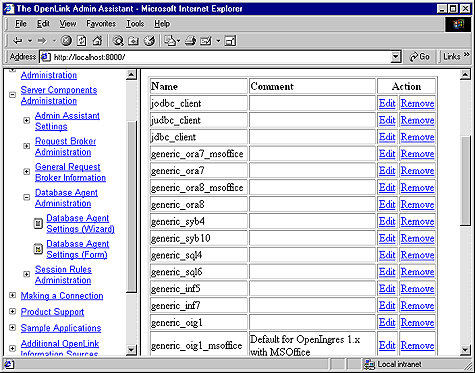
Navigate the Admin Assistant menu tree as follows: OpenLink Database Agent(s) Settings-->Database Agent(s) Settings (Form).
Figure8.38.Admin Assistant
-
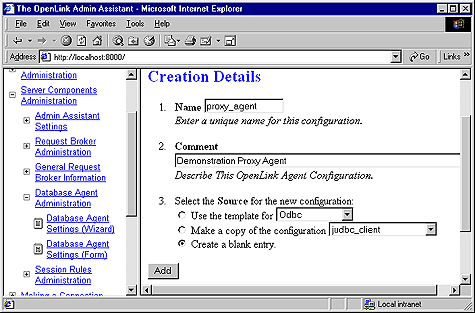
Scroll to the bottom of the Agent Templates listing page and then click on the "Add" button, this opens up a default agent initialization template page, enter a Name and Description for your new Agent Initialization Template, then select the "create blank entry" radio button and then click the "Add" hyperlink. Reinitialize the Broker when prompted.
Figure8.39.Admin Assistant
-
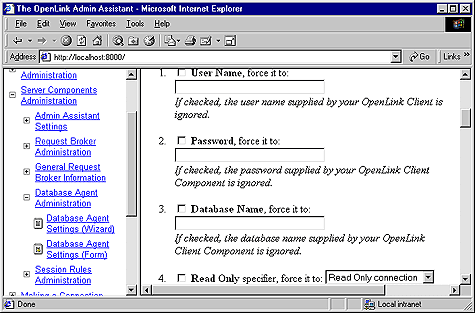
Navigate the Admin Assistant menu tree as follows: OpenLink Database Agent(s) Settings-->Database Agent(s) Settings (Form). Then locate the new Agent Template created in the previous step. Now click on the "Edit" hyperlink.
Enter values into the following fields representing key OpenLink Session Elements:
"User Name" - Leave empty (this is handled on the server using the Virtuoso Agent initialization Template)
"Password" - ditto
"Database Name" - ditto
"Read Only" - ditto
"Connect Options" - ditto
"Server Options" - ditto
"Server Type" - Virtuoso (you enter an valid OpenLink Domain values here, e.g Oracle 8, Informix 7, Progress 83B etc.)
"Host Name" - enter IP address or network alias of database server machine. this examples presumes the IP address of the database server 123.123.123.100
"Executable Name" - enter "proxy_sv" (Linux or UNIX) or "proxy_sv.exe" (for Windows)
In the "Client-Server Mapping Process & Control" section of this page select the "Conditionally" radio button and then hatch the "When originating from same machine" checkbox. This ensures that each new OpenLink client machine has a distinct proxy agent process servicing all the ODBC, JDBC, UDBC, OLE-DB clients on that machine thereby restricting the number of new proxy agents processes initialized.
Click on the "Update" button and the reinitialize the Request Broker.
Figure8.40.Admin Assistant
Creating Session Rule That Maps Connections to Proxy Agent's Template
-
Follow the "Server Components Administration"->"Session Rules Administration"->"Session Rules Editor" menu path which brings you to a screen identical to the one depicted below, this presents you with a list of existing session rules (all OpenLink installations come with a set of pre-configured session rules). Click on the "Add new rule" hyperlink to open up the session rule creation page.
Figure8.41.Admin Assistant

-
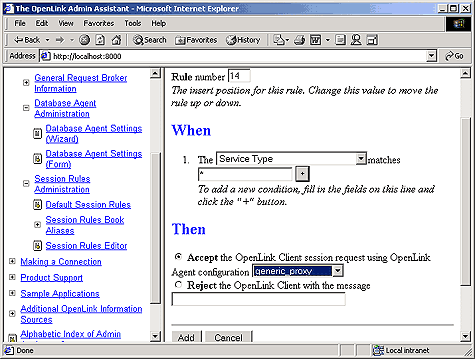
Create a new session rule by doing the following:
Set the Rule Number field to 1 (this means that this rule gets evaluated before others)
Leave the default value of "*" in the Server Type field this ensure that this rule applies to any Domain Type.
Pick the "proxy_agent" initialization template from the agent initialization template list box used by the "Then" processing instruction to determine how calls associated with this rule are to be handled.
Click on the "Add" button to save your new rule to the rule book. Then reinitialize the Request Broker.
Figure8.42.Admin Assistant
-
Create an OpenLink ODBC, JDBC, UDBC or OLE-DB client session with the Domain Type attribute set to Proxy and the Host attribute set to your middle-tier server.
If your database server is behind a firewall you need to perform the following additional additional steps:
-
Enable UDP support, and then make port 60001 available, this is the port number used by the OpenLink Request Broker. Since we are now connecting to a database server running the Request Broker that resides behind your firewall we need to open up this port.
-
Start the Request Broker on the Database Server
-
Start a Web Browser session and then initialize the Admin Assistant running on the Database Server machine by entering the following URL:
http://<hostname or IP address of Database Server machine>:8000/
(presuming you took the default number of 8000 for the Web Assistant at install time on the Database Server).
-
Navigate the Admin Assistant menu tree to: Server Components Administration--> Request Broker Administration-->Edit Request Brokers Parameters (Form).
Locate item number 4 on the form which reads "Only use ports in the range...", enter a range of TCP port numbers that you have enabled within your firewall software. The Broker will then automatically starts the Virtuoso agent (or other database agents depending on your settings) on the first available port in the range.