6.4.Windows 95/98/NT/XP/2000 Install
-
Ensure you have downloaded all of the relevant OpenLink Server Components from OpenLink Software Download wizard.
-
From the OpenLink email that is delivered at the time of download, save the attached license file to a temporary location.
-
Ensure all existing OpenLink server and client applications are shutdown.
-
Close the Services Control Panel Applet to avoid any locking of existing OpenLink services.
-
Run setup.exe, please note that the client and server components for Windows are packaged within the same installation archive. You distinguish the actual components that you want to install as part of your interaction with the installation program.
![[Note]](images/note.png)
Caution: please do not choose SPX/IPX protocol support during the installation process unless you have verified that this protocol is actually installed and configured on your Windows Server machine.
-
Once the installer has completed, the broker will be running and ready for use, assuming a valid license was supplied.
If the OpenLink Broker does not respond to client requests, or there was a Broker creation error during the install, then you can verify its operation as follows:
-
Start your OpenLink Request Broker in debug mode, from within your "services" control panel, or by opening up a DOS command window and then executing the OpenLink Request Broker startup command from within the "bin" sub-directory of the OpenLink server components installation directory:
oplrqb -dv
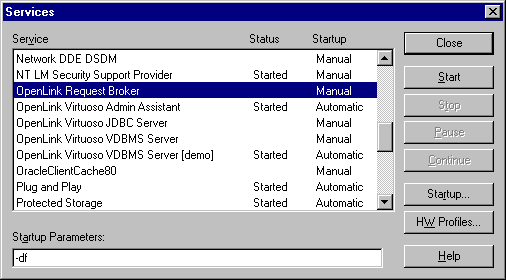
Note: When doing this from the "services" control panel (Windows NT) you must stop the Broker if it is already running and then change its startup mode from "Automatic" to "Manual", then enter the required startup commands as values in the Startup Parameters field, the screen shot below demonstrates this:
Figure6.3.3image2.gif
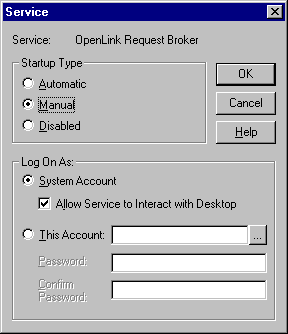
Selecting the service clicking the Startup button will give the following screen:
Figure6.4.3image3.gif
-
Start your Web Browser and then enter the following URL: http://<network alias of machine on to which you have just installed server components>:<port number you provided when prompted by OpenLink installer>. For example, if your machine has a network alias of "mainserver" and you accept the default port number at installation time, then the required URL would be constructed as follows: http://mainserver:8000/ you can also enter the value http://localhost:8000/ if the server in use is local rather than remote.
-
Follow the instructions provided in the "Making Your First OpenLink Connection" guide in order to verify your server components installation.
-
If the previous step is successful, shutdown the Request Broker by pressing: <CTRL-C> in the debug session window, or by selecting the OpenLink Request Broker entry within the "services" control panel and then clicking on the "stop" button.
You can also shutdown the Broker by executing the following command from a separate DOS command Window:
oplshut -f
-
Revert the OpenLink Request Broker startup mode back to "Automatic" from within the "Services" control panel and then restart by clicking on the "Startup" button. Note the Broker does not have to be in "Automatic" mode for regular use, it is your choice as to the startup mode that best suits your operational needs.
You can also start the Broker from a DOS Window by executing the command:
oplrqb -v